15 Emulab Chef Tutorial
This tutorial will walk you through the process of creating and using an instance of the Chef configuration management system on Emulab.
Since this tutorial was originally developed for CloudLab, you will find the screenshots below that have the CloudLab name and logo in them. When you use Emulab to build Chef, the process is exactly the same; the only difference is that you will see the Emulab name and logo instead in the portal pages you will open and use.
Chef is both the name of a company and the name of a popular modern configuration management system written in Ruby and Erlang. A large variety of tutorials, articles, technical docs and training opportunities is available at the Chef official website. Also, refer to the Customer Stories page to see how Chef is used in production environments, including very large installations (e.g., at Facebook, Bloomberg, and Yahoo!).
15.1 Objectives
In the process of taking this tutorial, you will learn to:
Create your own instance of Chef using a pre-defined profile
Explore profile parameters allowing to customize components of your Chef deployments
Access monitoring and management capabilities provided by Chef
- Use Chef to perform two exercises:
Install and configure NFS, the Network File System, on experiment nodes
Install and configure an instance of the Apache web server, as well as run a benchmark against it
Terminate your experiment
Learn where to get more information
15.2 Motivation
This tutorial will demonstrate how experiments can be managed on Emulab, as well as show how experiment resources can be administered using Chef. By following the instructions provided below, you will learn how to take advantage of the powerful features of Chef for configuring multi-node software environments. The exercises included in this tutorial are built around simple but realistic configurations. In the process of recreating these configurations on nodes running default images, you will explore individual components of Chef and follow the configuration management workflow applicable to more complex configurations and experiments.
15.3 Prerequisites
This tutorial assumes that:
- You have an existing account on either:
Emulab (Instructions for getting an account can be found here.)
The GENI portal. (Instructions for getting an account can be found here.)
15.4 Logging In
If you have signed up for an account at the Emulab website, simply open https://www.emulab.net/portal/ in your browser, click the “Log In” button, enter your username and password.
15.5 Launching Chef Experiments
Once you have logged in to Emulab, you will “instantiate” a “profile” to create an experiment. (An experiment in Emulab is similar to a “slice” in GENI.) Profiles are Emulab’s way of packaging up configurations and experiments so that they can be shared with others. Each experiment is separate: the experiment that you create for this tutorial will be an instance of a profile provided by the facility, but running on resources that are dedicated to you, which you have complete control over. This profile uses local disk space on the nodes, so anything you store there will be lost when the experiment terminates.
The Chef cluster we are building in this tutorial is very small, but Emulab has large clusters that can be used for larger-scale experiments.
For this tutorial, we will use a profile that launches a Chef cluster —
See this manual’s section on profiles for more information about how they work.
- Start Experiment
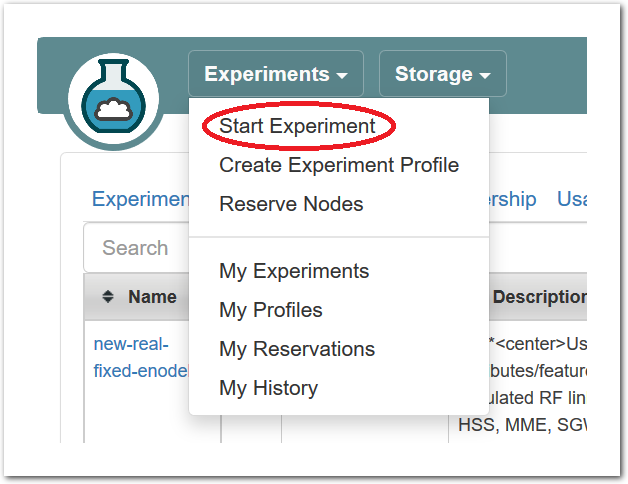 After logging in, you are taken to your main status dashboard. Select “Start Experiment” from the “Experiments” menu.
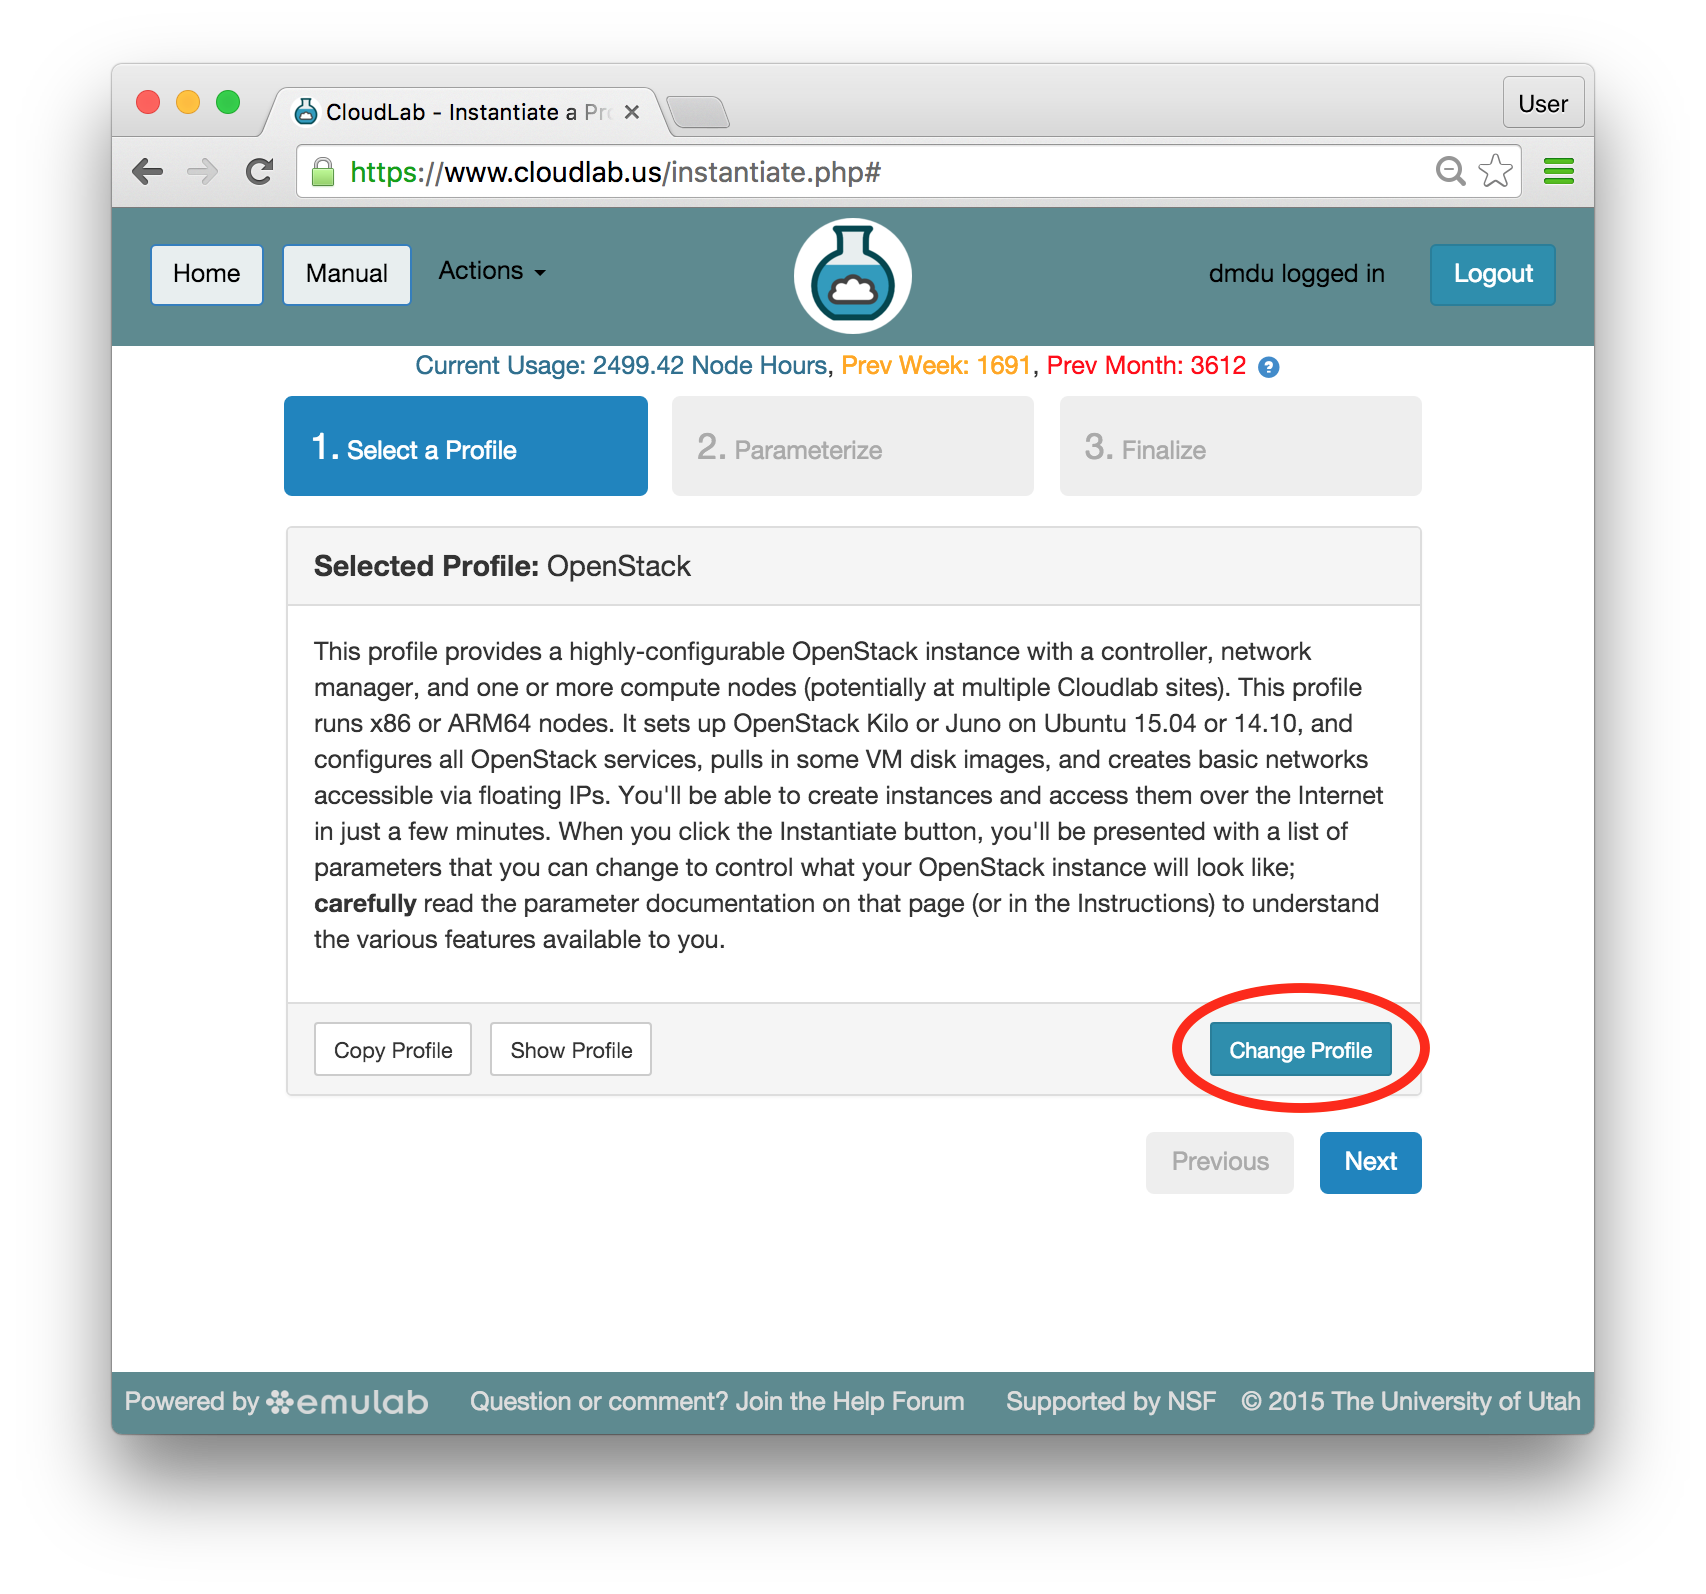
 - Select a profileBy default, the “Start an Experiment” page suggests launching the OpenStack profile which is discribed in detail in the OpenStack tutorial.Go to the list of available profile by clicking “Change Profile”:
 Find the profile by typing ChefCluster in the search bar. Then, select the profile with the specified name in the list displayed below the search bar. A 2-node preview should now be shown along with high-level profile information. Click “Select Profile” at the bottom of the page:
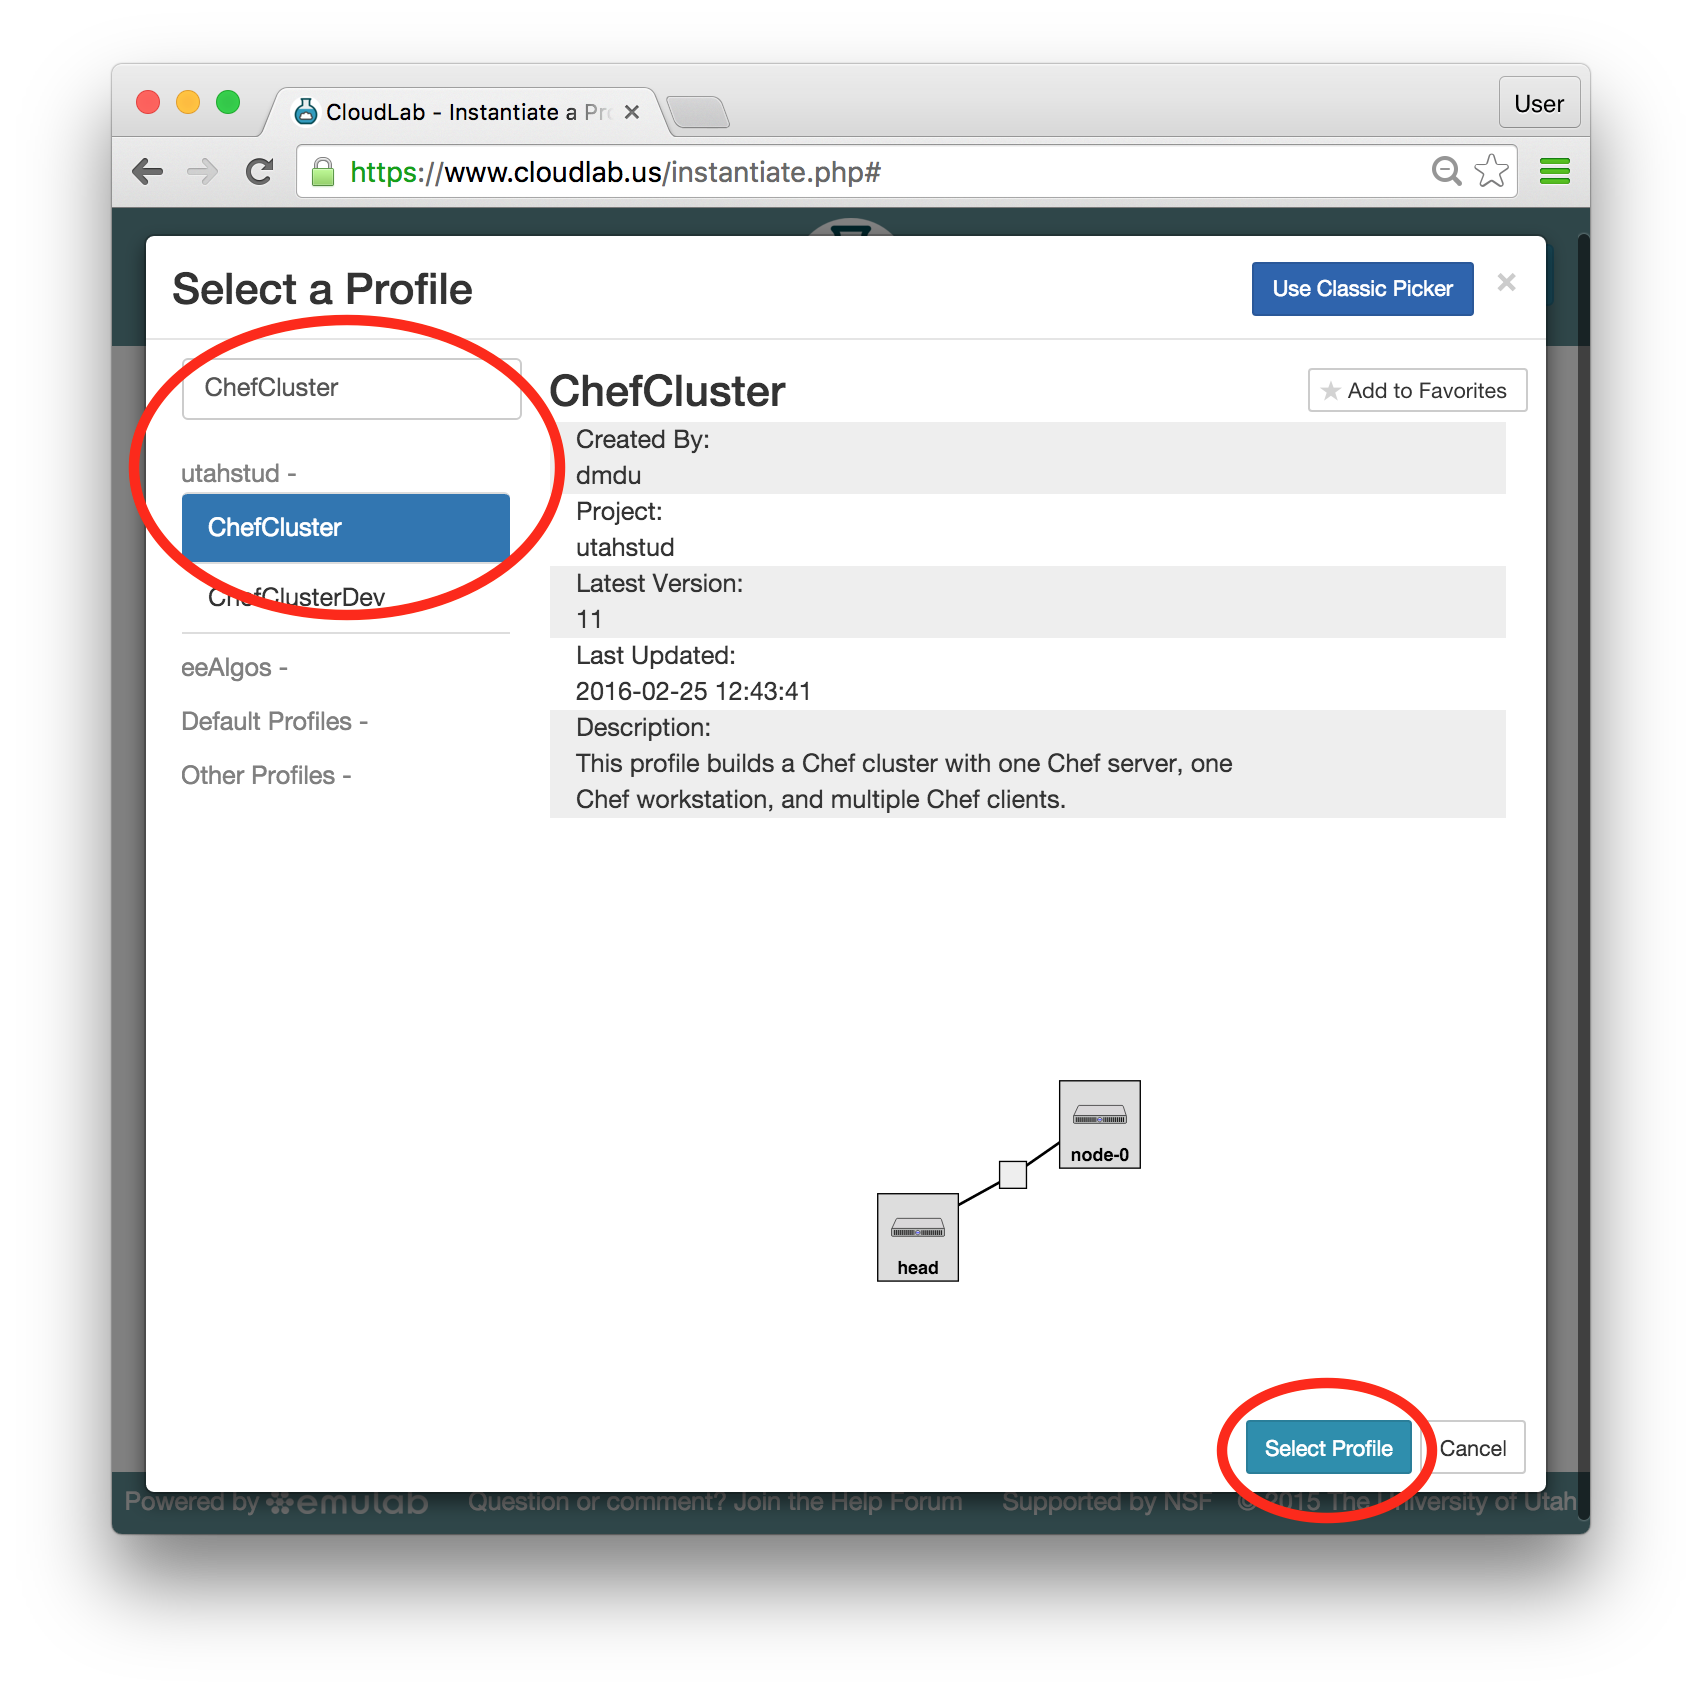 After you select the correct profile, click “Next”:
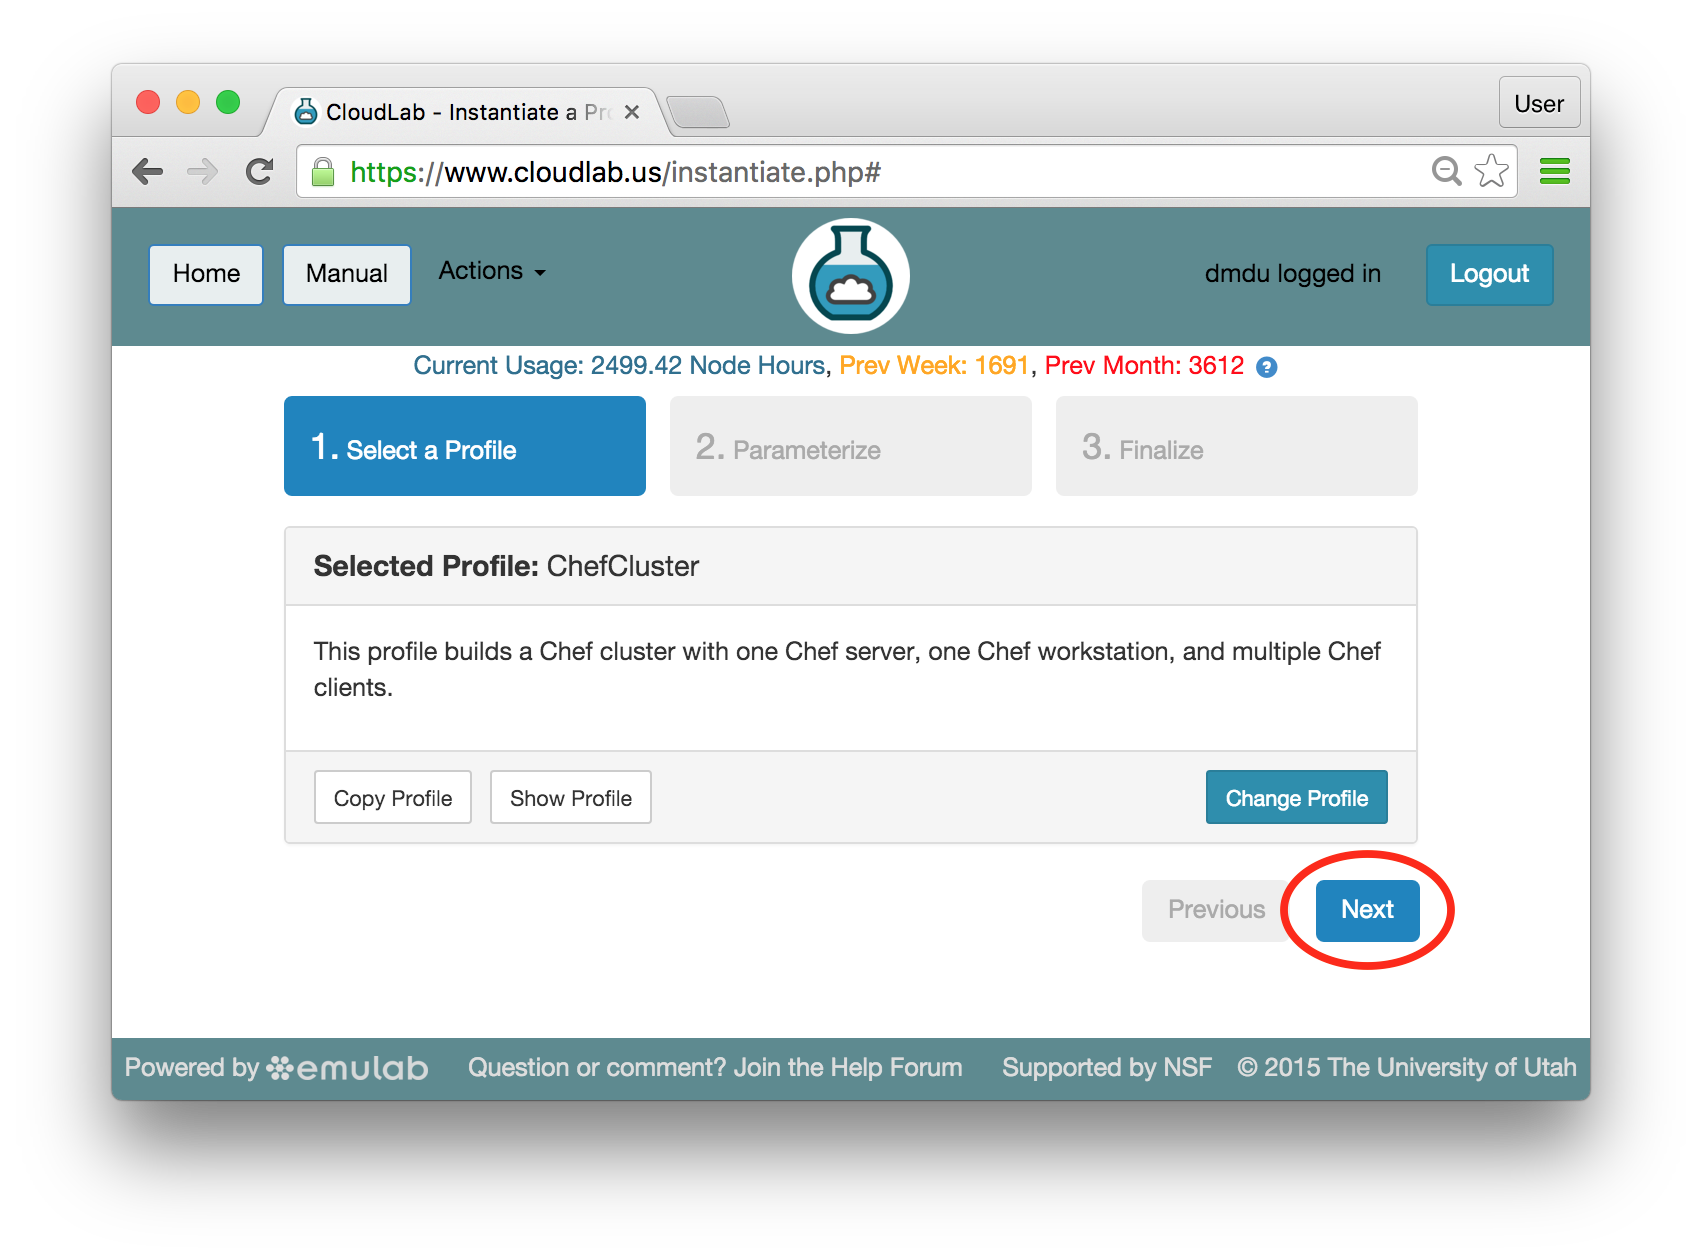
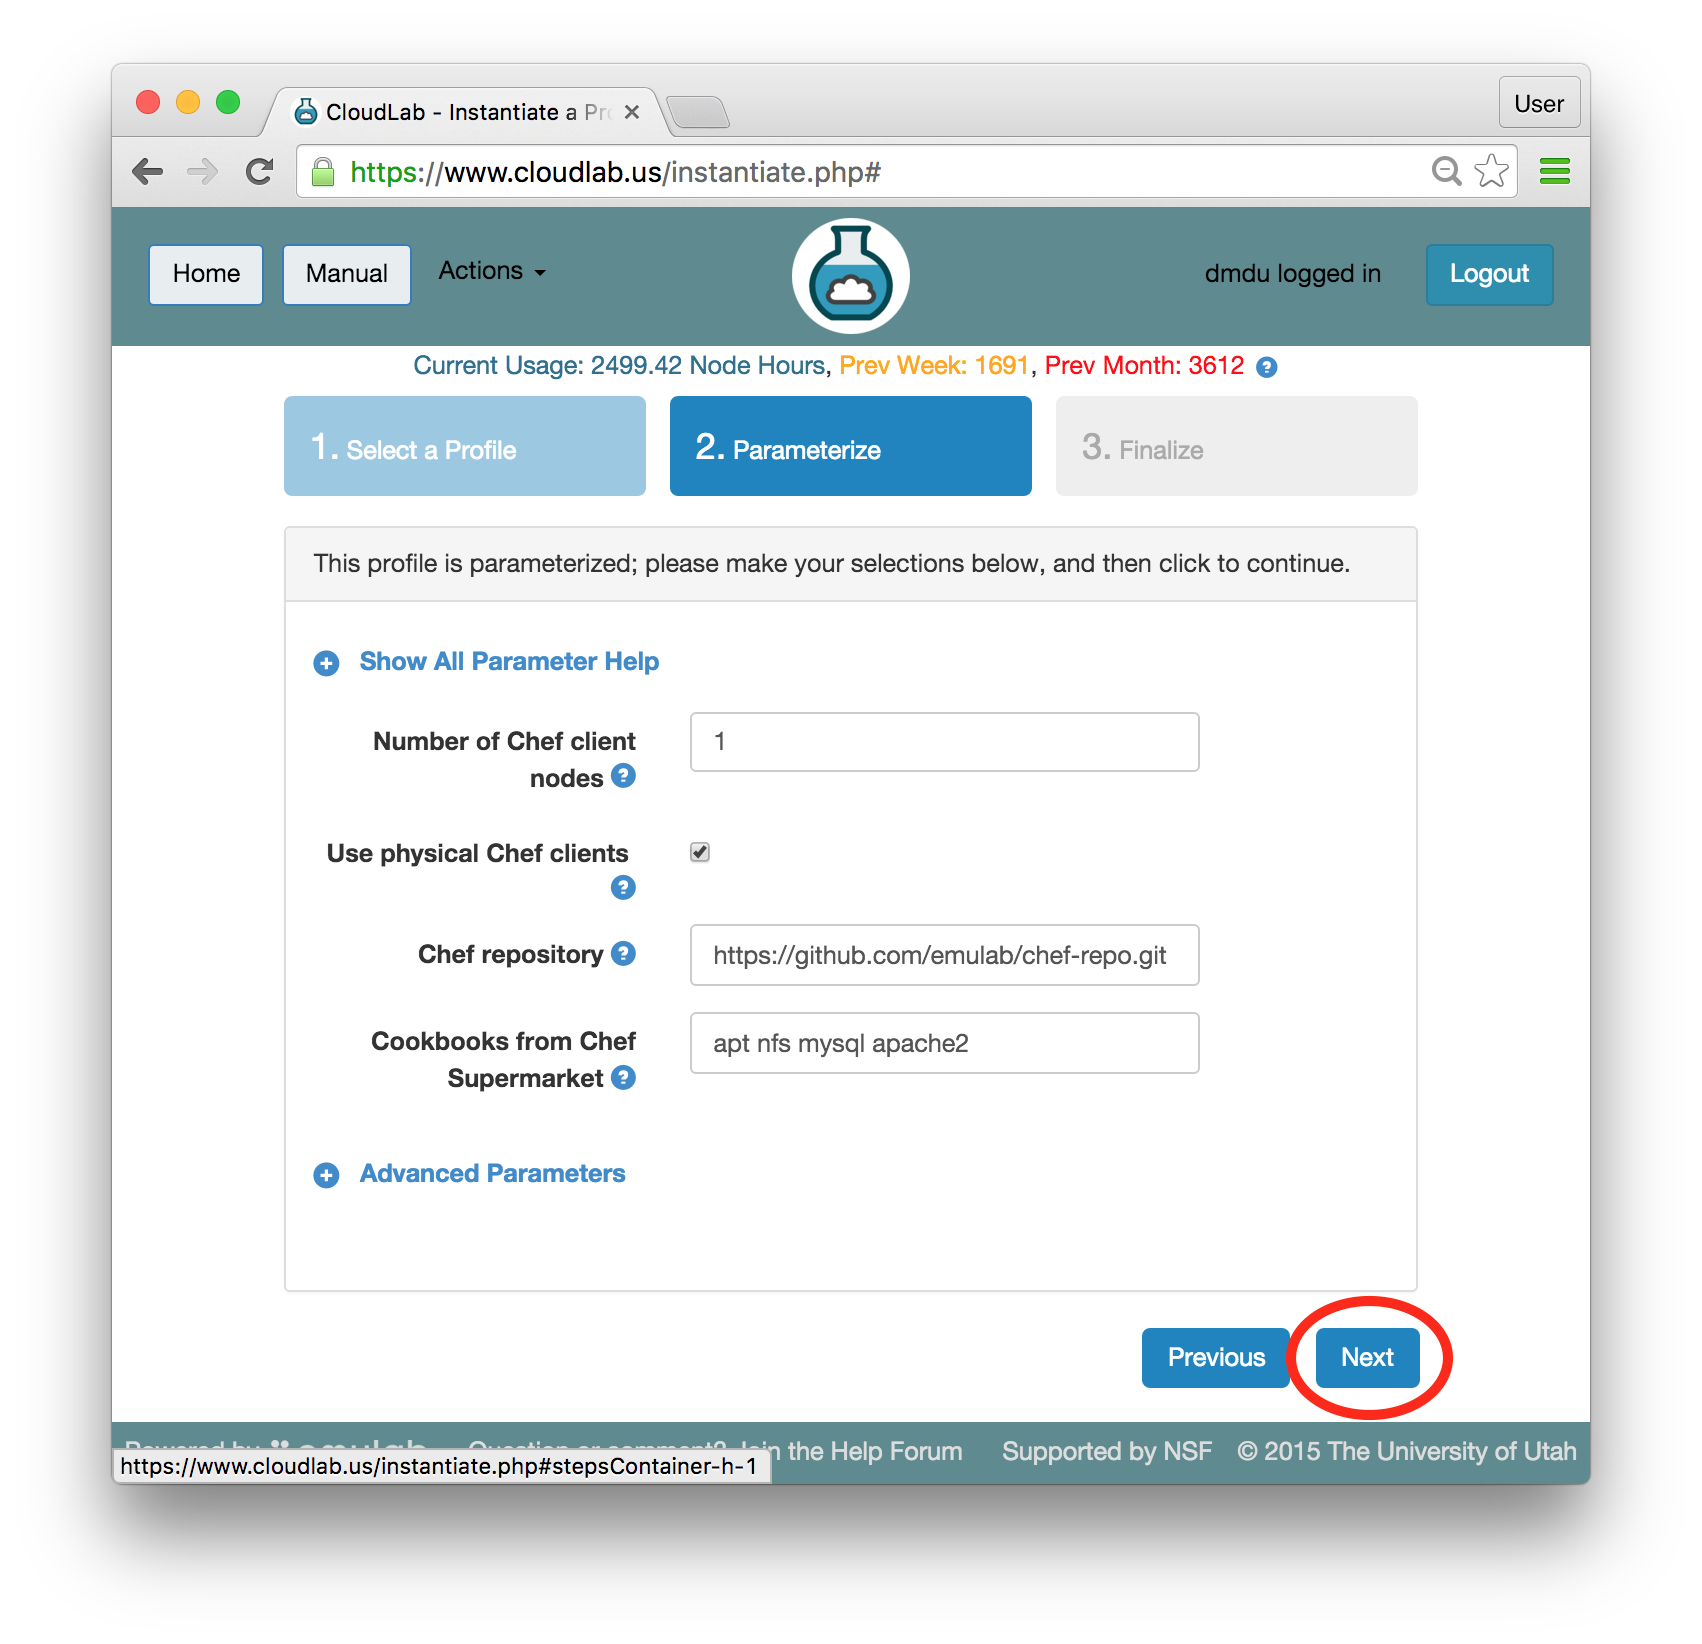
- Set parametersProfiles in Emulab can have parameters that affect how they are configured; for example, this profile has parameters that allow you to set the number of client nodes, specify the repository with the infrastructure code we plan to use, obtain copies of the application-specific infrastructure code developed by the global community of Chef developers, etc.For this tutorial, we will leave all parameters at their defaults and just click “Next”.
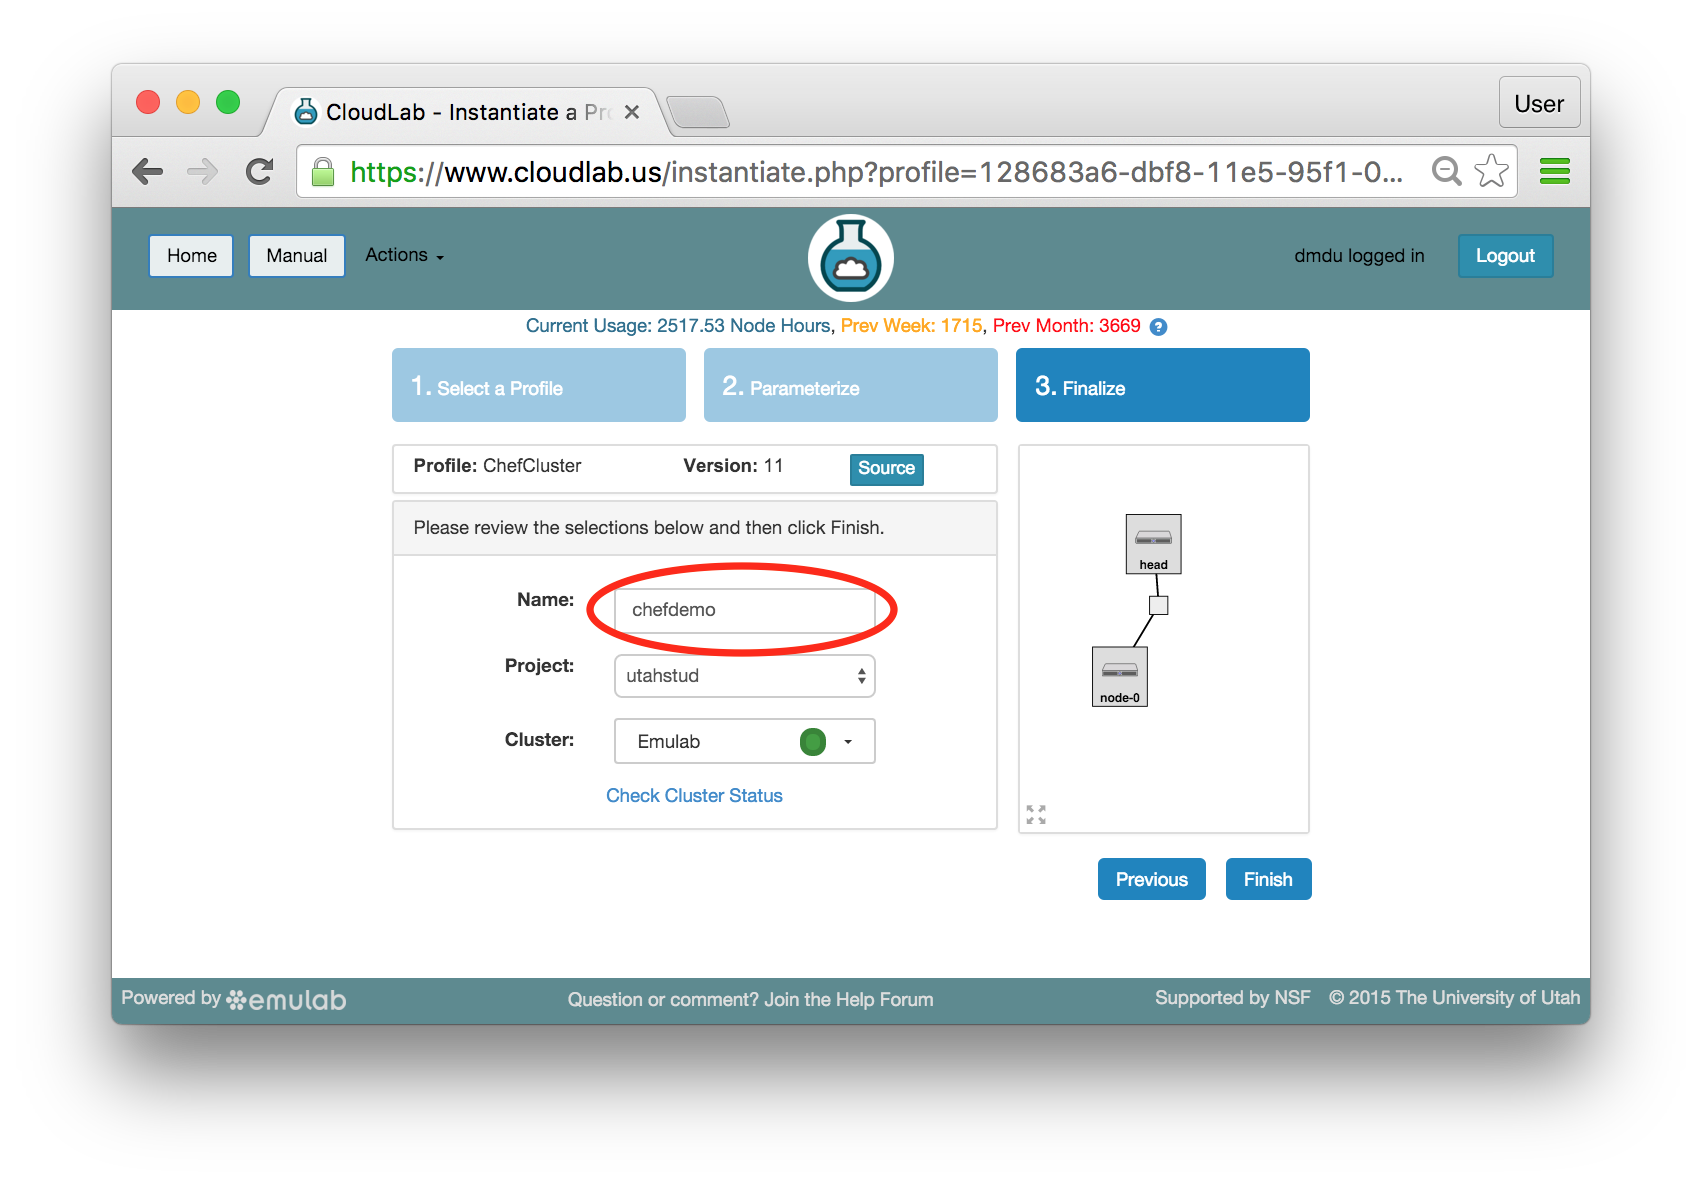
- Choose experiment nameYou may optionally give your experiment a meaningful name, e.g., “chefdemo”. This is useful if you have many experiments running at once.
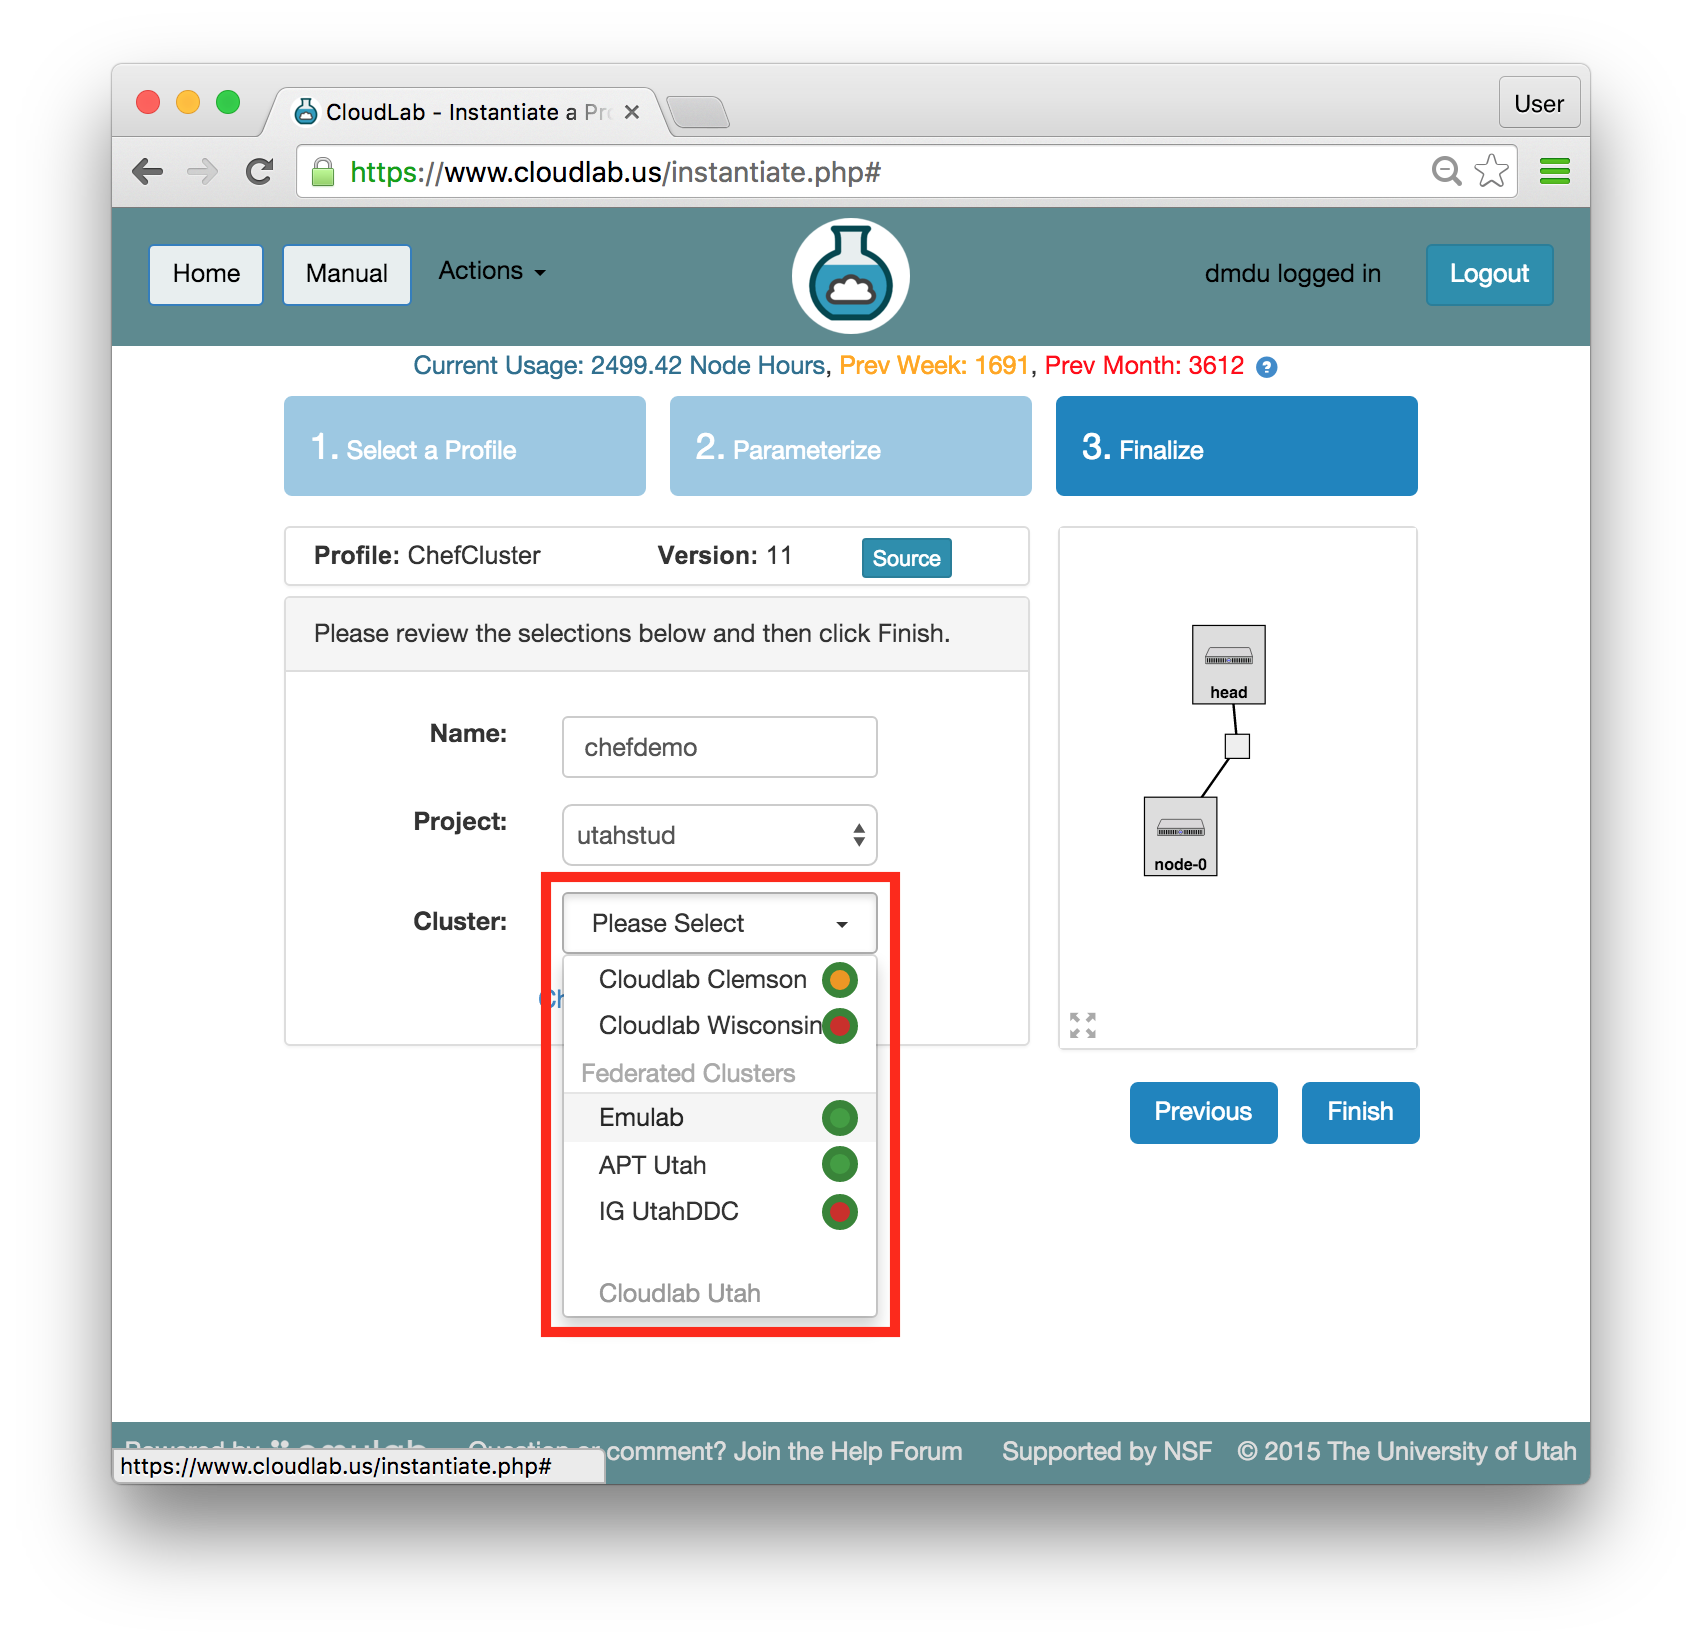
- Select a clusterEmulab has multiple clusters available to it. Some profiles can run on any cluster, some can only run on specific ones due to specific hardware constraints. ChefCluster can only run on the x86-based clusters. This excludes the Emulab Utah cluster which is built on ARMv8 nodes. Refer to the Hardware section for more information.Note: If you are at an in-person tutorial, the instructor will tell you which cluster to select. Otherwise, you may select any compatible and available cluster.
The dropdown menu for the clusters shows you both the health (outer ring) and available resources (inner dot) of each cluster. The “Check Cluster Status” link opens a page (in a new tab) showing the current utilization of all Emulab clusters.
- Click Finish!When you click the “Finish” button, Emulab will start provisioning the resources that you requested on the cluster that you selected.
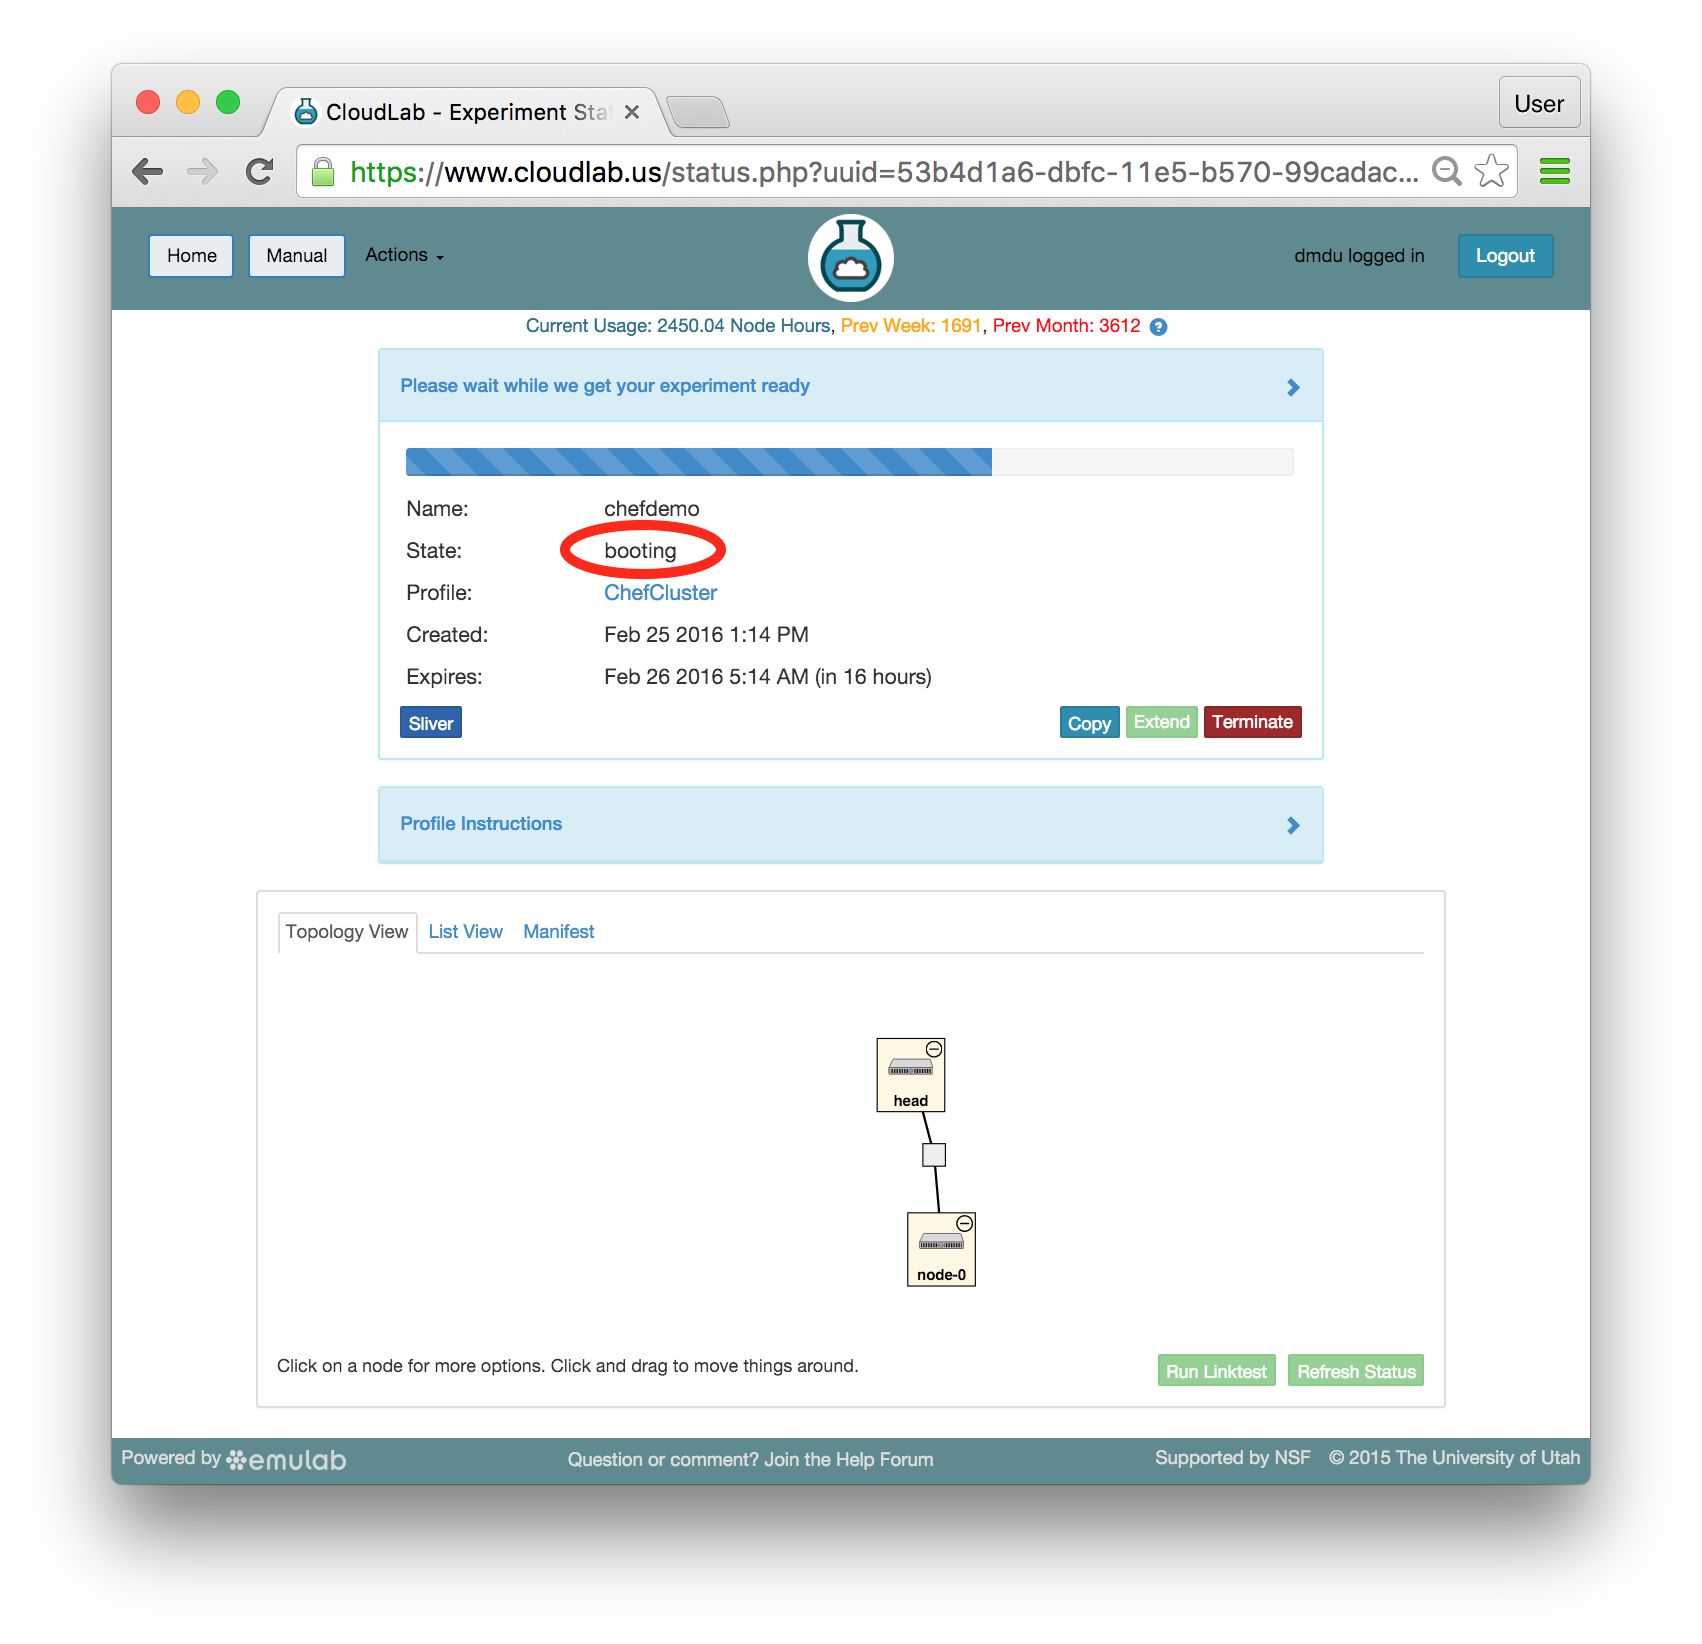
- @(tb) instantiates your profileEmulab will take a few minutes to bring up your experiment, as many things happen at this stage, including selecting suitable hardware, loading disk images on local storage, booting bare-metal machines, re-configuring the network topology, etc. While this is happening, you will see the topology with yellow node icons:
Provisioning is done using the GENI APIs; it is possible for advanced users to bypass the Emulab portal and call these provisioning APIs from their own code. A good way to do this is to use the geni-lib library for Python.
As soon as a set of resources have been assigned to you, you will see details about them if you switch to the "List View" tab (though you will not be able to log in until they have gone through the process of imaging and booting.) While you are waiting for your resources to become available, you may want to have a look at the Emulab user manual, or use the “Sliver” button to watch the logs of the resources (“slivers”) being provisioned and booting. - Your resources are ready!Shortly, the web interface will report the state as “Booted”.
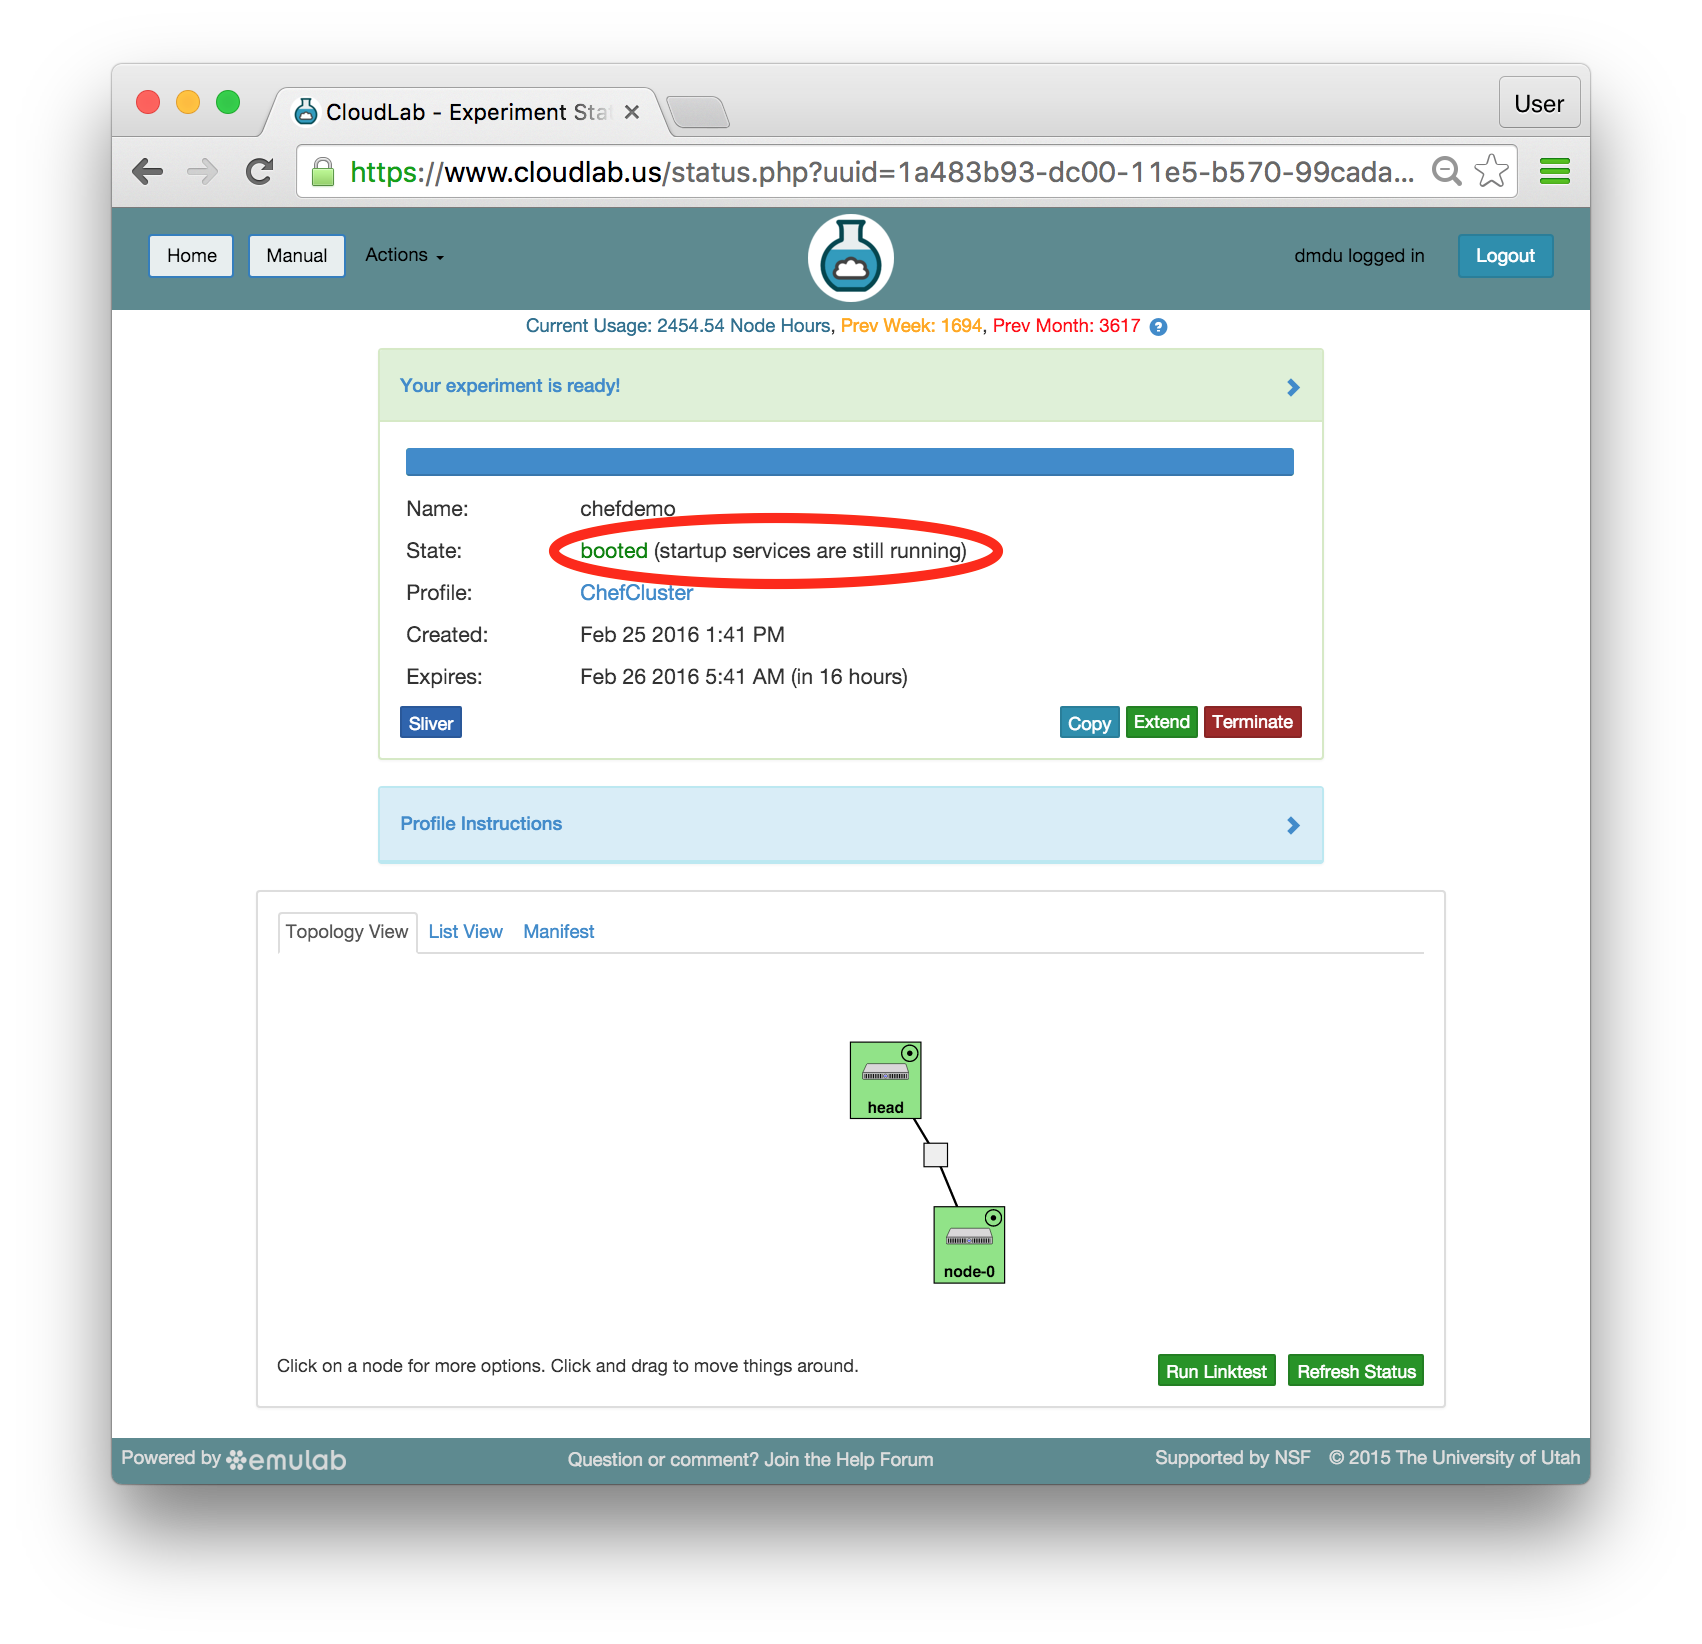 Important: A “Booted” status indicates that resources are provisioned and booted; this particular profile runs scripts to complete the Chef setup, and it will be a few more minutes before Chef becomes fully functional. You will be able to tell that the configuration process has finished when the status changes from “Booted” to “Ready”. Until then, you will likely see that the startup scripts (i.e. programs that run at the beginning of the experiment to set it up) run longer on head than on node-0 —
a lot more work is required to install the Chef server than the client. In the Topology View tab, mouse over the circle in the head’s icon, to confirm the current state of the node. 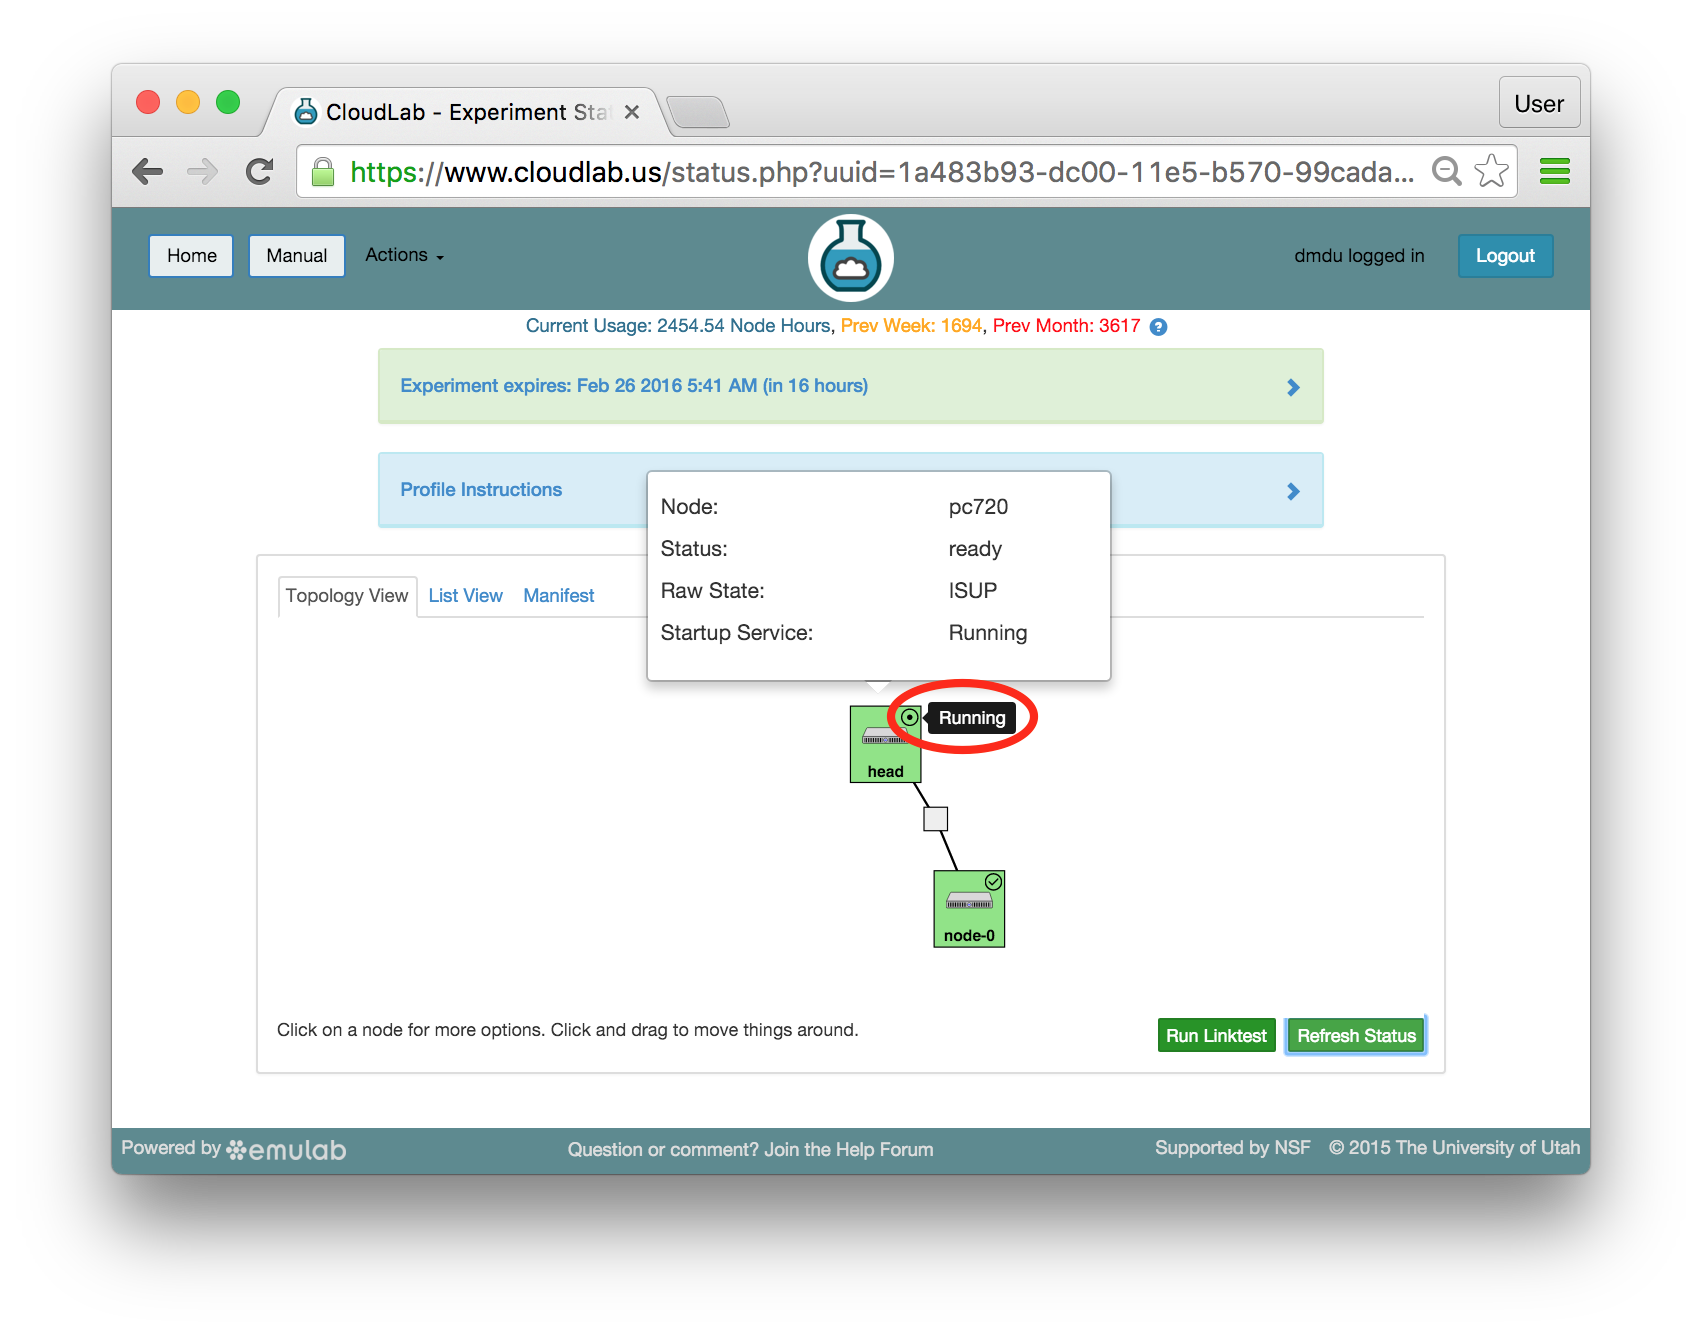
15.6 Exploring Your Experiment
While the startup scripts are still running, you will have a few minutes to look at various parts of the Emulab experiment page and learn what resources you now have access to and what you can do with them.
15.6.1 Experiment Status
The panel at the top of the page shows the status of your experiment —
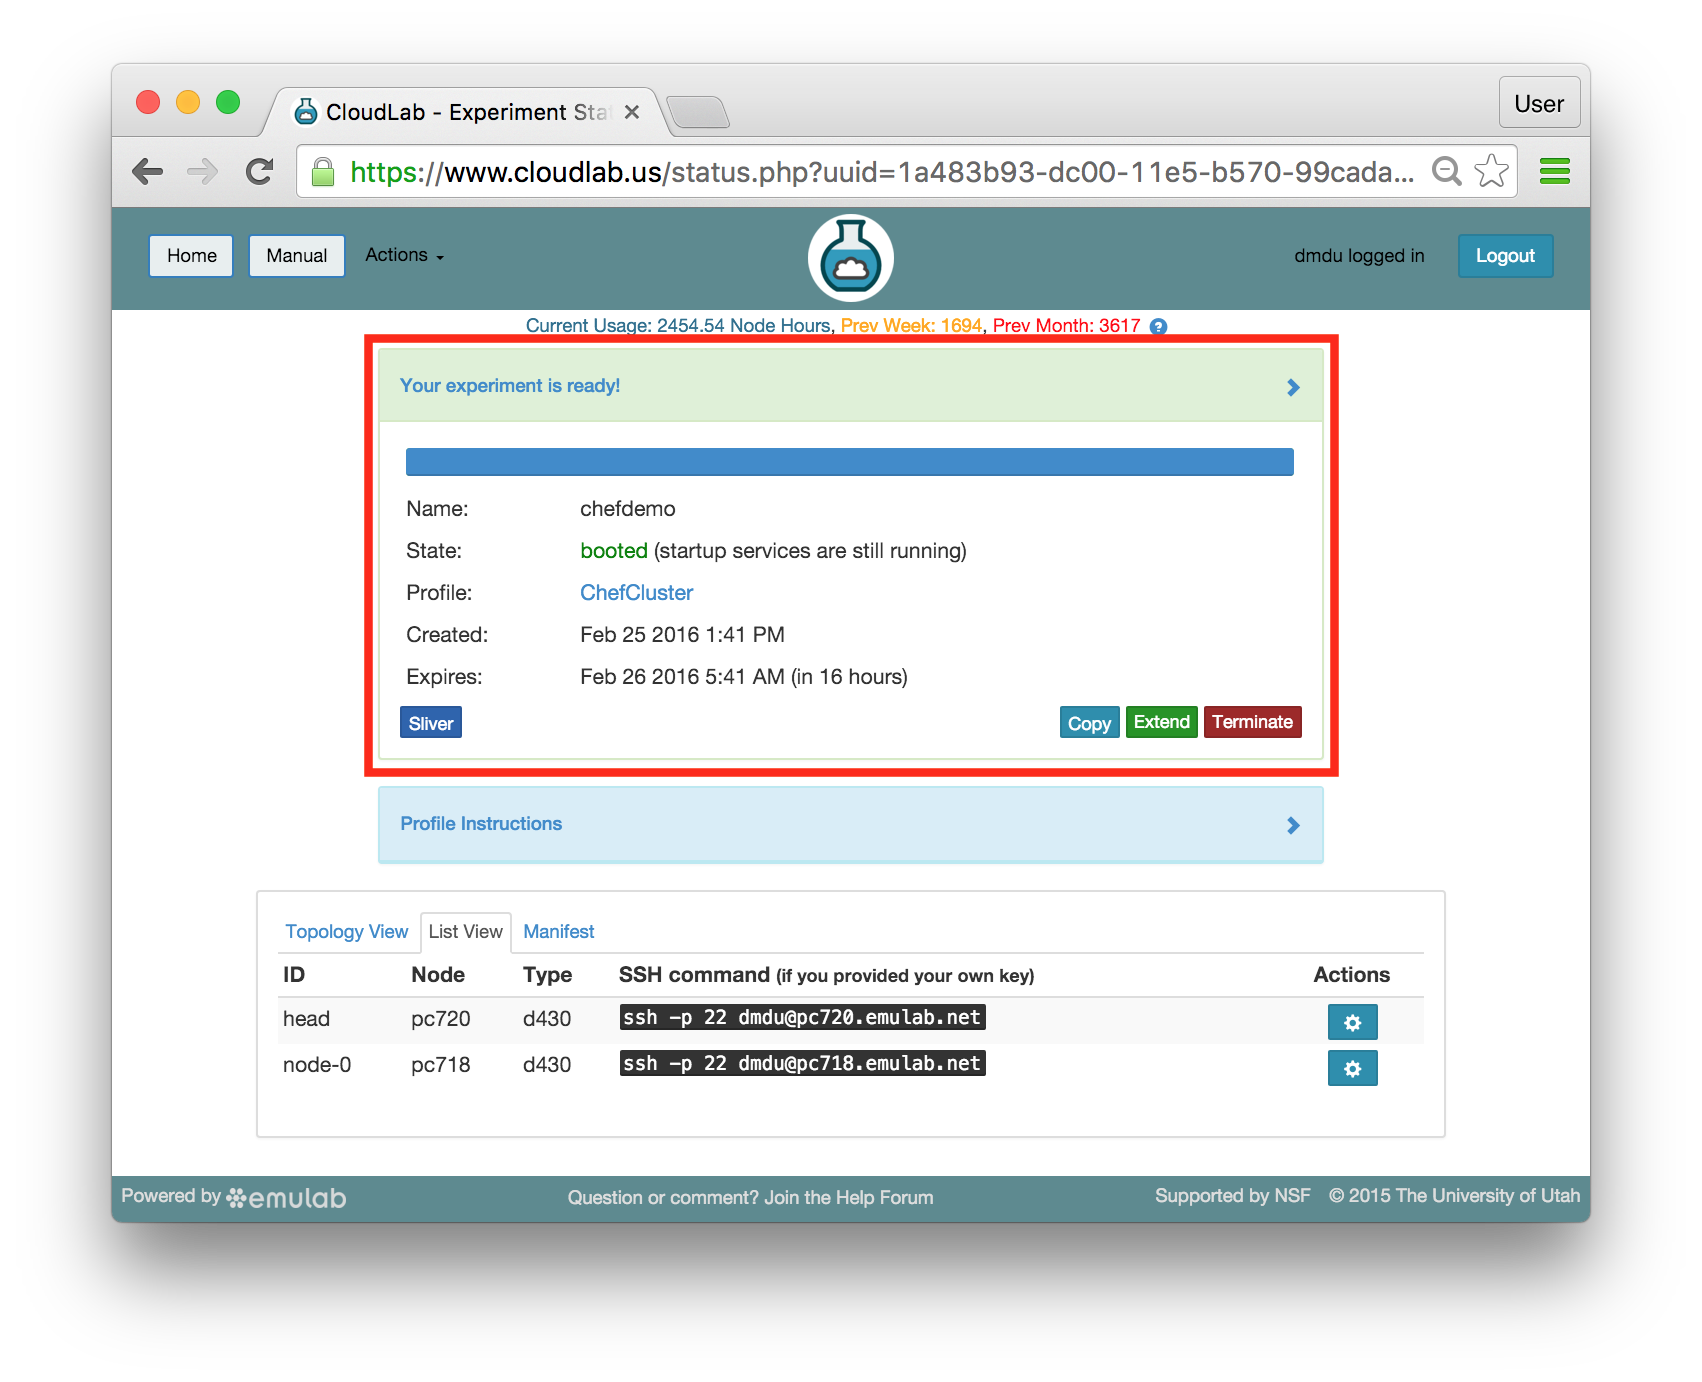
Note that the default lifetime for experiments on Emulab is less than a day; after this time, the resources will be reclaimed and their disk contents will be lost. If you need to use them for longer, you can use the “Extend” button and provide a description of why they are needed. Longer extensions require higher levels of approval from Emulab staff. You might also consider creating a profile of your own if you might need to run a customized environment multiple times or want to share it with others.
You can click on the title of the panel to expand or collapse it.
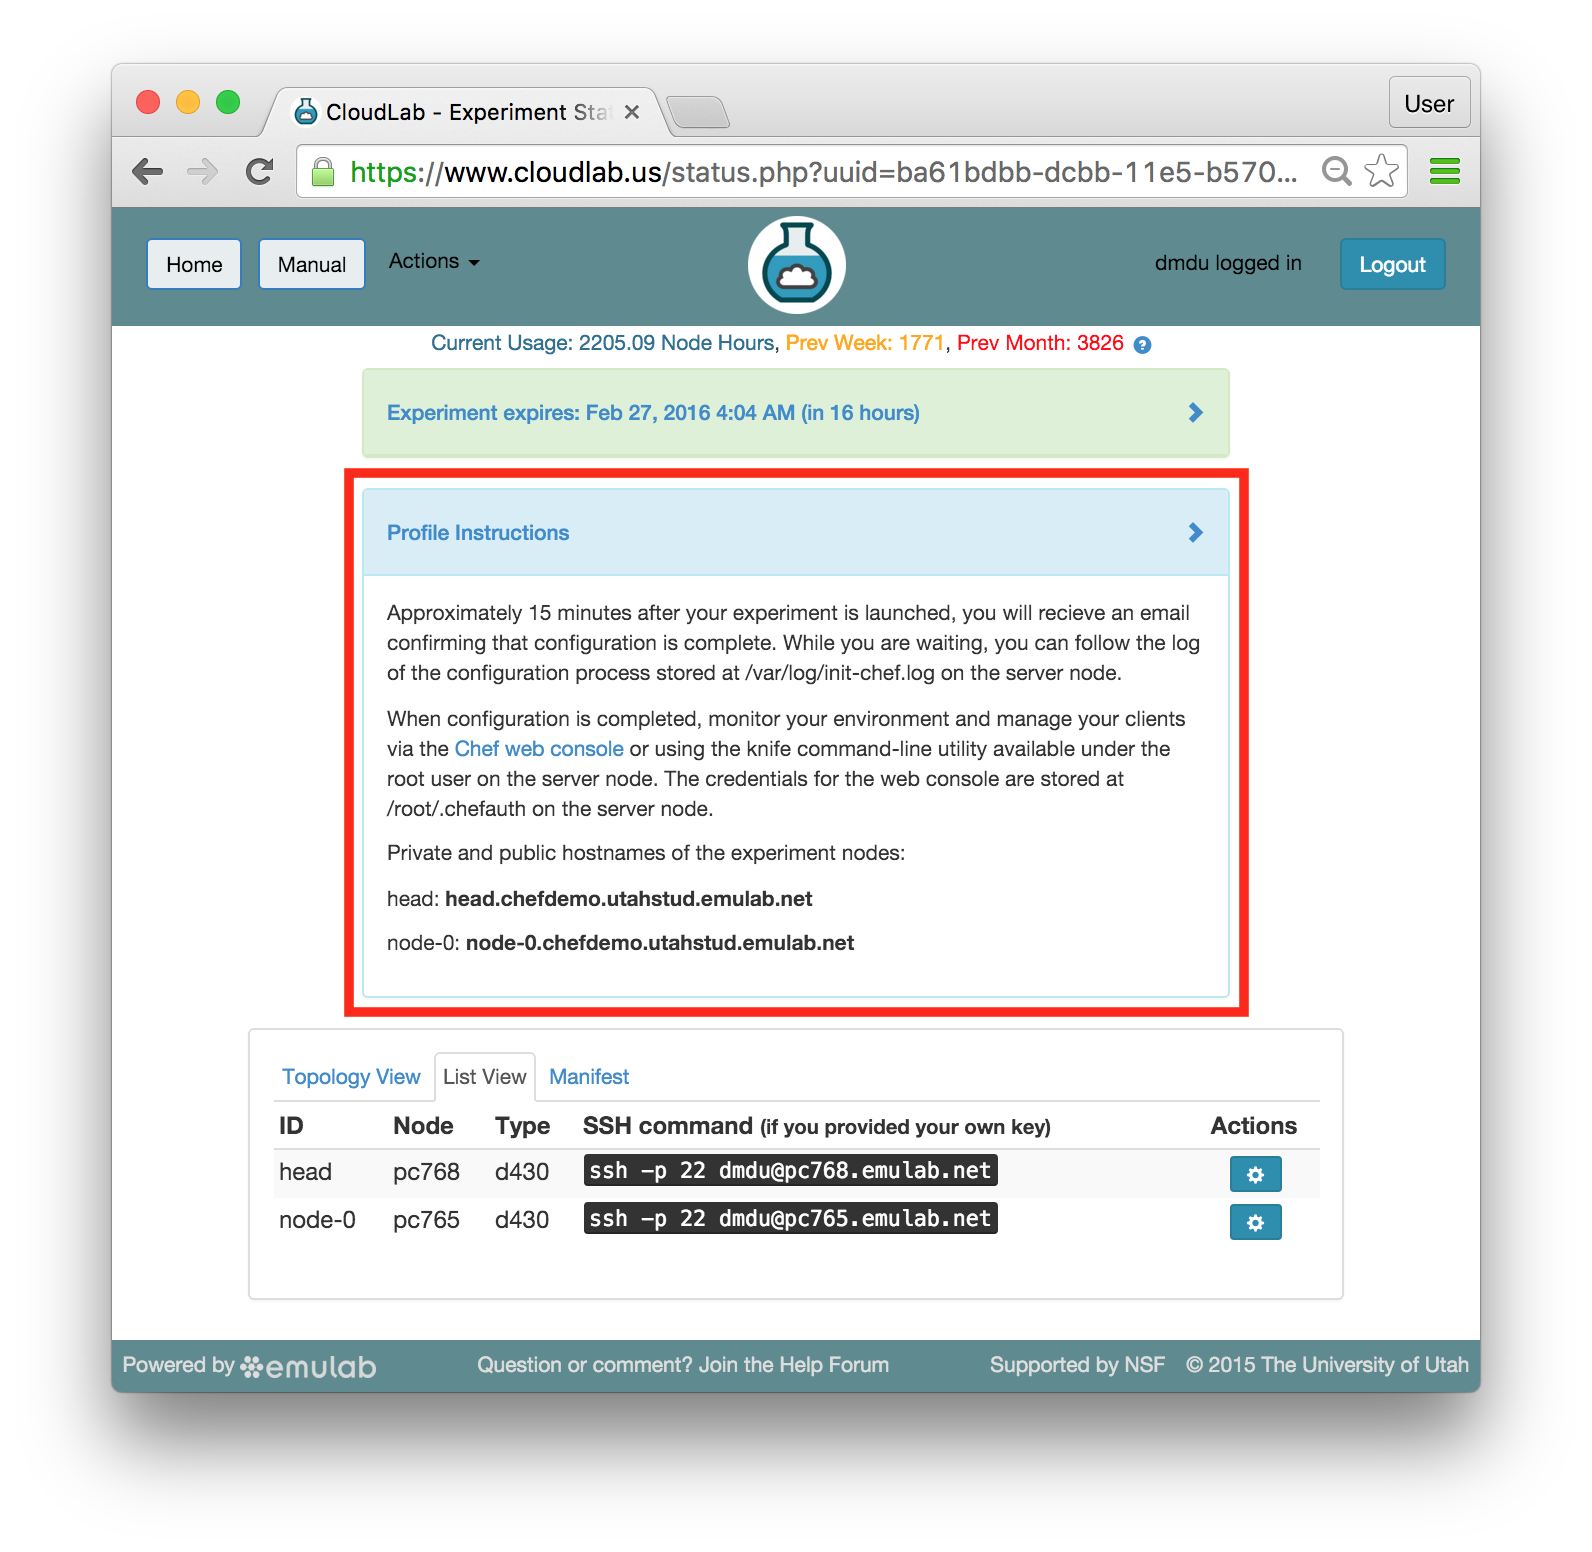
15.6.2 Profile Instructions
Profiles may contain written instructions for their use. Clicking on the title
of the “Profile Instructions” panel will expand or collapse it. In this
case, the instructions provide a link to the Chef server web console.
(Don’t click on the link yet —
Also, notice the list of private and public hostnames of the experiment nodes included in the instructions. You will use the public hostnames (shown in bold) in the exercise with the Apache web server and apache benchmark.
15.6.3 Topology View
We have already used the topology viewer to see the node status; let’s take a closer look at the topology of this experiment. This profile has two nodes connected by a 10 Gigabit LAN, which is represented by a gray box in the middle of the topology. The names given for each node are the names assigned as part of the profile; this way, every time you instantiate a profile, you can refer to the nodes using the same names, regardless of which physical hardware was assigned to them. The green boxes around each node indicate that they are up; click the “Refresh Status” button to initiate a fresh check.
You can also run several networking tests by clicking the “Run Linktest” button at the bottom of the page. The available tests include:
Level 1 —
Connectivity and Latency Level 2 —
Plus Static Routing Level 3 —
Plus Loss Level 4 —
Plus Bandwidth Higher levels will take longer to complete and require patience.
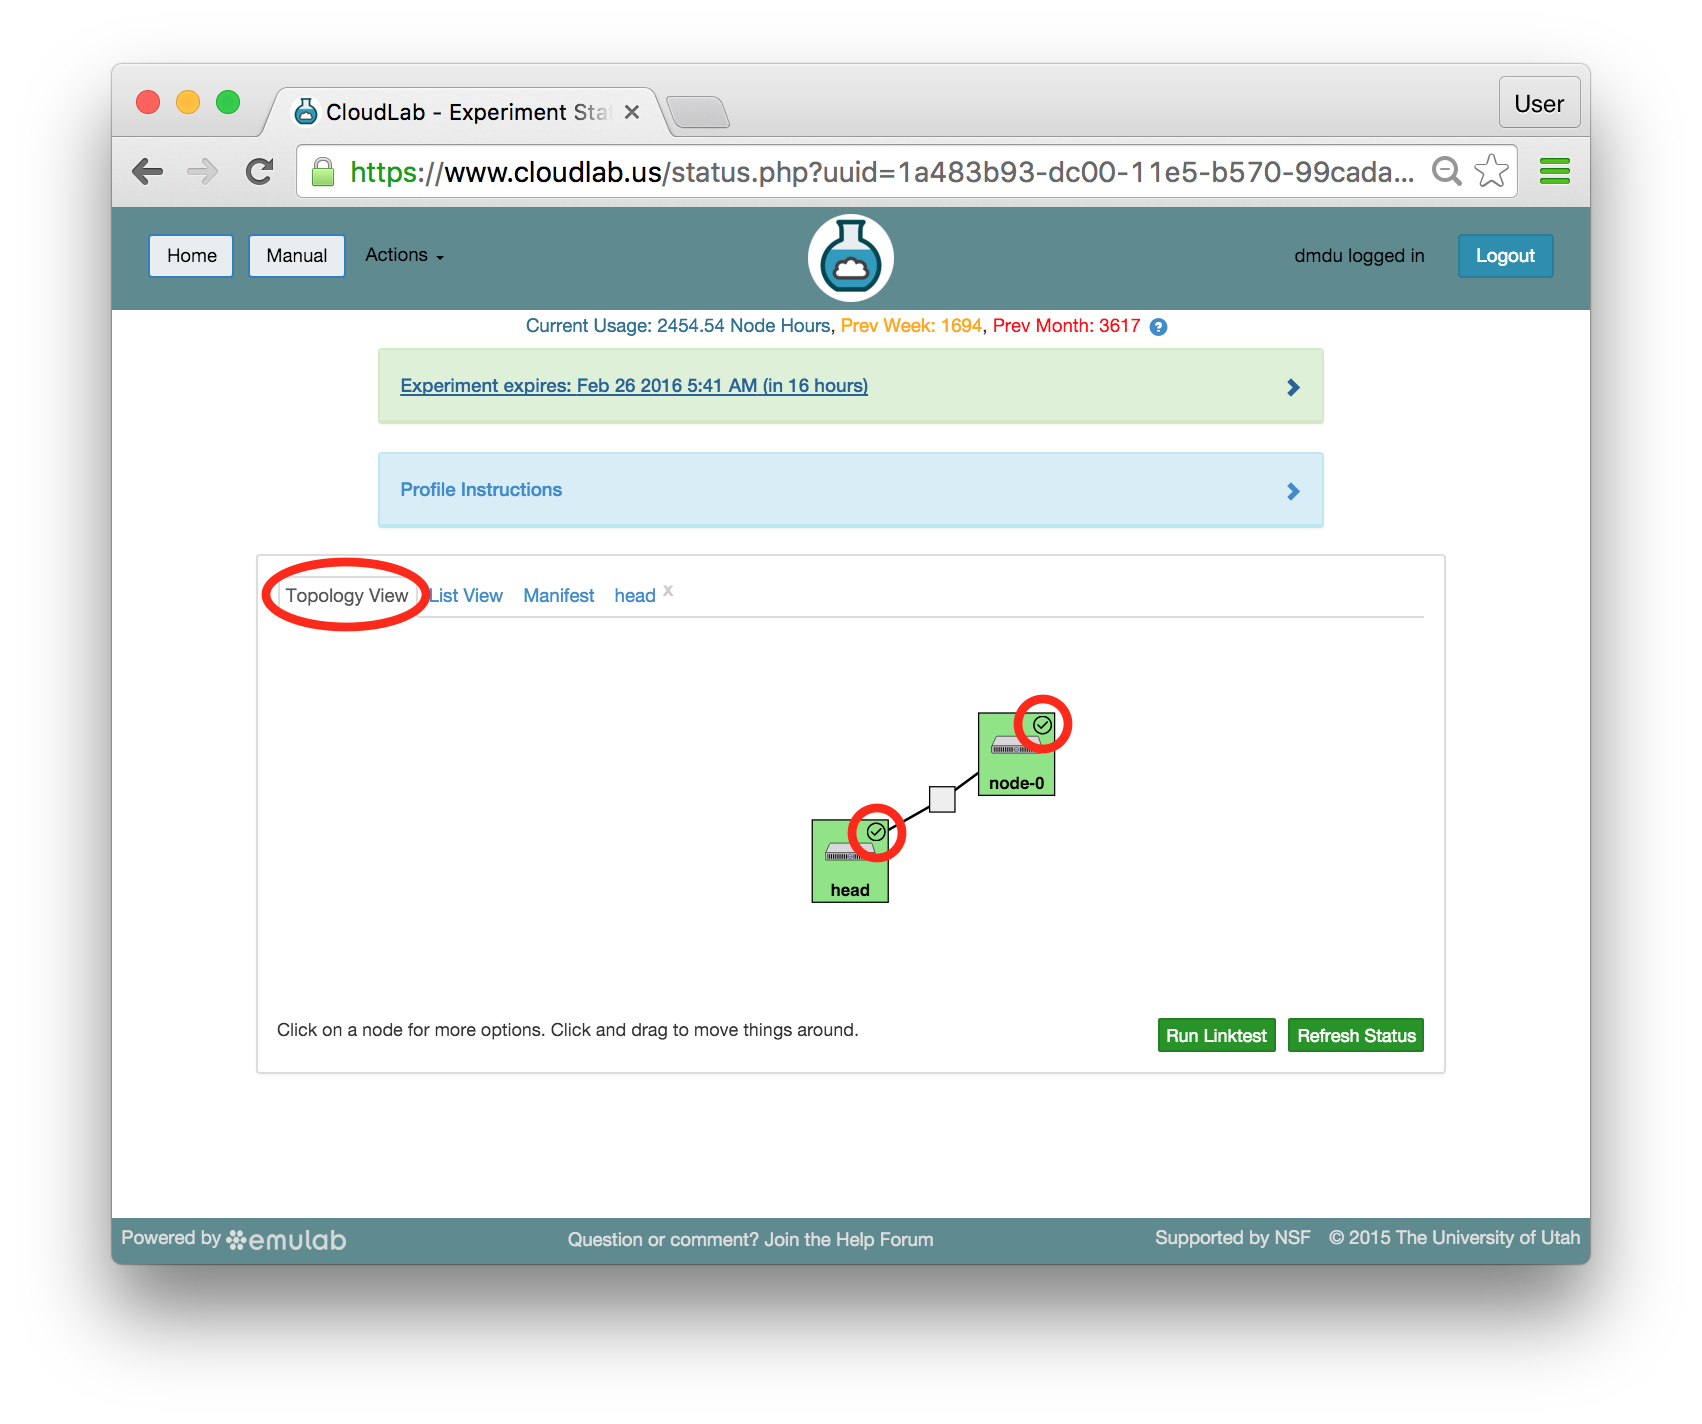
If an experiment has startup services, their statuses are indicated by small icons in the upper right corners of the node icons. You can mouse over this icon to see a description of the current status. In this profile, the startup services on the client node(s), such as node-0, typically complete quickly, but the scripts on head take much longer. The screenshot above shows the state of the experiment when all startup scripts complete.
It is important to note that every node in Emulab has at least two network interfaces: one “control network” that carries public IP connectivity, and one “experiment network” that is isolated from the Internet and all other experiments. It is the experiment net that is shown in this topology view. You will use the control network to ssh into your nodes, interact with their web interfaces, etc. This separation gives you more freedom and control in the private experiment network, and sets up a clean environment for repeatable research.
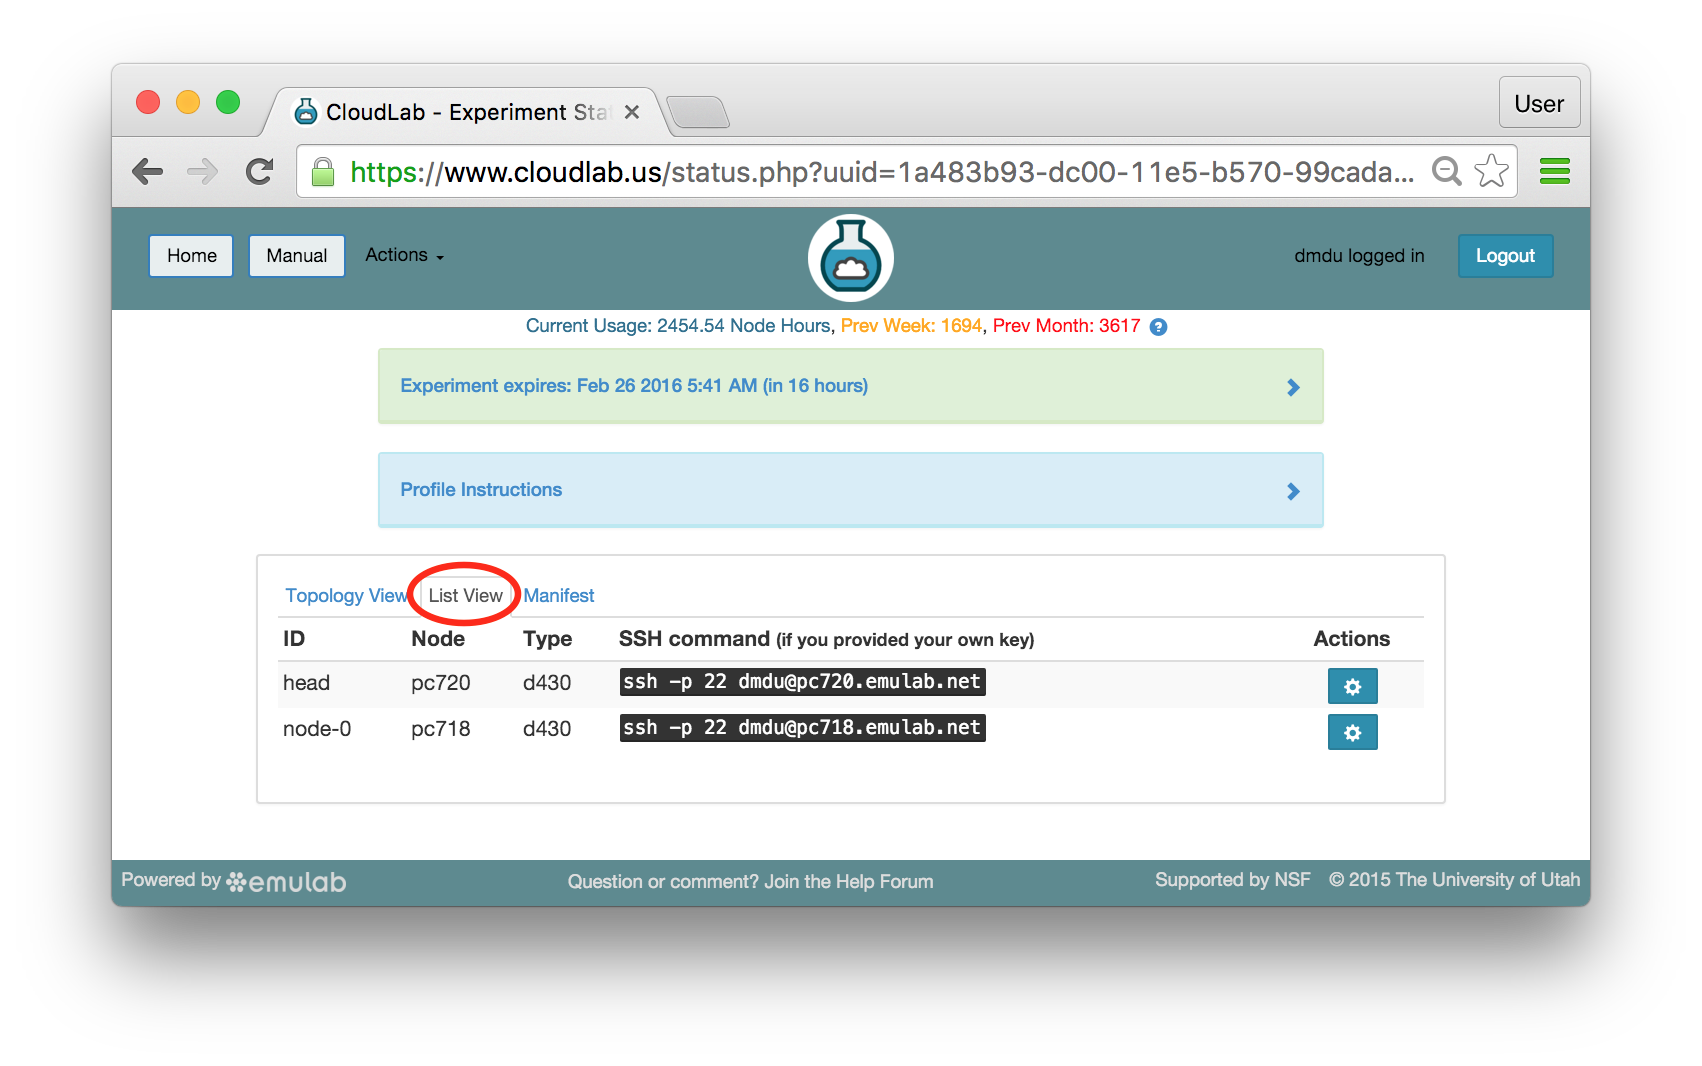
15.6.4 List View
The list view tab shows similar information to the topology view, but in a different format. It shows the identities of the nodes you have been assigned, and the full ssh command lines to connect to them. In some browsers (those that support the ssh:// URL scheme), you can click on the SSH commands to automatically open a new session. On others, you may need to cut and paste this command into a terminal window. Note that only public-key authentication is supported, and you must have set up an ssh keypair on your account before starting the experiment in order for authentication to work.
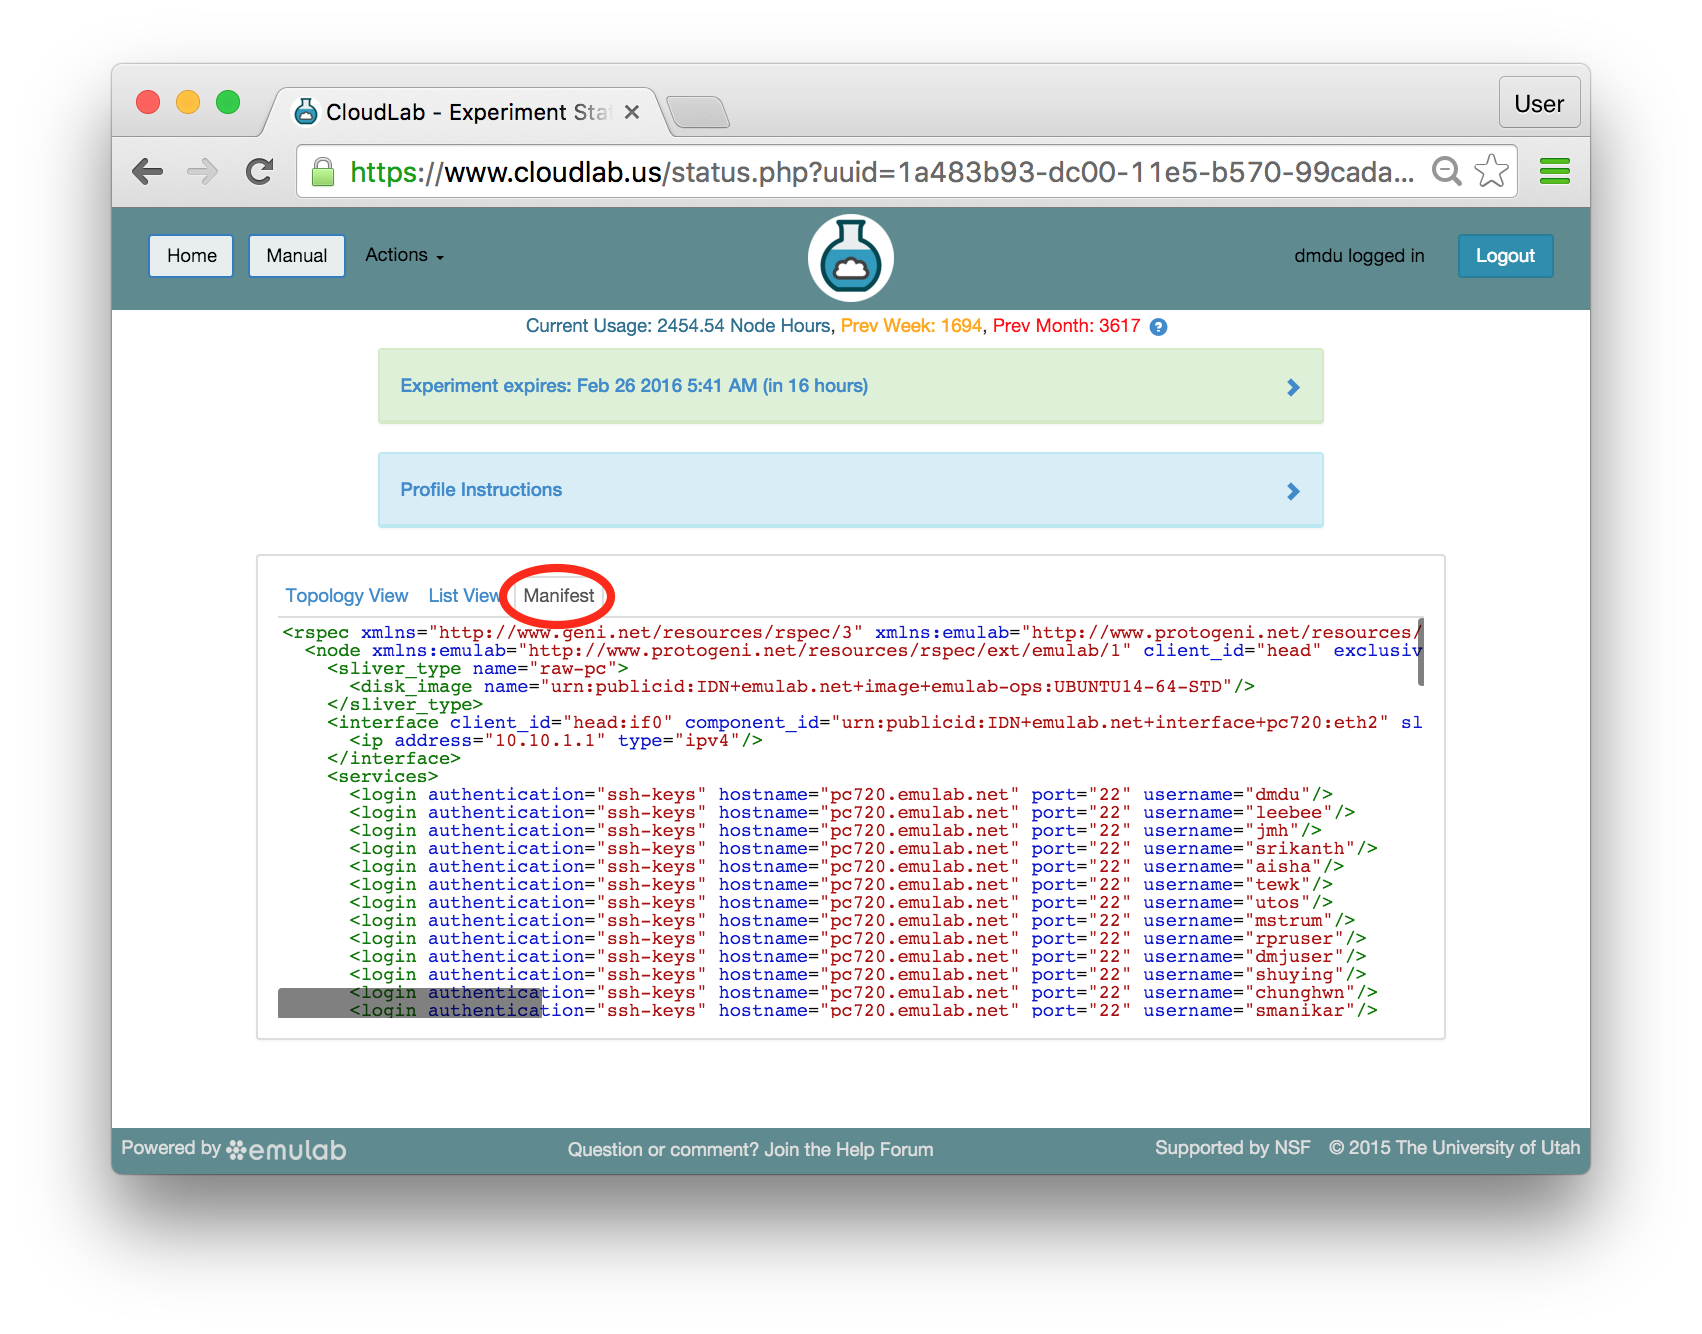
15.6.5 Manifest View
The final default tab shows a manifest detailing the hardware that has been assigned to you. This is the “request” RSpec that is used to define the profile, annotated with details of the hardware that was chosen to instantiate your request. This information is available on the nodes themselves using the geni-get command, enabling you to do rich scripting that is fully aware of both the requested topology and assigned resources.
Most of the information displayed on the Emulab status page comes directly from this manifest; it is parsed and laid out in-browser.
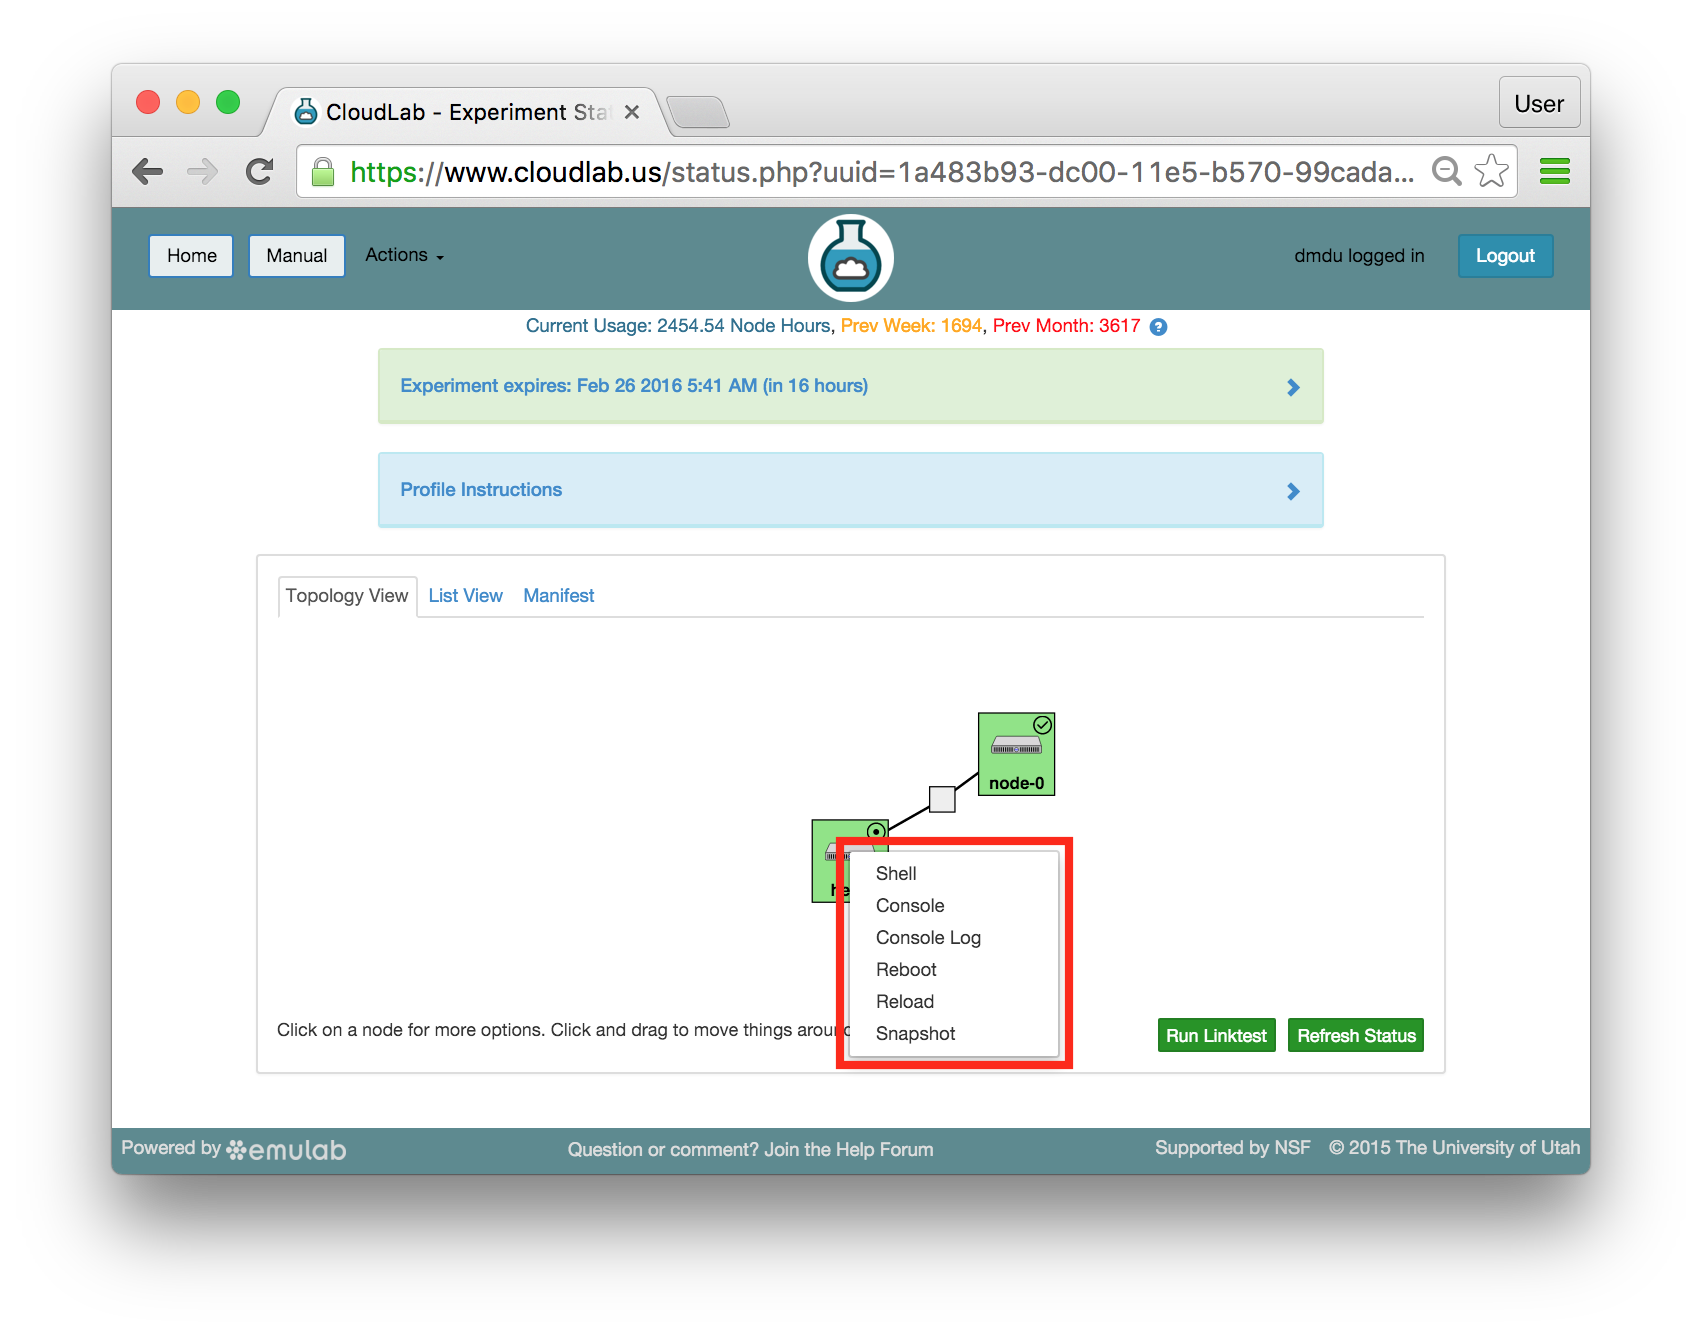
15.6.6 Actions
In both the topology and list views, you have access to several actions that you may take on individual nodes. In the topology view, click on the node to access this menu; in the list view, it is accessed through the icon in the “Actions” column. Available actions include rebooting (power cycling) a node, and re-loading it with a fresh copy of its disk image (destroying all data on the node). While nodes are in the process of rebooting or re-imaging, they will turn yellow in the topology view. When they have completed, they will become green again. The shell action is described in more detail below and will be used as the main method for issuing commands on the experiment nodes throughout this tutorial.
15.7 Brief Introduction to Chef
While the startup scripts are running, let’s take a quick look at the architecture of a typical Chef intallation. The diagram provided at the official Overview of Chef page demonstrates the relationships between individual Chef components. While there is a number of optional, advanced components that we don’t use in this tutorial, it is worth noting the following:
Chef clients can run on a variety of resources: virtual and physical servers, cloud instances, storage and networking devices, containers, etc. All clients connect and listen to the central, infrastructure-wide Chef server.
The Chef server has a web interface. The server manages cookbooks, which are fundamental units of configuration management that define configurations and contain everything that is required to instantiate those configurations. Additionally, the server manages run lists, which can be viewed as mappings between collections of cookbooks and the clients on which they need to execute.
A workstation represents a machine from which a Chef administrator connects to and controls the server. It typically has a copy of chef-repo, the repository which contains cookbooks and other code artifacts. The administrator modifies cookbooks locally and submits them to the server to make them available to all clients.
Recipes, shown next to cookbooks on the workstation, are the "building blocks" from which cookbooks are assembled. Recipes can be viewed as individual scripts accomplishing specific fine-grained tasks, such as create a user, install a package, clone a repository, configure a network interface, etc. Cookbooks, which include one or more recipes, are responsible for "bigger" tasks: install and configure a database, install and run a web server, and so on.
Another type of Chef code artifacts (not shown in the diagram) is called role. A role can include one or more cookbooks and specific recipes (each cookbook and recipe can be used in several roles if necessary). Roles typically define complete node configurations; for instance, in a simple case, one role corresponds to a master node on a cluster with a set of specific services, while another role defines how the rest of the cluster nodes, so-called “worker” nodes, should be configured. After being created on the workstation, these roles are submitted to the server by the administrator and then assigned to specific nodes via the run lists.
In the experiment we have launched, head runs all three: the server, the workstation, and the client
(there is no conflict between these components), while node-0 runs only the client. If this profile is instantiated
with the arbitrary number N of clients, there will be N “client-only” nodes
named node-0,node-1,...,node-(N-1).
Another profile parameter allows choosing the repository from which chef-repo is cloned;
by default, it points to emulab/chef-repo.
The startup scrips in this profile also obtain and install copies of public cookbooks
hosted at the respository called Supermarket.
Specifically, the exercises in this tutorial rely on the nfs
and apache2 cookbooks —
15.8 Logging in to the Chef Web Console
As soon as the startup scripts complete, you will likely recieve an email confirming that Chef is installed and operational.
Dear User, |
|
Chef server and workstataion should now be |
installed on head.chefdemo.utahstud.emulab.net. |
|
To explore the web management console, copy |
this hostname and paste it into your browser. |
Installation log can be found at /var/log/init-chef.log |
on the server node. |
|
To authenticate, use the unique credentials |
saved in /root/.chefauth on the server node. |
|
Below are several Chef commands which detail the launched experiment: |
|
# chef -v |
Chef Development Kit Version: 0.7.0 |
chef-client version: 12.4.1 |
berks version: 3.2.4 |
kitchen version: 1.4.2 |
|
# knife cookbook list |
apache2 3.1.0 |
apt 2.9.2 |
emulab-apachebench 1.0.0 |
emulab-nfs 0.1.0 |
... |
nfs 2.2.6 |
|
# knife node list |
head |
node-0 |
|
# knife role list |
apache2 |
apachebench |
... |
nfs |
|
# knife status -r |
1 minute ago, head, [], ubuntu 14.04. |
0 minutes ago, node-0, [], ubuntu 14.04. |
|
Happy automation with Chef! |
In some cases, you will not be able to see this email —
When you receive this email or see in the topology viewer that the startup scripts completed, you can proceed to the following step.
15.8.1 Web-based Shell
Emulab provides a browser-based shell for logging into your nodes, which is accessed through the action menu described above. While this shell is functional, it is most suited to light, quick tasks; if you are going to do serious work, on your nodes, we recommend using a standard terminal and ssh program.
This shell can be used even if you did not establish an ssh keypair with your account.
Three things of note:
Your browser may require you to click in the shell window before it gets focus.
Depending on your operating system and browser, cutting and pasting into the window may not work. If keyboard-based pasting does not work, try right-clicking to paste.
The recommended browsers are Chrome and Firefox. The web-based shell does not work reliably in Safari. It is not guaranteed that it works smoothly in other browsers.
Create a shell tab for head by choosing “Shell” in the Actions menu for head in either the topology or the list view. The new tab will be labeled “head”. It will allow typing shell commands and executing them on the node. All shell commands used throughout this tutorial should be issued using this shell tab.
While you are here, switch to the root user by typing:
sudo su - |
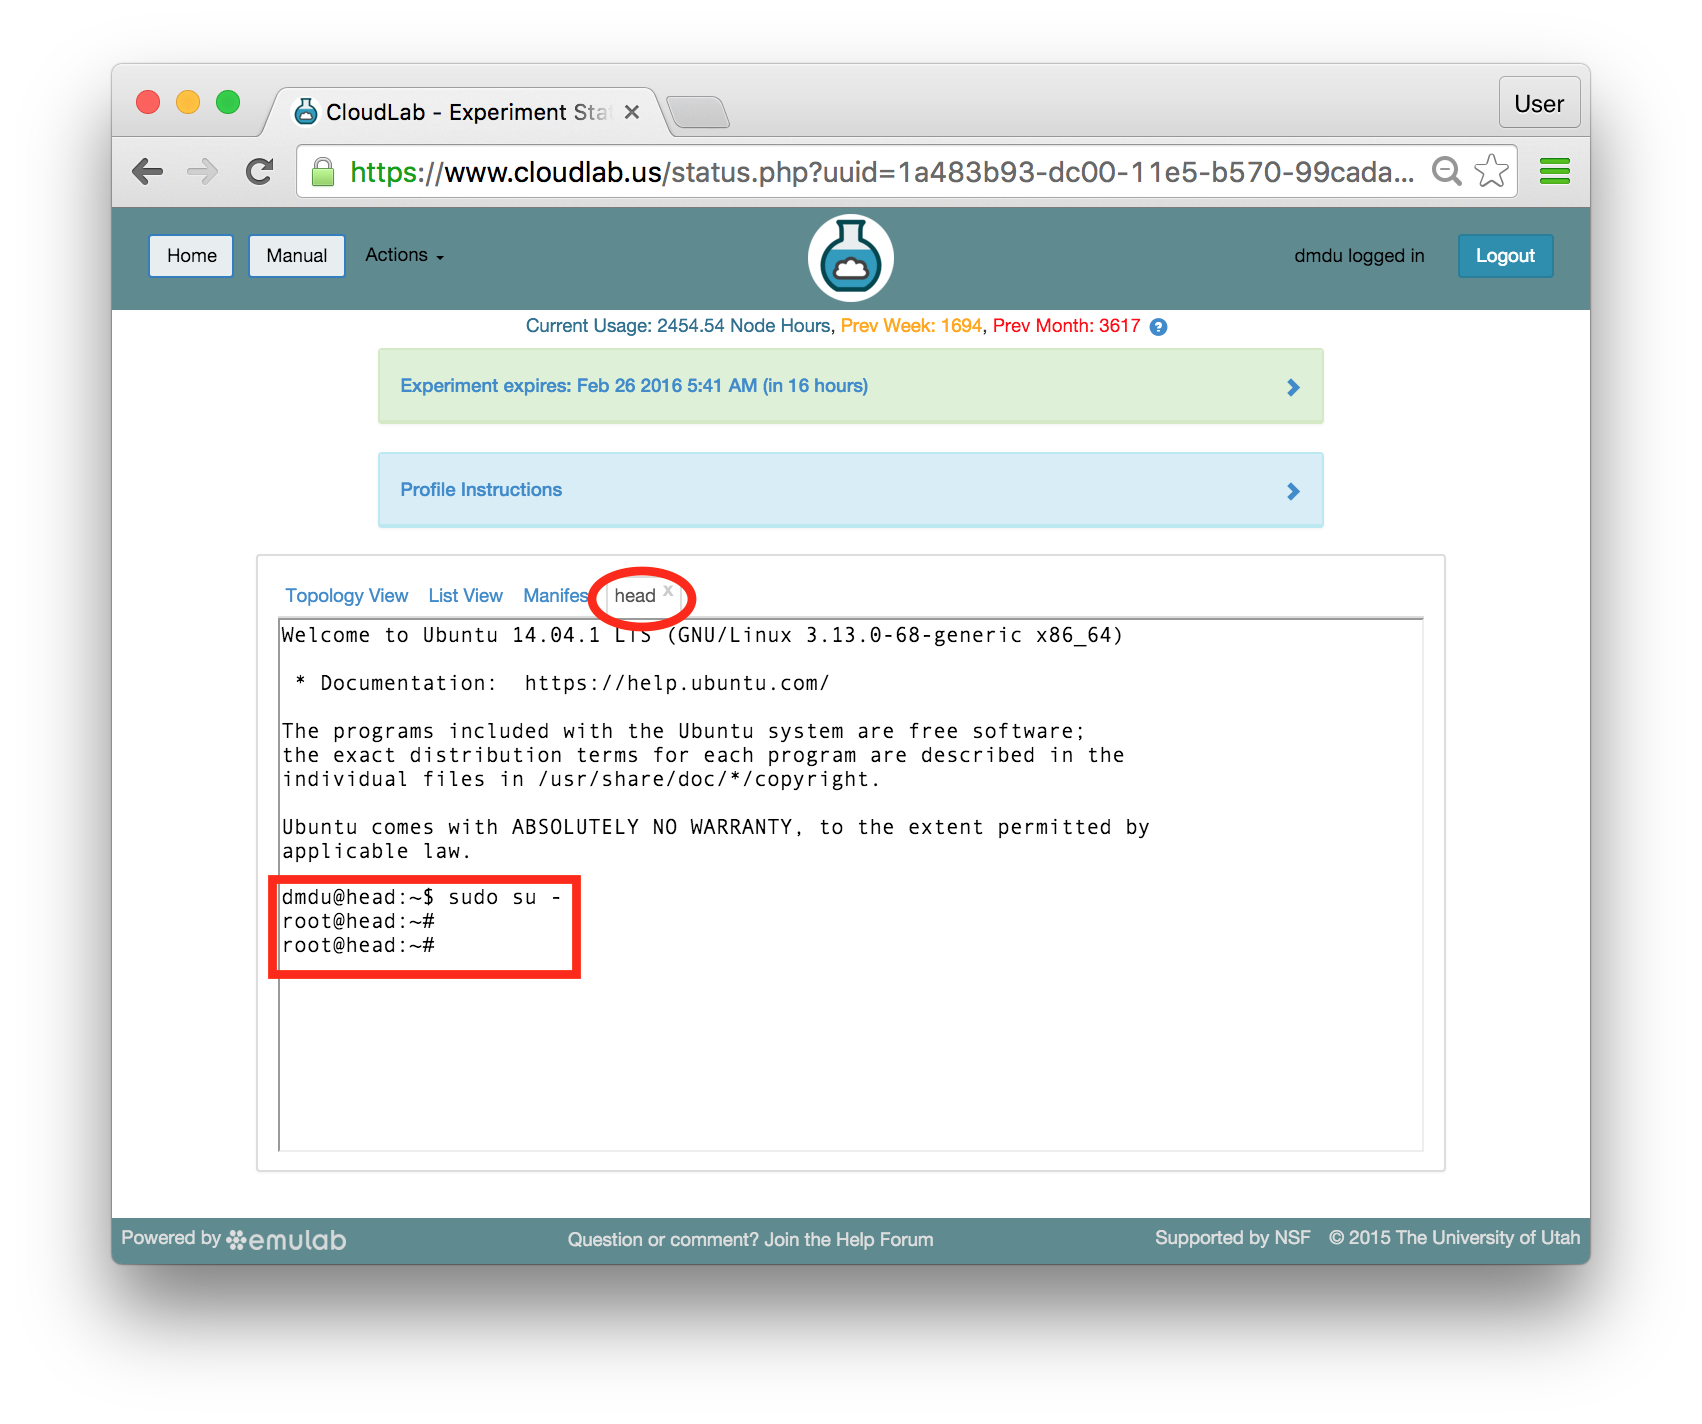
Your prompt, the string which is printed on every line before the cursor, should change to root@head. All commands in the rest of the tutorial should be executed under root.
15.8.2 Chef Web Console
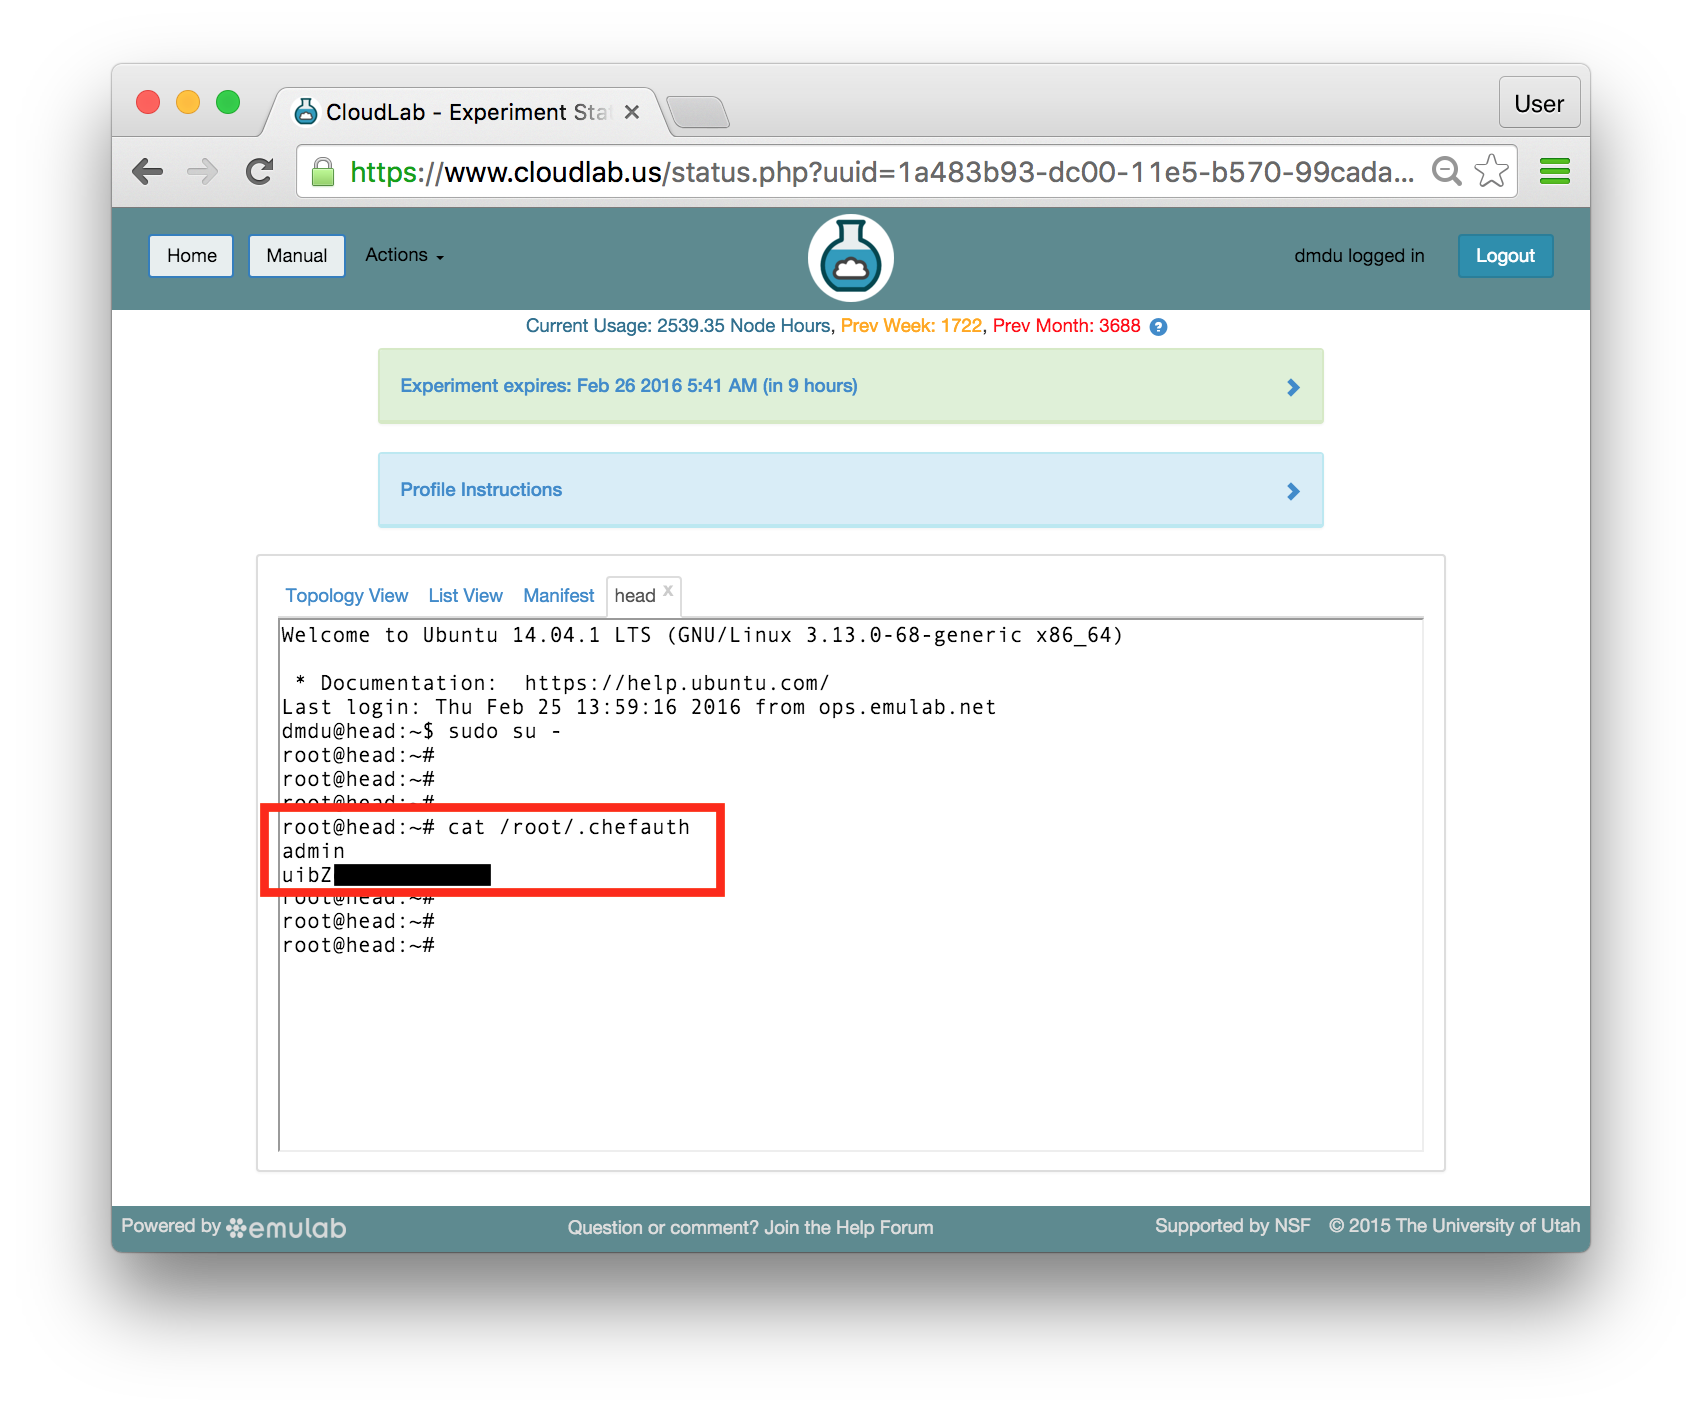
Type the following to print Chef credentials:
cat /root/.chefauth |
You should see the unique login and password that have been generated by the startup scripts specifically for your instance of Chef:
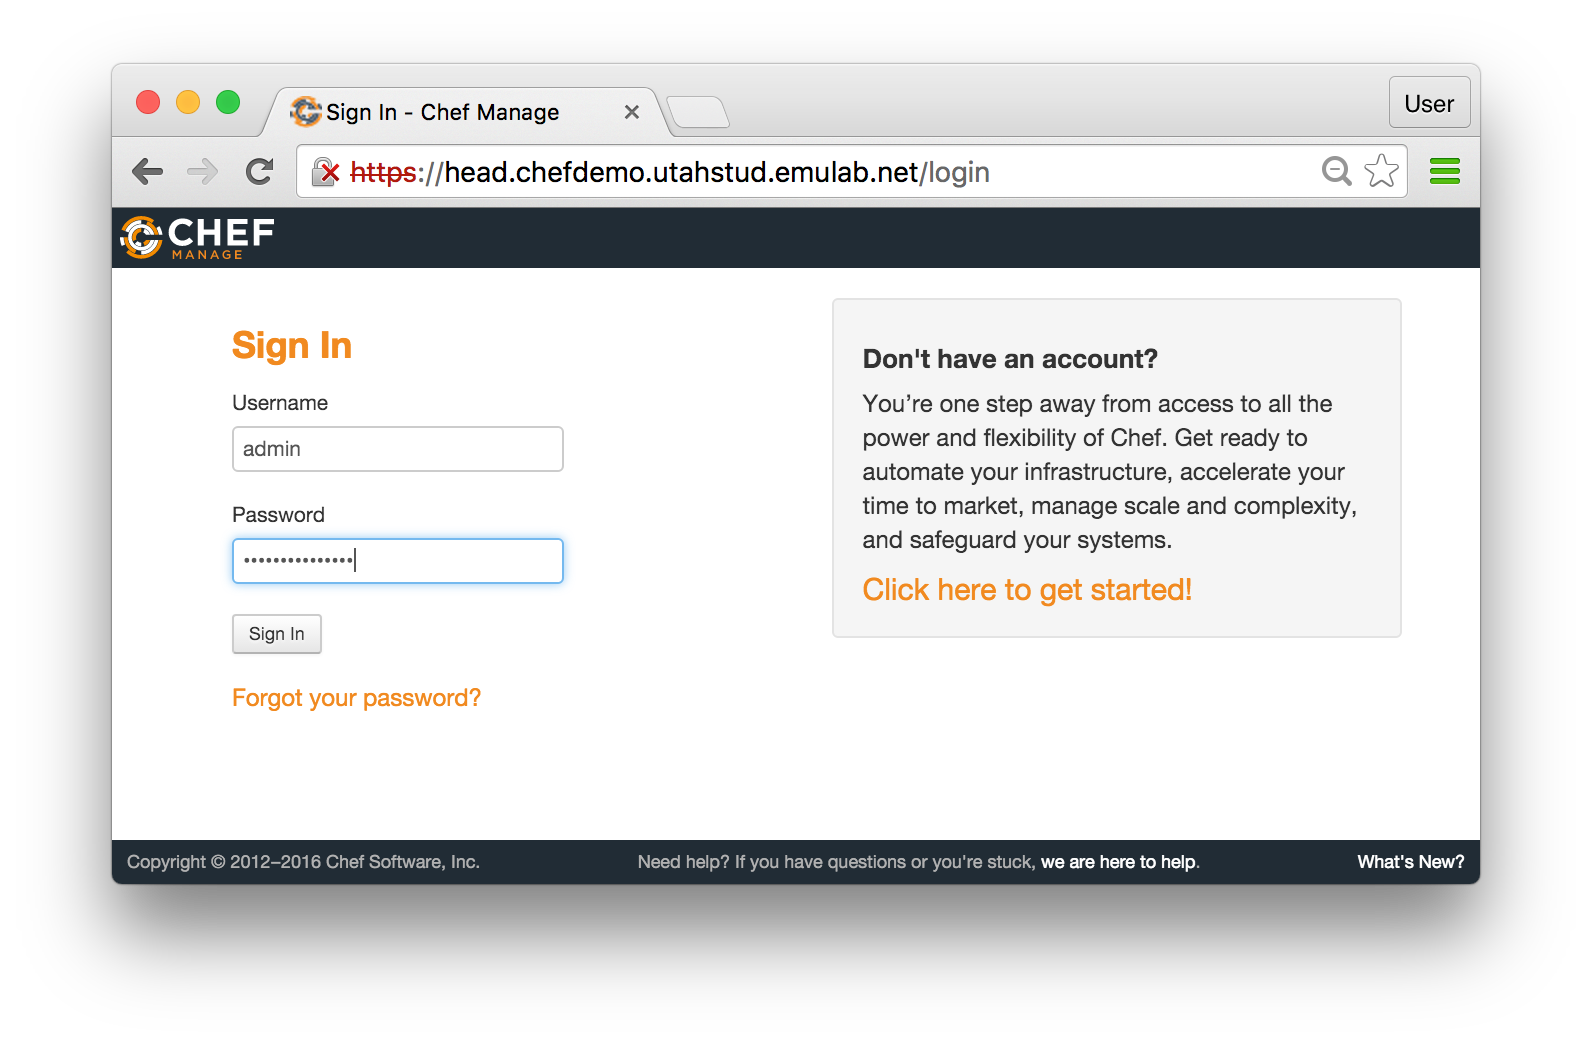
Expand the “Profile Instructions” panel and click on the “Chef web console” link.
Warning: When your browser first points to this link, you will see a warning about using a self-signed SSL certificate. Using self-signed certificates is not a good option in production scenarios, but it is totally acceptable in this short-term experimentation environment. We will ignore this warning and proceed to using the Chef console. The sequence of steps for ignoring it depends on your browser. In Chrome, you will see a message saying "Your connection is not private". Click “Advanced” at the bottom of the page and choose “Proceed to <hostname> (unsafe)”. In Firefox, the process is slightly different: click “Advanced”, choose “Add Exception”, and click “Confirm Security Exception”.
When the login page is finally displayed, use the credentials you have printed in the shell:
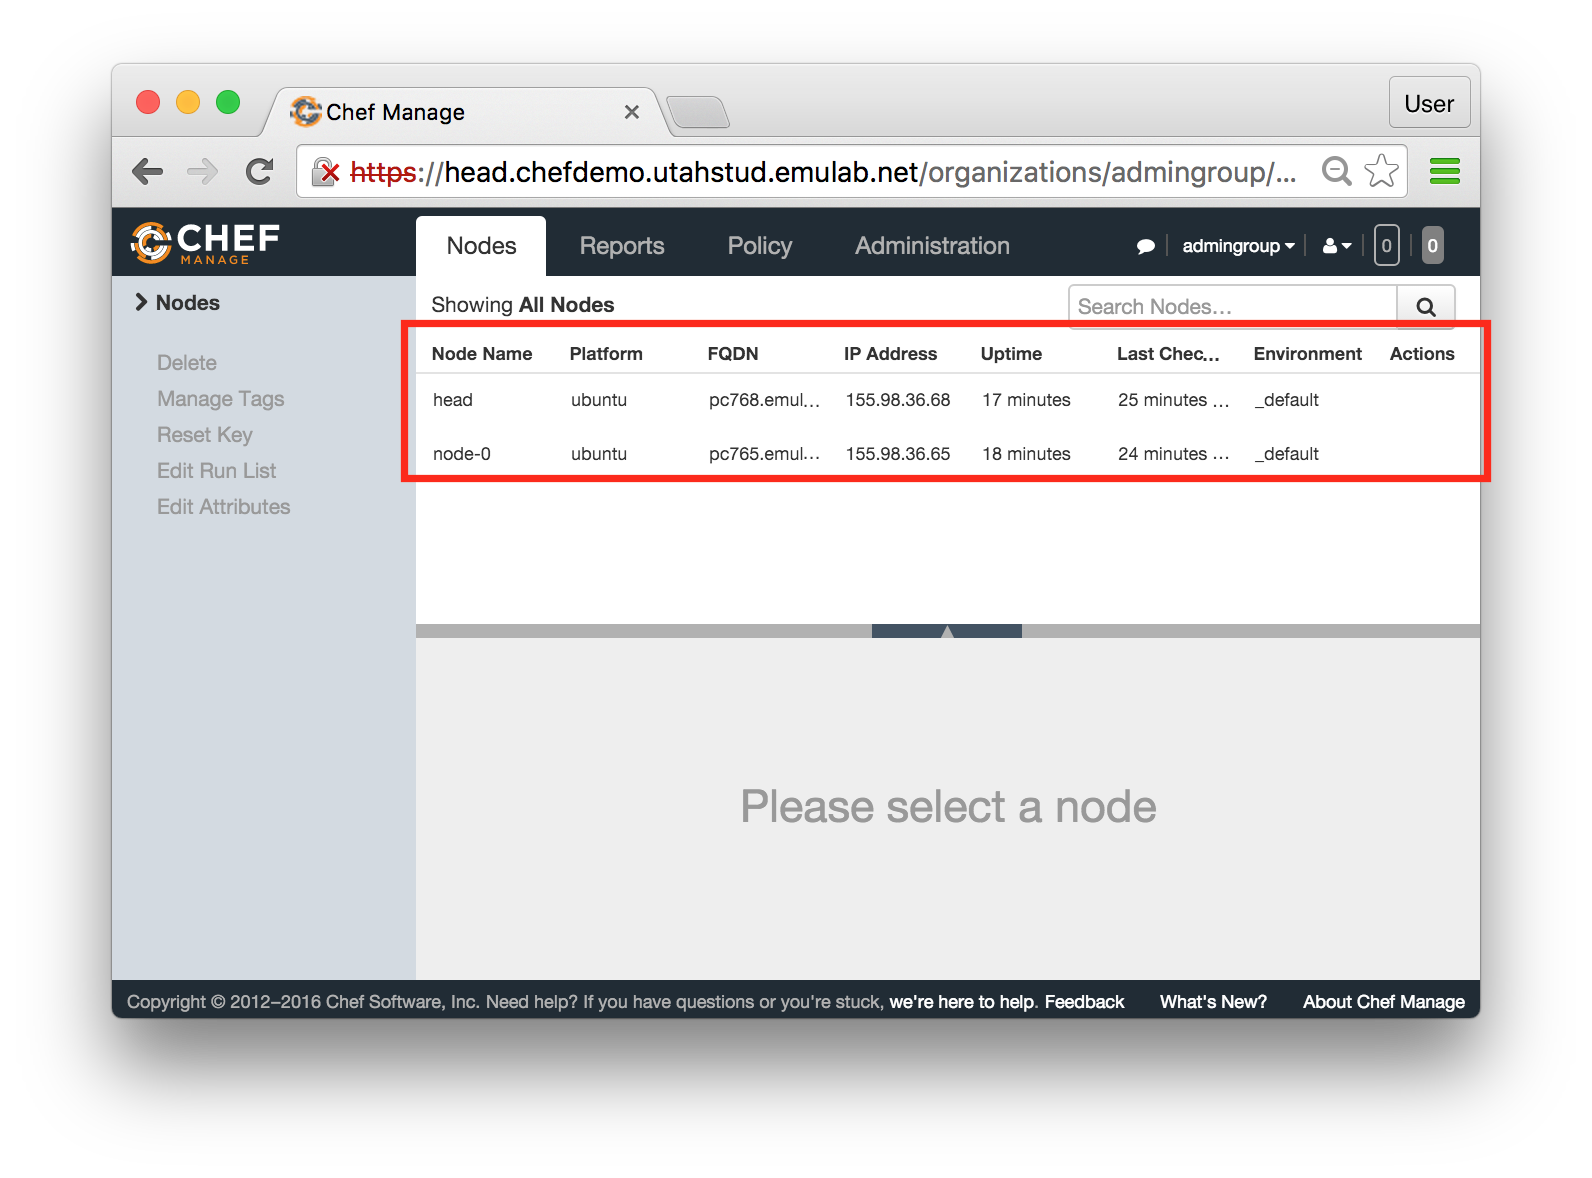
If you see a console like the one above, with both head and node-0 listed on the “Nodes” tab, you have a working Chef cluster! You can now proceed to managing your nodes using Chef recipes, cookbooks, and roles.
In the rest of the tutorial, we demonstrate how you can use several pre-defined cookbooks and roles.
Development of cookbooks and roles is a subject of another tutorial (many such tutorials can be
found online). Our goal in the following sections is to walk you through
the process of using existing cookbooks and roles —
15.9 Configuring NFS
Now that you have a working instance of Chef where both head and node-0 can be controlled using Chef, let’s start modifying the software stacks on these nodes by installing NFS and exporting a directory from head to node-0.
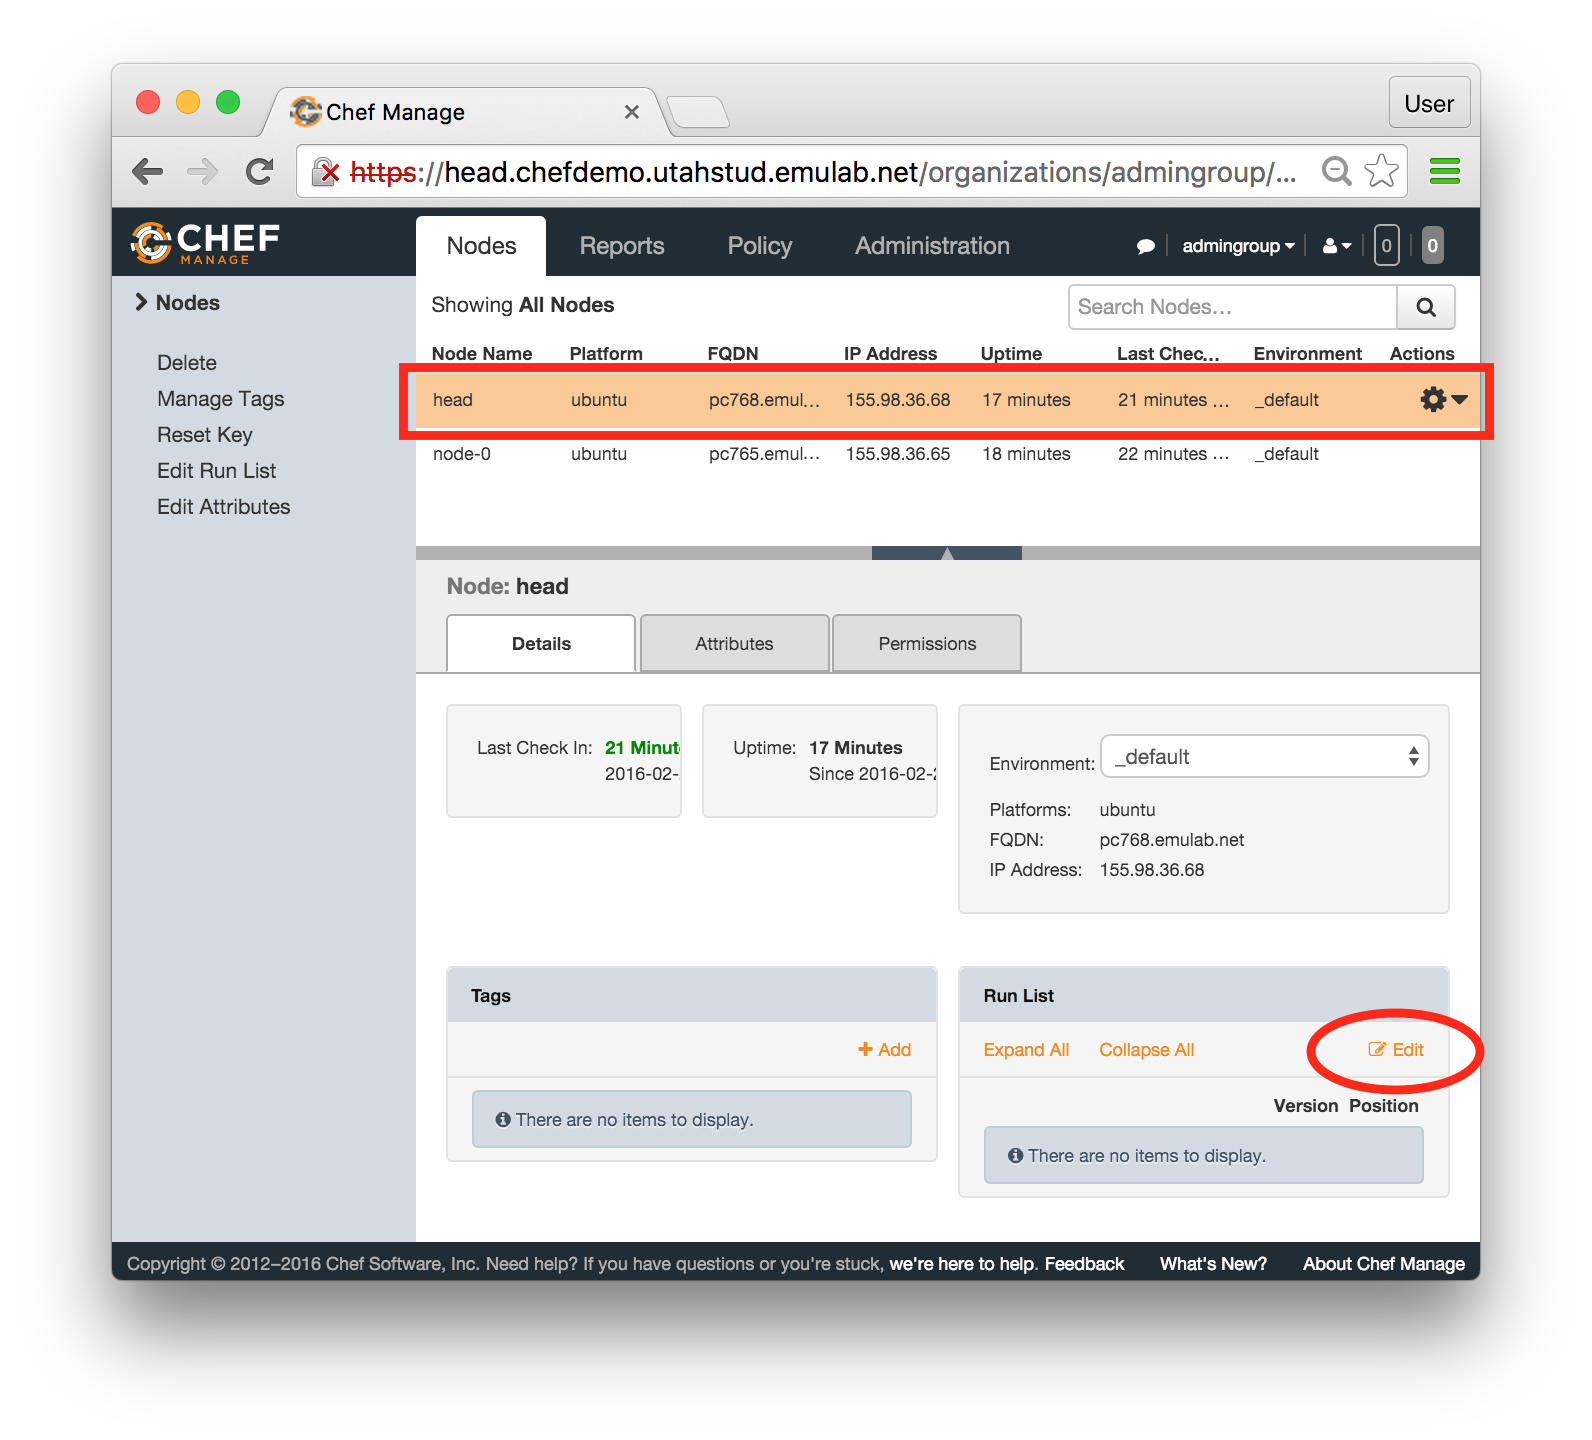
- Modify the run list on headClick on the row for head in the node list (so the entire row is highlighted in orange), and then click "Edit" in the Run List panel in the bottom right corner of the page:
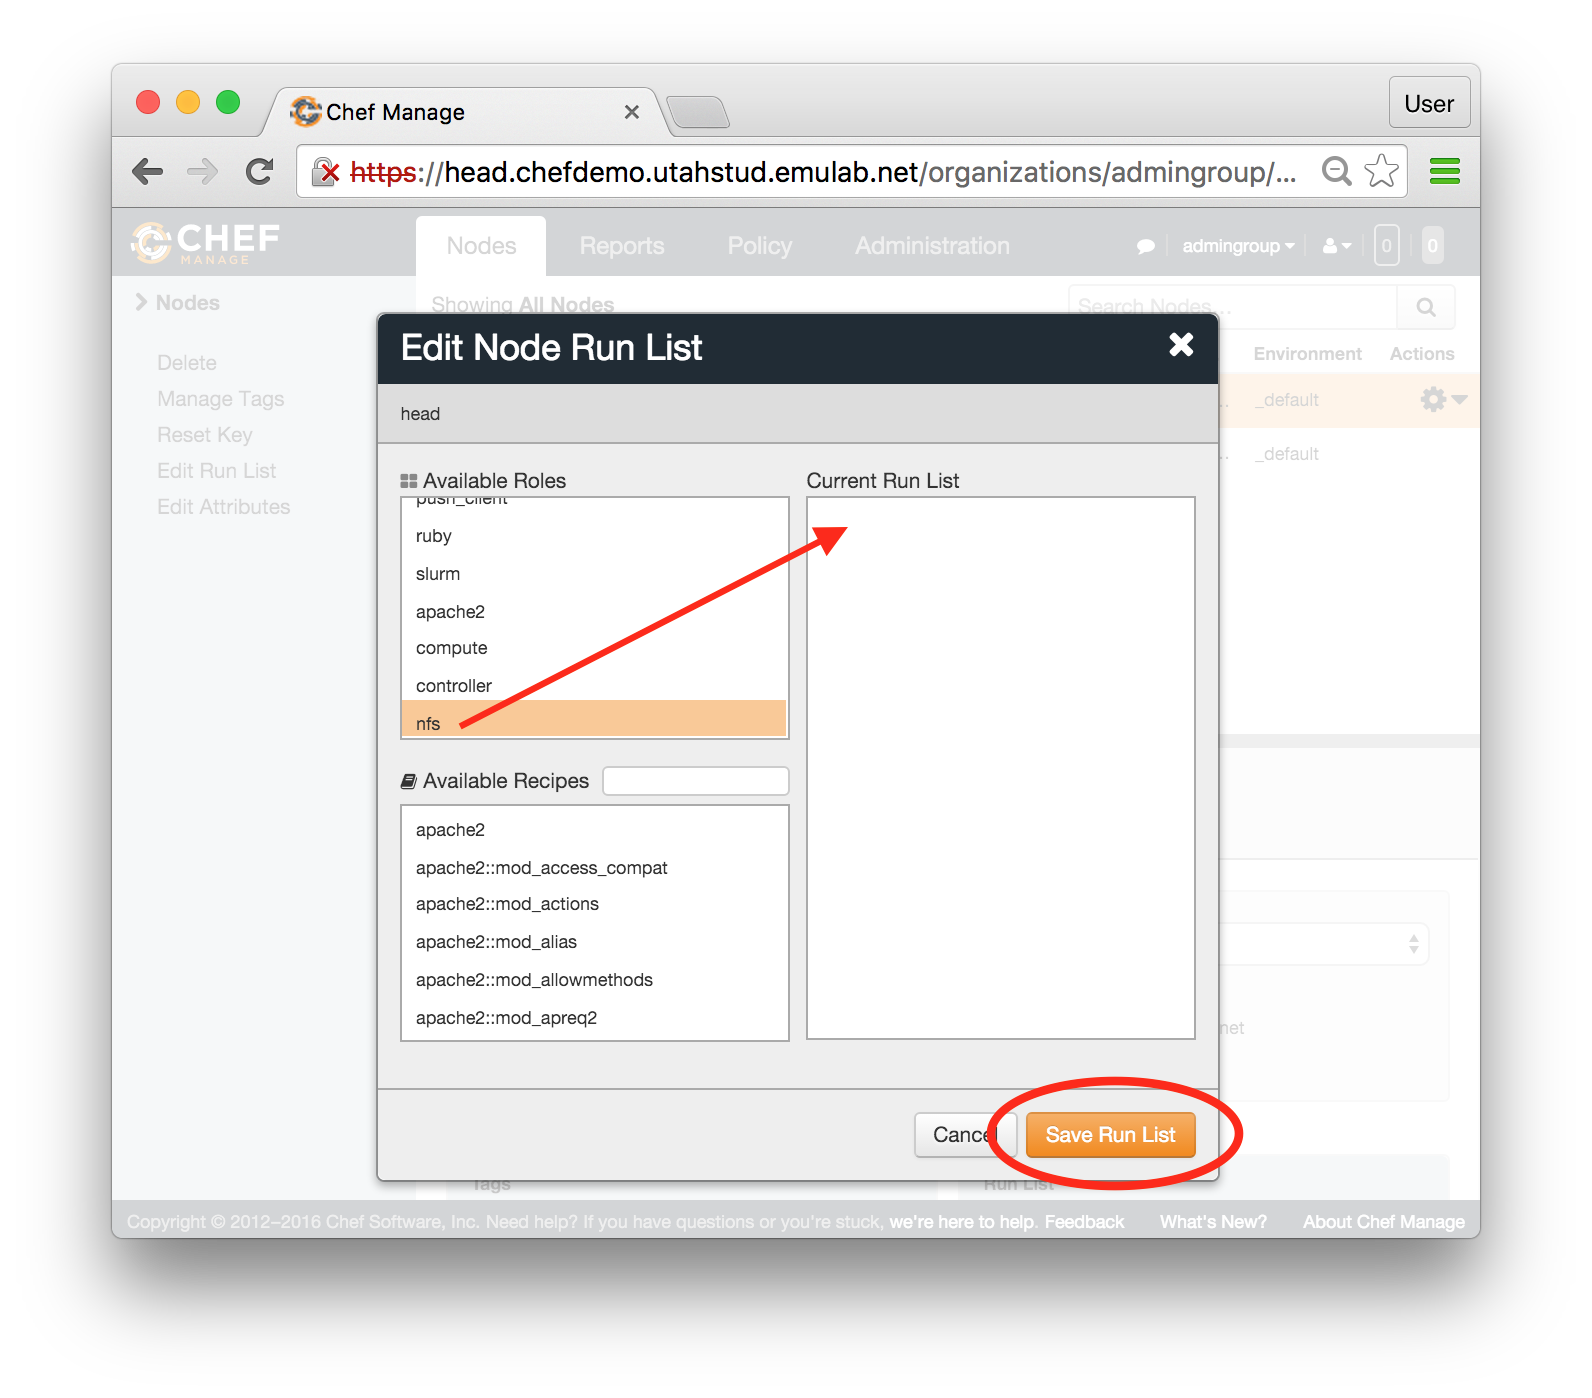
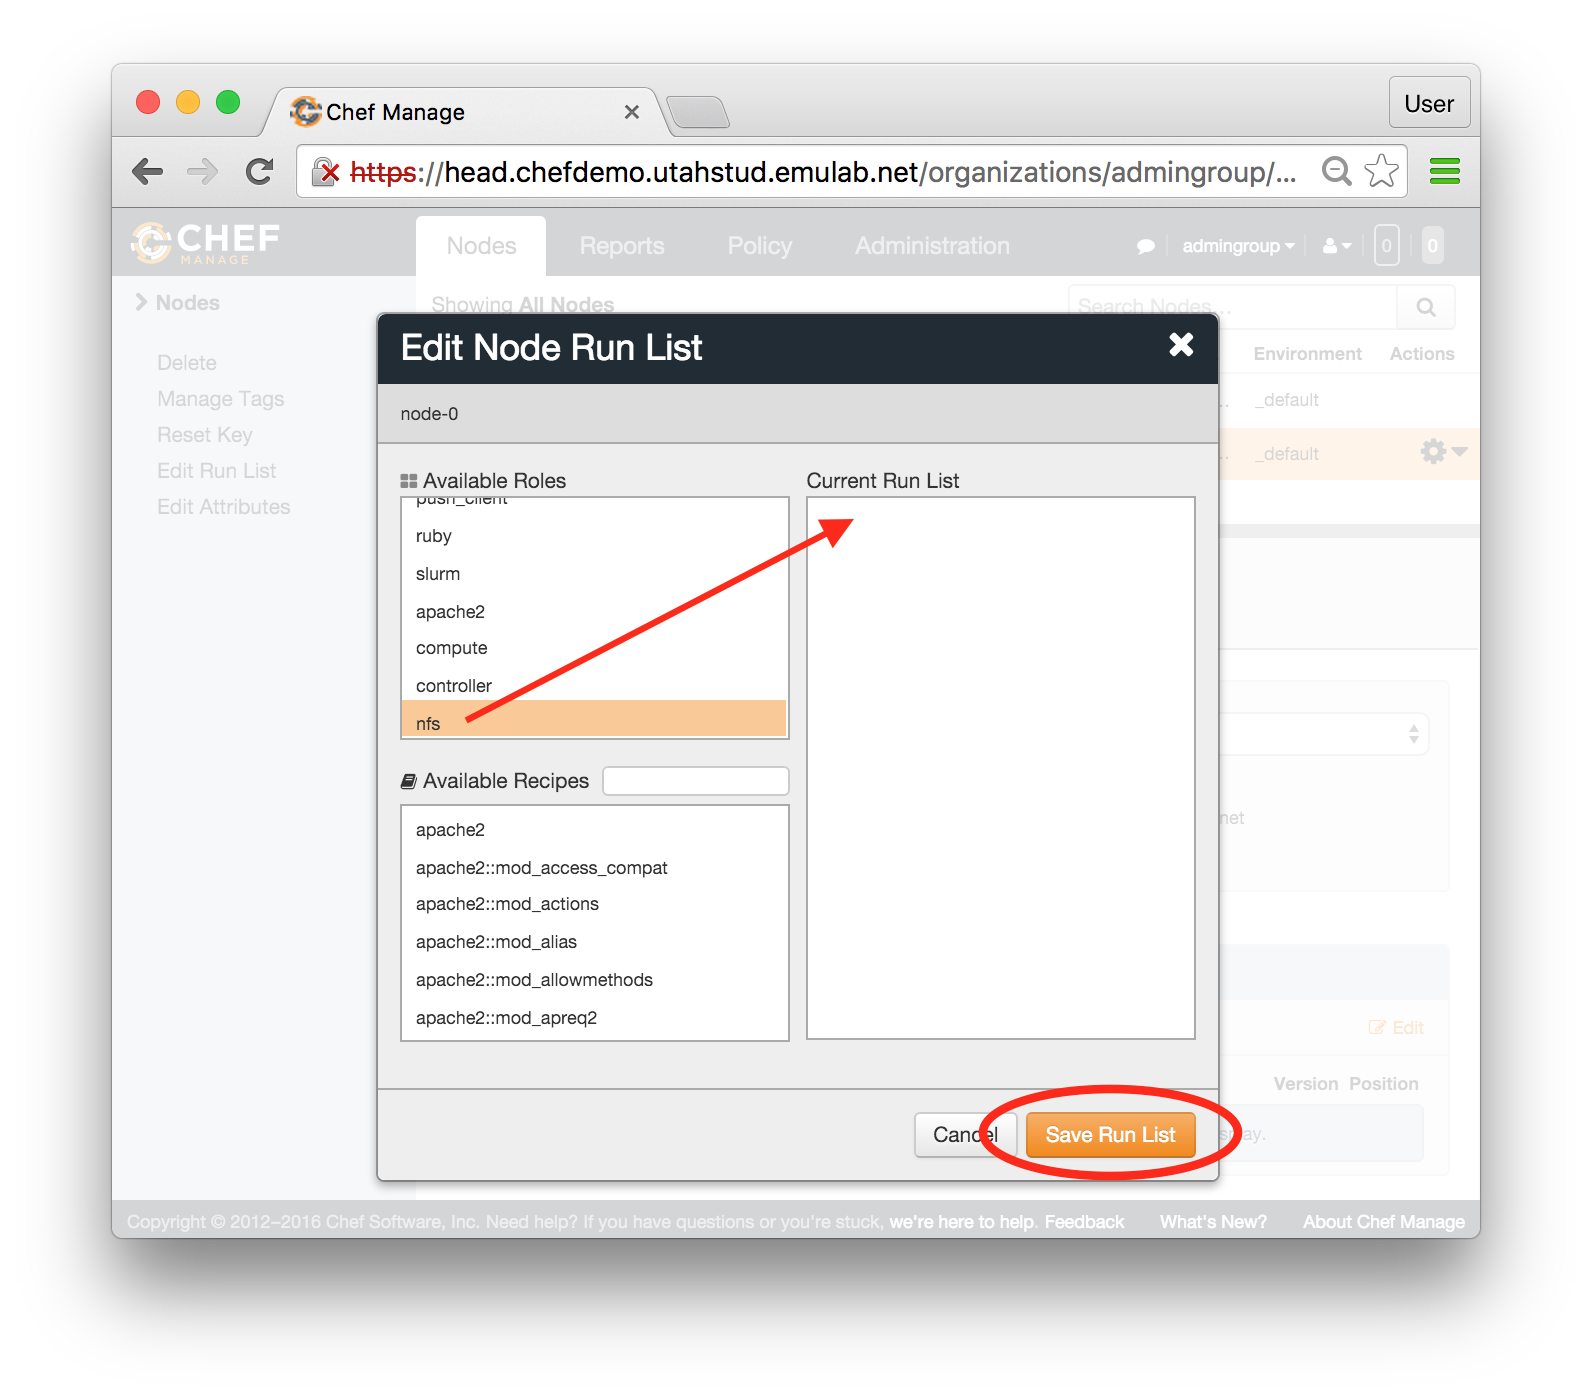
- Apply nfs role:In the popup window, find the role called nfs in the Available Roles list on the left, drag and drop it into the "Current Run List" field on the right. When this is done, click "Save Run List".
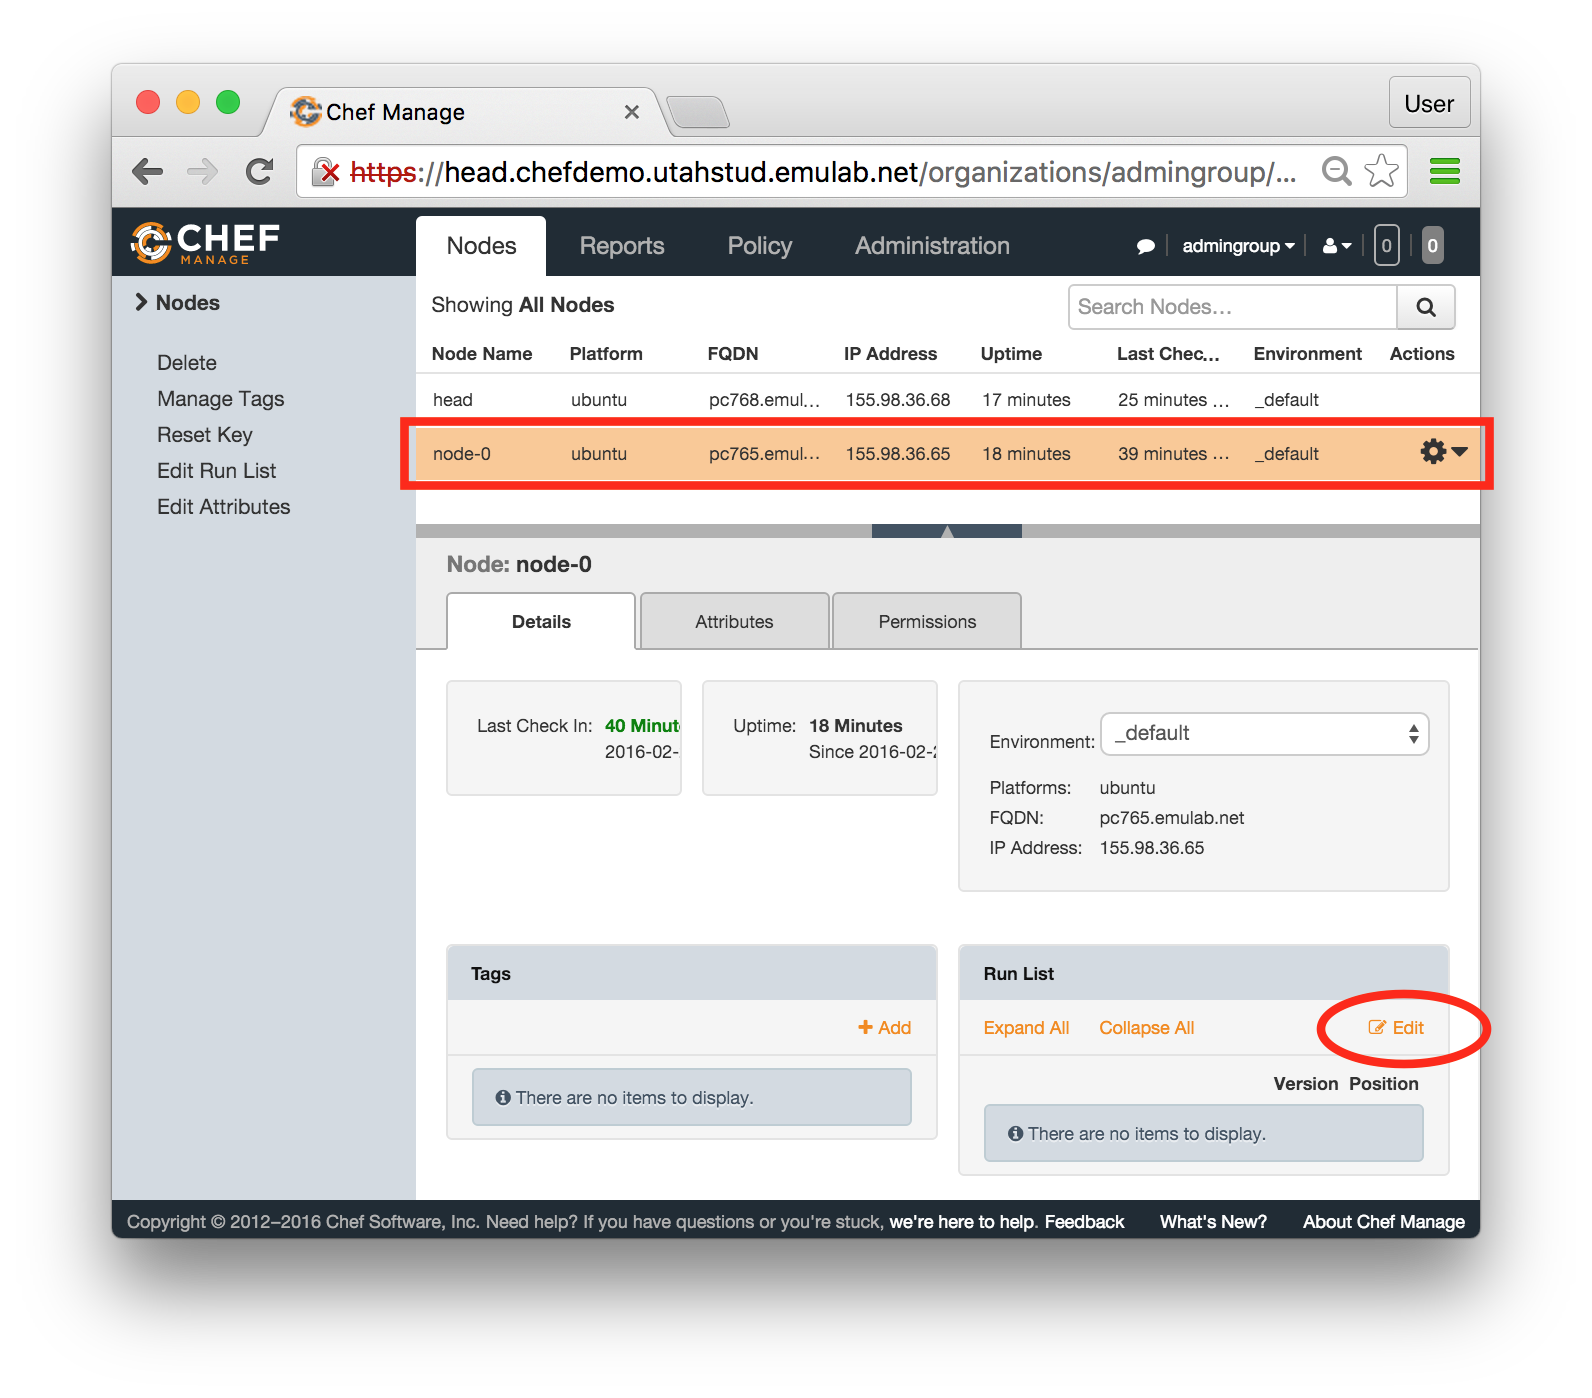
- Repeat the last two steps for node-0:
 At this point, nfs role is assigned to both nodes, but nothing has executed yet.
 - Check the status from the shellBefore proceeding to applying these updates, let’s check the role assignment from the shell by typing:
knife status -r
The run lists for your nodes should be printed inside square brackets: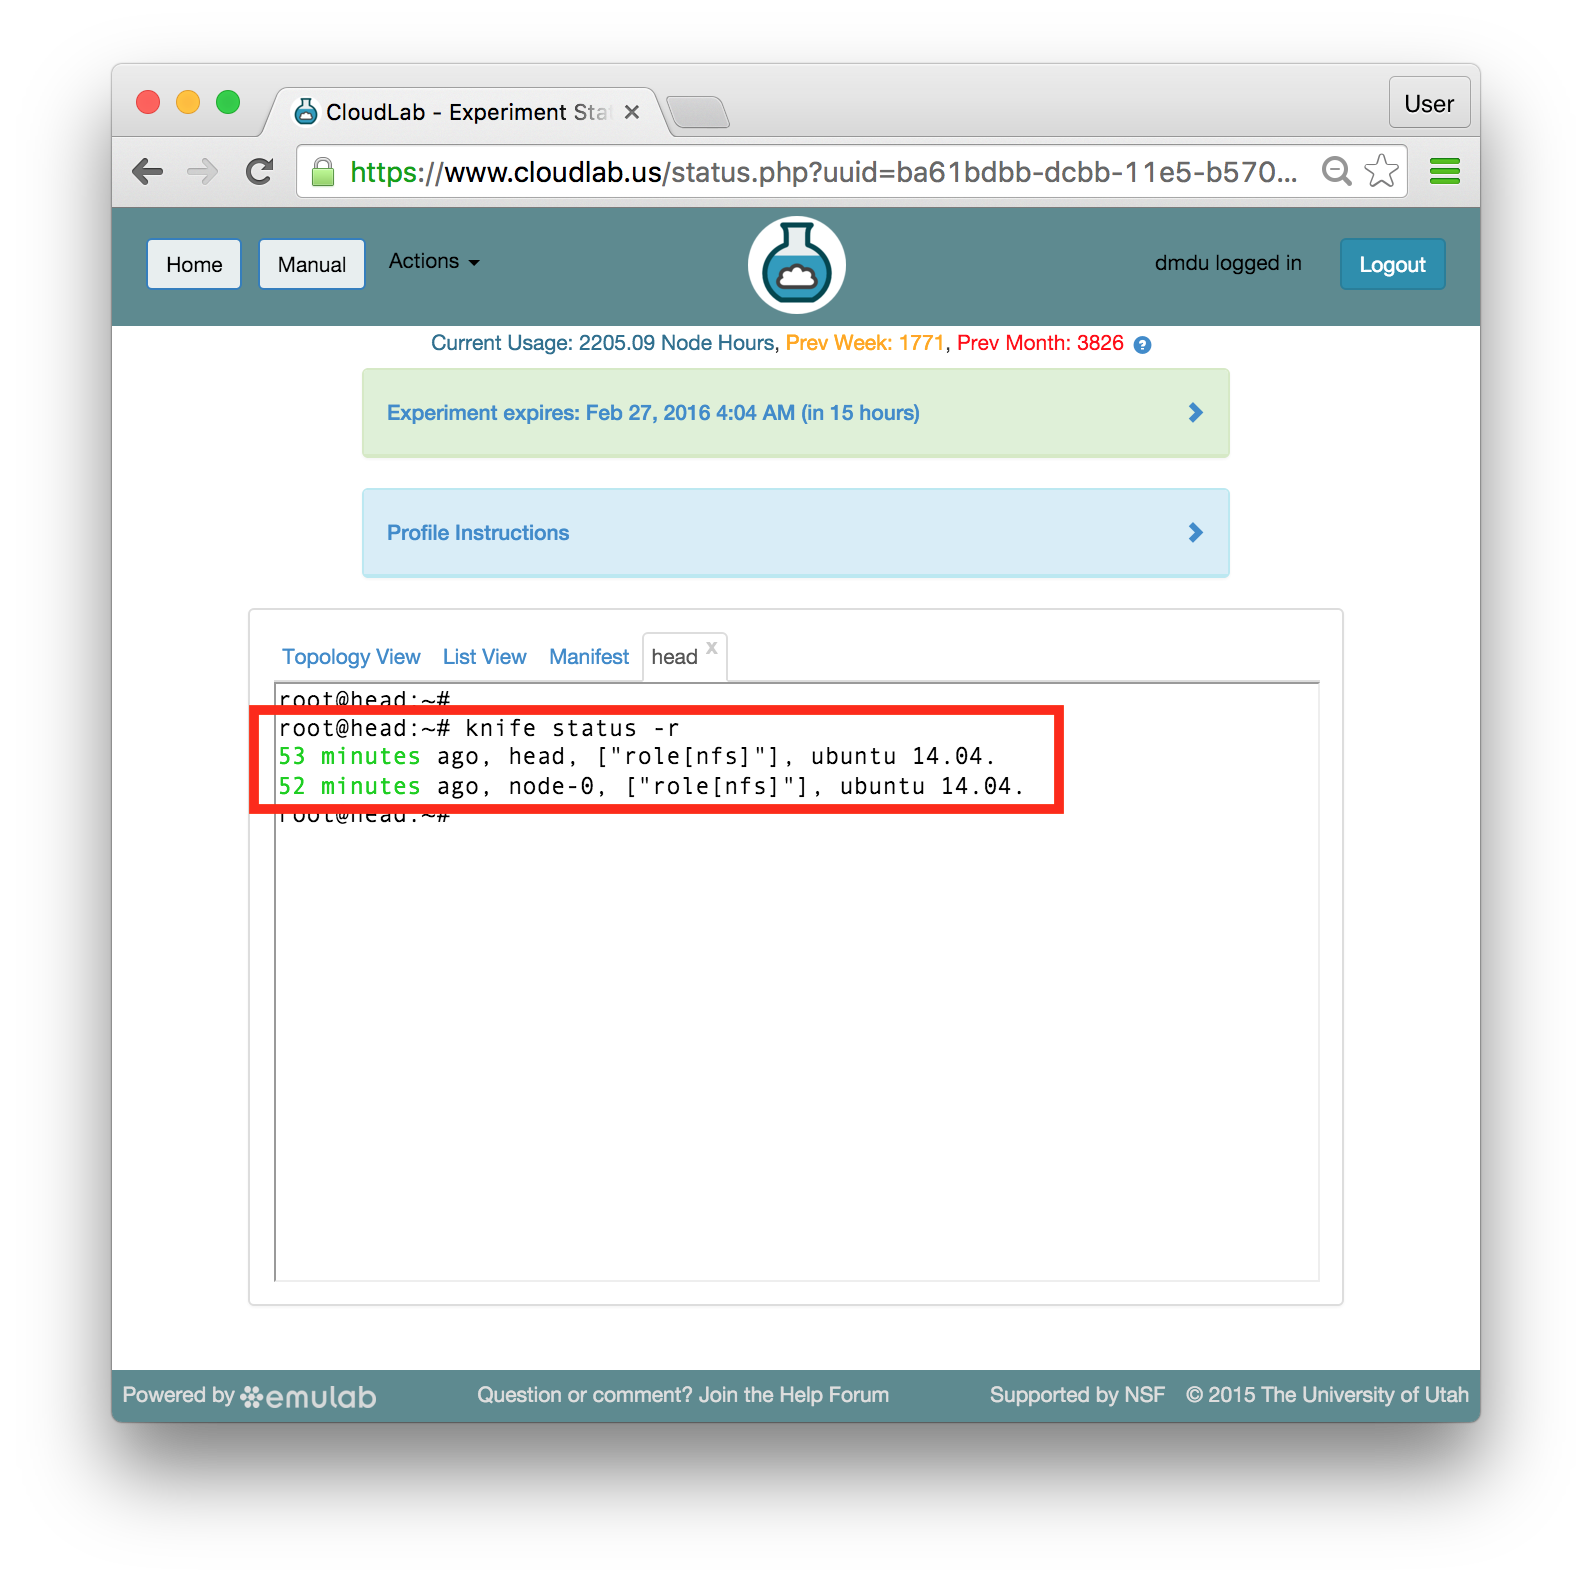 The output of this command also conveniently shows when Chef applied changes to your nodes last (first column) and what operating systems run on the nodes (last column).
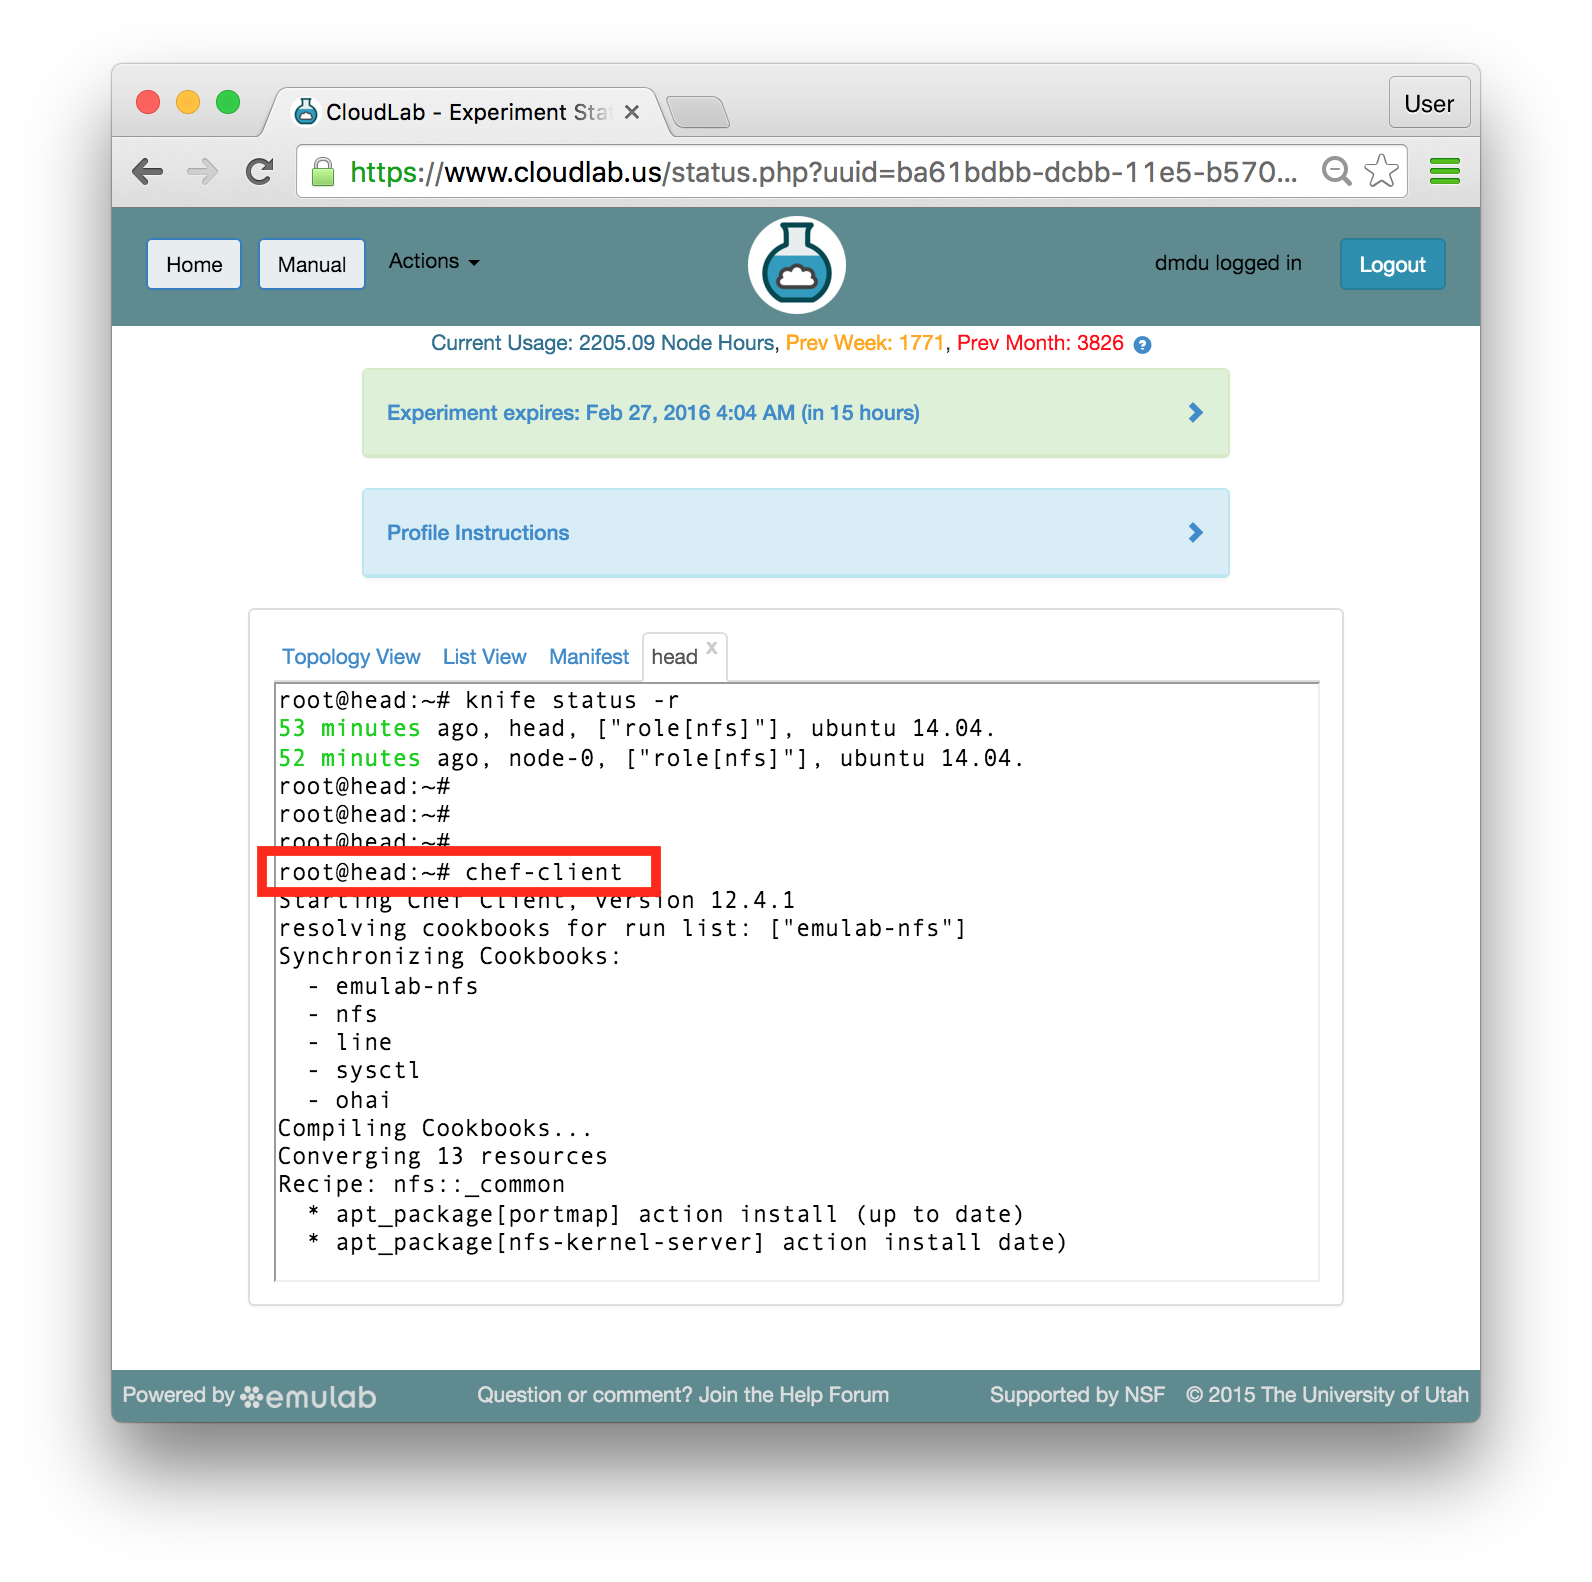
 - Trigger the updatesRun the assigned role on head by typing:
chef-client
 As a part of the startup procedure, passwordless ssh connections are enabled between the nodes. Therefore, you can use ssh to run commands remotely, on the nodes other than head, from the same shell. Execute the same command on node-0 by typing:
ssh node-0 chef-client
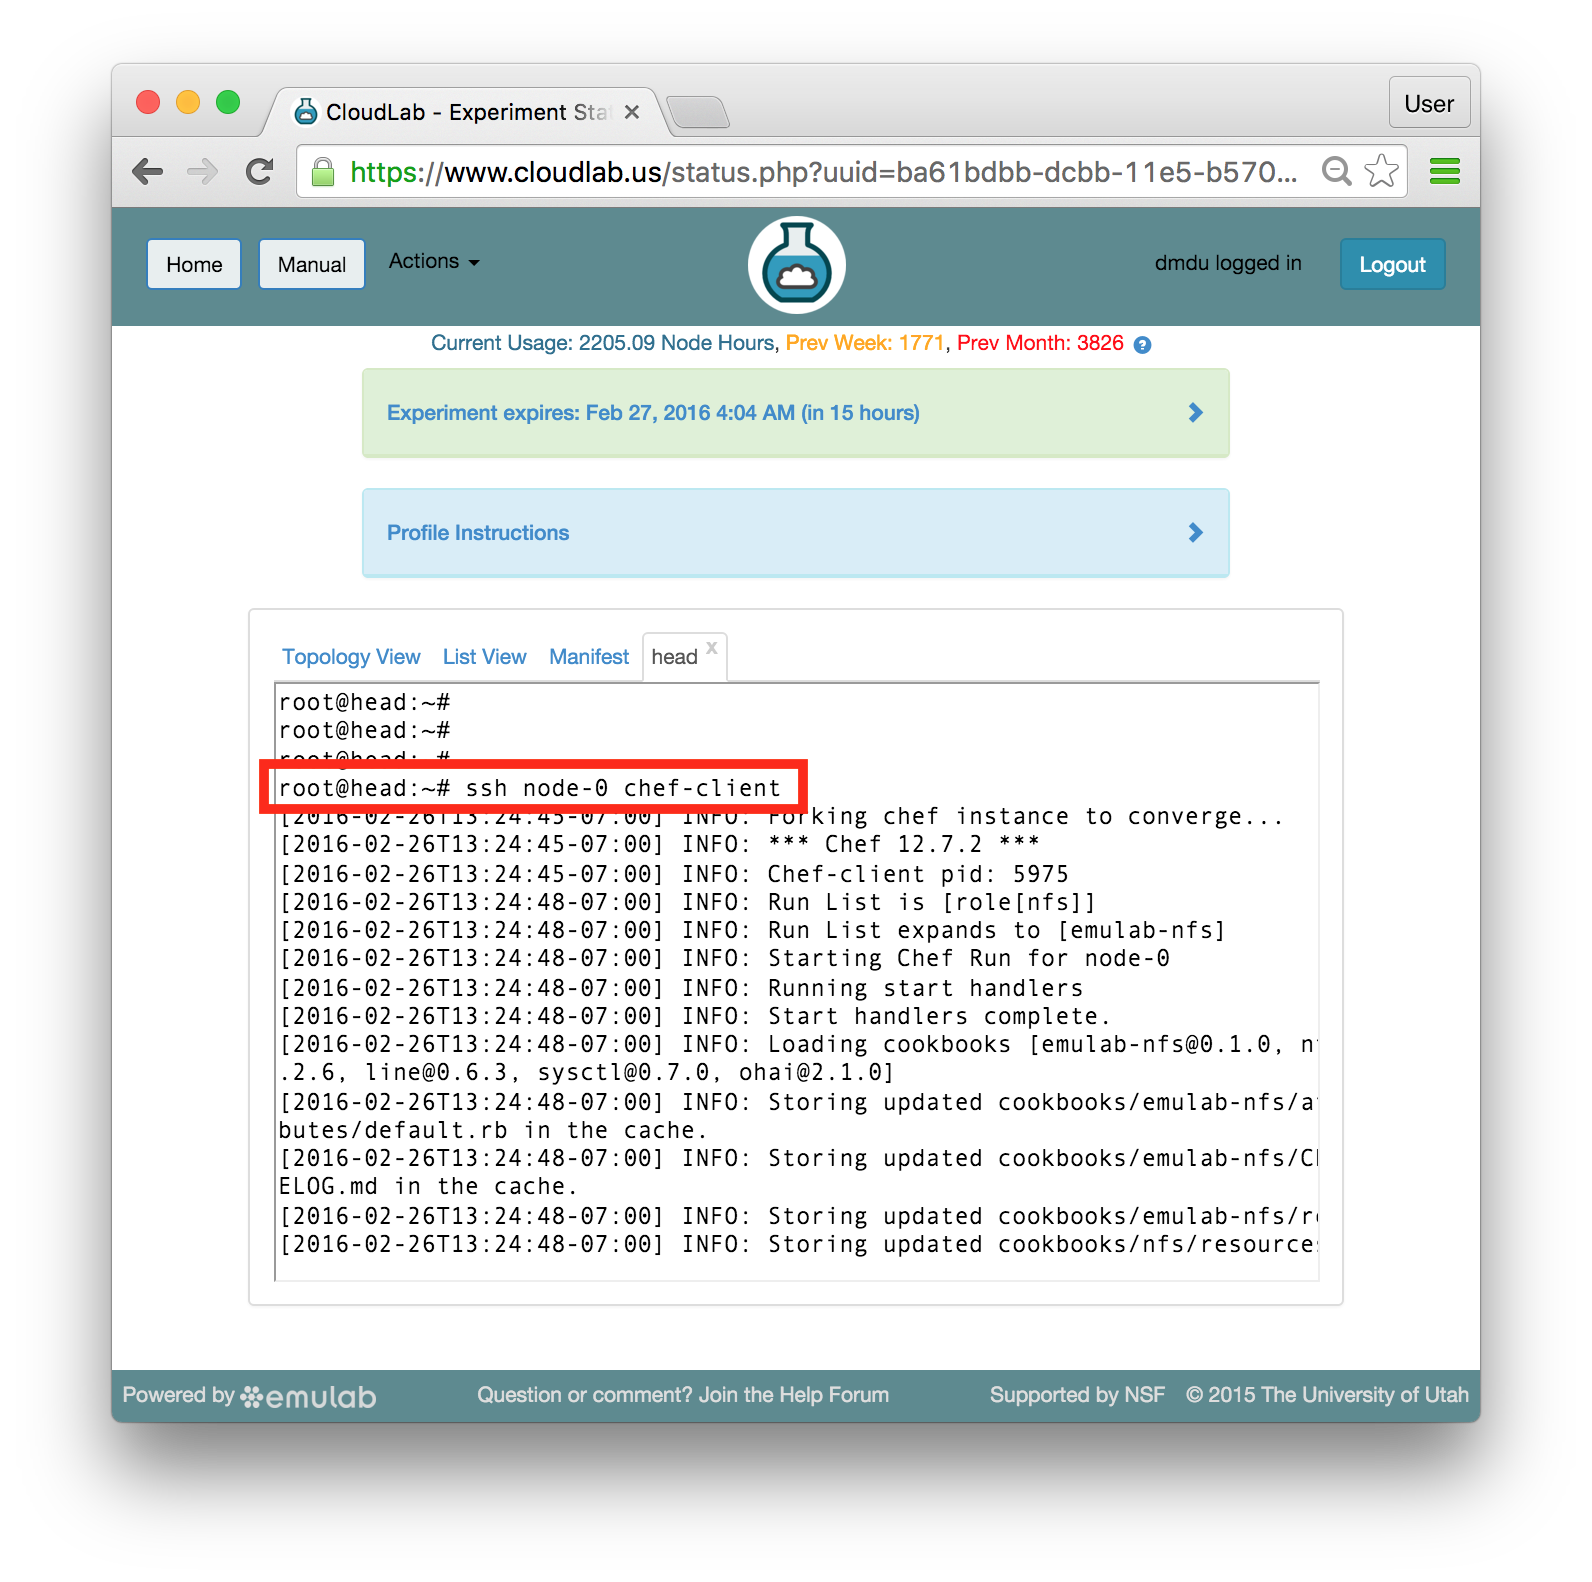 When nodes execute the “chef-client” command, they contact the server and request the cookbooks, recipes, and roles have been assigned to them in their run lists. The server responds with those artifacts, and the nodes execute them in the specified order.
 - Verify that NFS is workingAfter updating both nodes, you should have a working NFS configuration in which the /exp-share directory is exported from head and mounted on node-0.
The name of the NFS directory is one of the attributes that is set in the nfs role. To explore other attributes and see how this role is implemented, take a look at the /chef-repo/roles/nfs.rb file on head
The simplest way to test that this configuration is functioning properly is to create a file on one node and check that this file becomes available on the other node. Follow these commands to test it (the lines that start with the # sign are comments):# List files in the NFS directory /exp-share on head; should be empty
ls /exp-share/
# List the same directory remotely on node-0; also empty
ssh node-0 ls /exp-share/
# Create an empty file in this derectory locally
touch /exp-share/NFS-is-configured-by-Chef
# Find the same file on node-0
ssh node-0 ls /exp-share/
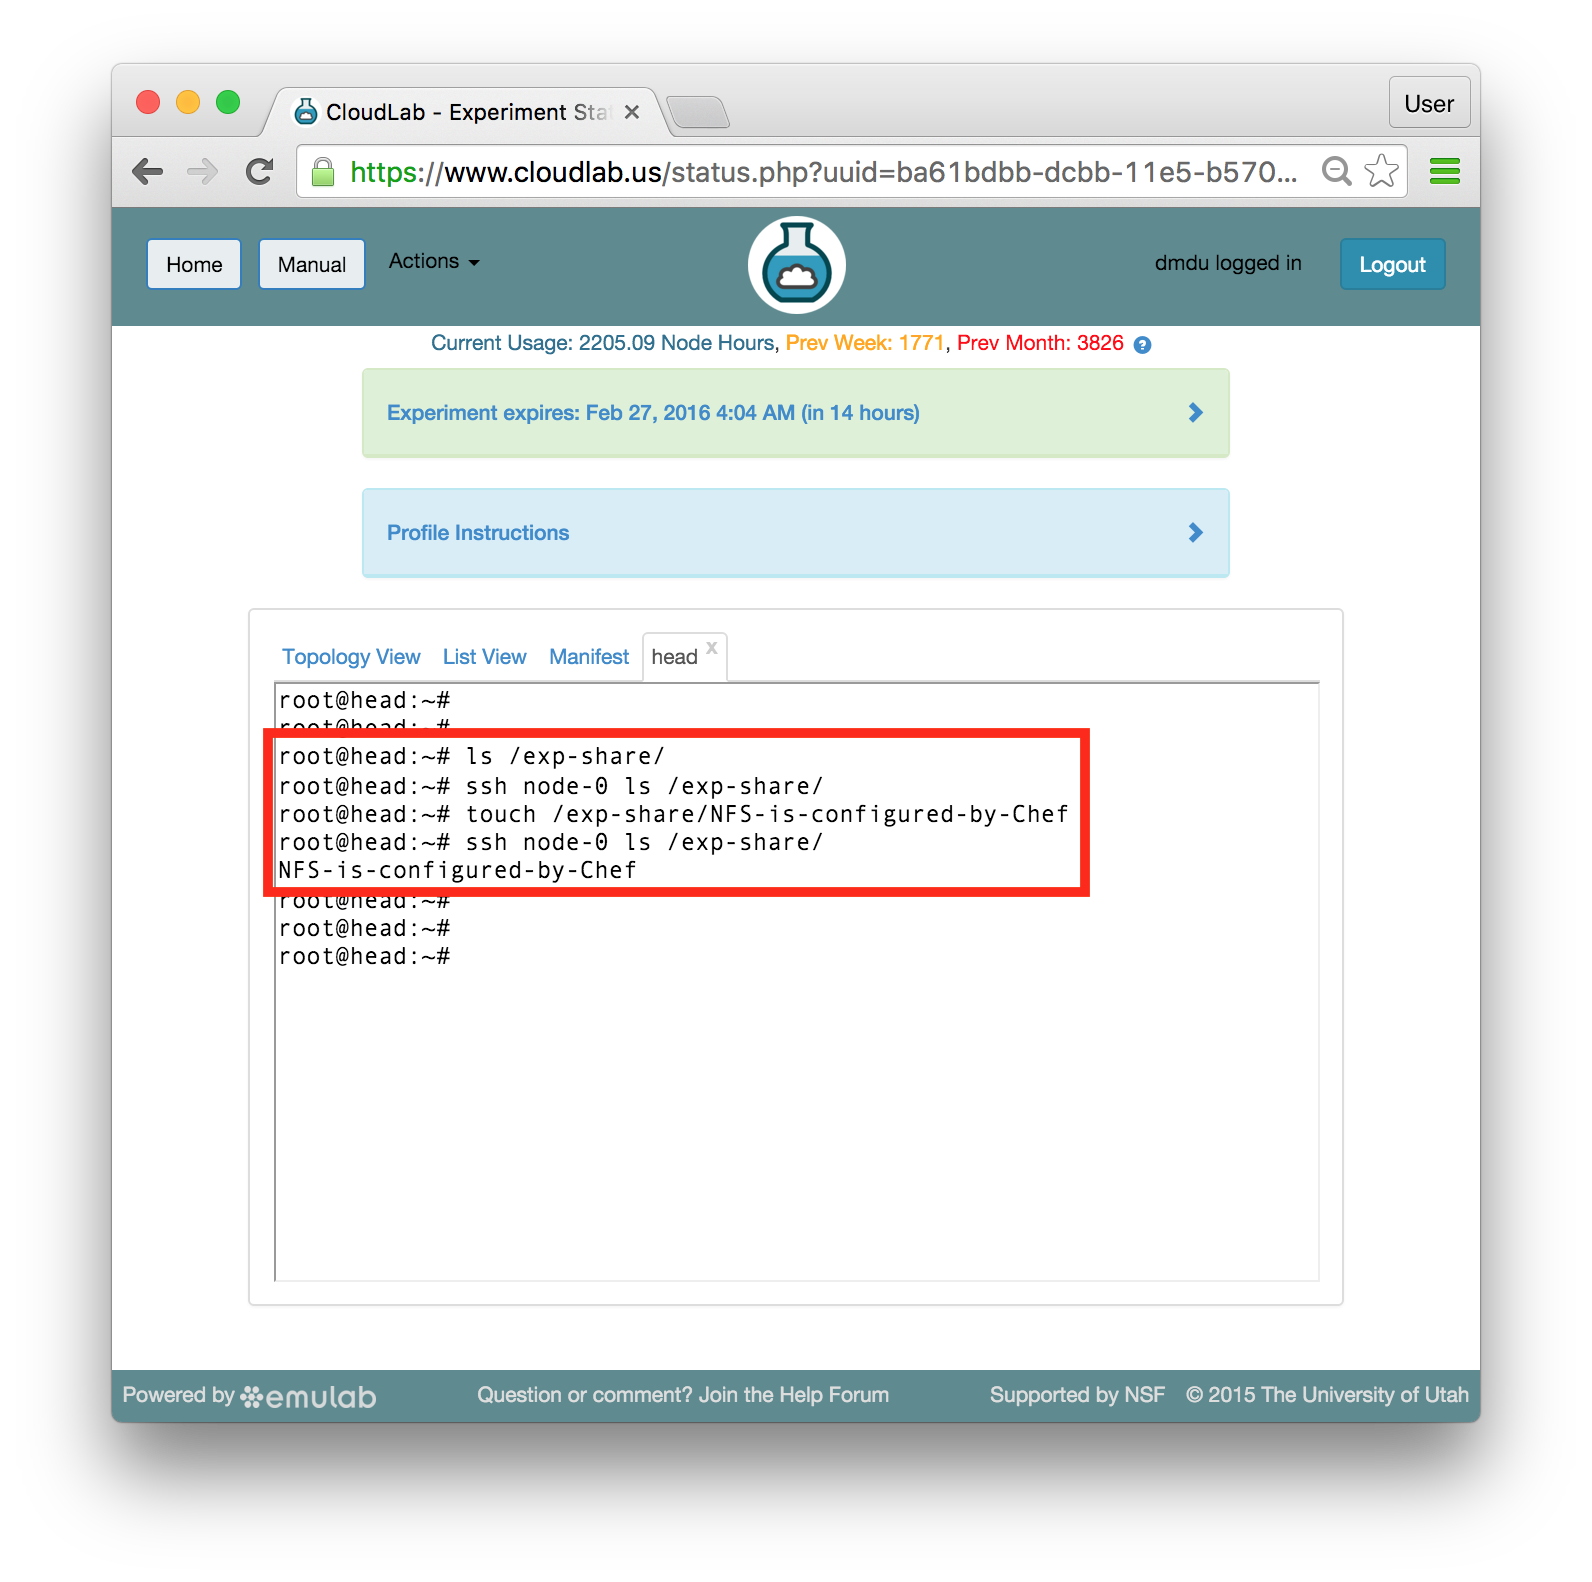 If you can see the created file on node-0, your NFS is working as expected. Now you can easily move files between your nodes using the /exp-share directory.
Summary: You have just installed and configured NFS by assigning a Chef role and running it on your nodes. You can create much more complex software environments by repeating these simple steps and installing more software components on your nodes. Additionally, installing NFS on a set of nodes is not a subject of a research experiment but rather an infrastructure prerequisite for many distributed systems. You can automate installation and configuration procedures in those systems using a system like Chef and save a lot of time when you need to periodically recreate them or create multiple instances of those systems.
15.9.1 Exploring The Structure
It is worth looking at how the role you have just used is implemented. Stored at /chef-repo/roles/nfs.rb on head, it should include the following code:
# |
# This role depends on the emulab-nfs cookbook; |
# emulab-nfs depends on the nfs cookbook |
# available at: https://supermarket.chef.io/cookbooks/nfs |
# Make sure it is installed; If it is not, try: knife cookbook site install nfs |
# |
name "nfs" |
description "Role applied to all NFS nodes - server and client" |
override_attributes( |
"nfs" => { |
"server" => "head", |
"dir" => "/exp-share", |
"export" => { |
"network" => "10.0.0.0/8", |
"writeable" => true |
} |
} |
) |
run_list [ "emulab-nfs" ] |
You can see a number of domain-specific Ruby attributes in this file. name and description are self-describing attributes. The override_attribute attribute allows you to control high-level configuration parameters, including (but not limited to) the name of the node running the NFS server, the directory being exported and mounted, the network in which this directory is shared, and the “write” permission in this directory (granted or not). The run_list attribute includes a single cookbook called emulab-nfs.
You are probably wondering now about how the same cookbook can perform different actions on different nodes. Indeed, the emulab-nfs cookbook has just installed NFS server on head and NFS client on node-0. You can take a look at the implementation of the default.rb, the default recipe in the emulab-nfs cookbook which gets called when the cookbook is executed. You should find the following code at /chef-repo/cookbooks/emulab-nfs/recipes/default.rb:
# |
# Cookbook Name:: emulab-nfs |
# Recipe:: default |
# |
|
if node["hostname"] == node["nfs"]["server"] |
include_recipe "emulab-nfs::export" |
else |
include_recipe "emulab-nfs::mount" |
end |
The if statement above allows comparing the hostname of the node on which the cookbook is running with one of the attributes specified in the role. Based on this comparison, the recipe takes the appropriate actions by calling the code from two other recipes in this cookbook. Optionally, you can explore /chef-repo/cookbooks/emulab-nfs/recipes/export.rb and /chef-repo/cookbooks/emulab-nfs/recipes/mount.rb to see how these recipes are implemented.
Obviously, this is not the only possible structure for this configuration. You can alternatively create two roles, such as nfs-server and nfs-client, that will call the corresponding recipes without the need for the described comparison. Since a single model cannot fit perfectly all scenarios, Chef provides the developer with enough flexibility to organize the code into structures that match specific environment and application needs.
15.10 Apache Web Server and ApacheBench Benchmarking tool
In this exercise, we are going to switch gears and experiment with
different software —
We recommend you to continue using the shell tab for head (again, make sure that your commands are executed as root). Run the commands described below in that shell.
- Add a role to the head’s run listIssue the command in bold (the rest is the expected output):
knife node run_list add head "role[apache2]"
head:
run_list:
role[nfs]
role[apache2]
- Add two roles to the node-0’s run listRun the two knife commands listed below (also on head) in order to assign two roles to node-0:
knife node run_list add node-0 "role[apache2]"
run_list:
head:
run_list:
role[nfs]
role[apache2]
knife node run_list add node-0 "role[apachebench]"
run_list:
head:
run_list:
role[nfs]
role[apache2]
role[apachebench]
Notice that we did not exclude the nfs role from the run lists. Configuration updates in Chef are idempotent, which means that an update can be applied to a node multiple times, and every time the update will yield identical configuration (regardless of the node’s previous state) Thus, this time, when you run “chef-client” again, Chef will do the right thing: the state of each individual component will be inspected, and all NFS-related tasks will be silently skipped because NFS is already installed. - Trigger updates on all nodesIn the previous section, we updated one node at a time. Try the “batch” update - run a single command that will trigger configuration procedures on all client nodes:
knife ssh "name:*" chef-client
apt155.apt.emulab.net resolving cookbooks for run list:
["emulab-nfs", "apache2", "apache2::mod_autoindex", "emulab-apachebench"]
apt154.apt.emulab.net resolving cookbooks for run list:
["emulab-nfs", "apache2", "apache2::mod_autoindex"]
apt155.apt.emulab.net Synchronizing Cookbooks:
....
apt155.apt.emulab.net Chef Client finished, 5/123 resources updated in 04 seconds
You should see interleaved output from the “chef-client” command running on both nodes at the same time.The last command uses a node search based on the “name:*” criteria. As a result, every node will execute “chef-client”. In cases where it is necessary, you can use more specific search strings, such as, for instance, “name:head” and “name:node-*”. - Check that the webservers are runningOne of the attributes in the apache2 role configures the web server such that it runs on the port 8080. Let’s check that the web servers are running via checking the status of that port:
knife ssh "name:*" "netstat -ntpl | grep 8080"
pc765.emulab.net tcp6 0 0 :::8080 :::* LISTEN 9415/apache2
pc768.emulab.net tcp6 0 0 :::8080 :::* LISTEN 30248/apache2
Note that this command sends an arbitrary command (unrelated to Chef) to a group of nodes. With this functionality, the knife command-line utility can be viewed as an orchestration tool for managing groups of nodes that is capable of replacing pdsh, the Parallel Distributed Shell utility, that is often used on computing clusters.The output that is similar to the one above indicates that both apache2 web servers are running. The command that you have just issued uses netstat, a command-line tool that displays network connections, routing tables, interface statistics, etc. Using knife, you have run netstat in combination with a Linux pipe and a grep command for filtering output and displaying the information only on the port 8080. - Check benchmarking results on node-0Many different actions have taken place on node-0, including:
apache2 has been installed and configured
ab, a benchmarking tool from the apache2-utils package, has been installed and executed
benchmarking results have been saved, and plots have been created using the gnuplot utility
the plots have been made available using the installed web server
To see how the last three tasks are performed using Chef, you can take a look at the default.rb recipe inside the emulab-apachebench cookbook. In the in-person tutorial, let’s proceed to the following steps and leave the discussion of this specific recipe and abstractions used in Chef recipes in general to the end of the tutorial.Obtain the node-0’s public hostname (refer to the list included in the profile instructions), and construct the following URL:http://<node-0's public hostname>:8080
With the right hostname, copy and paste this URL into your browser to access the web server running on node-0 and serving the benchmarking graphs. You should see a directory listing like this: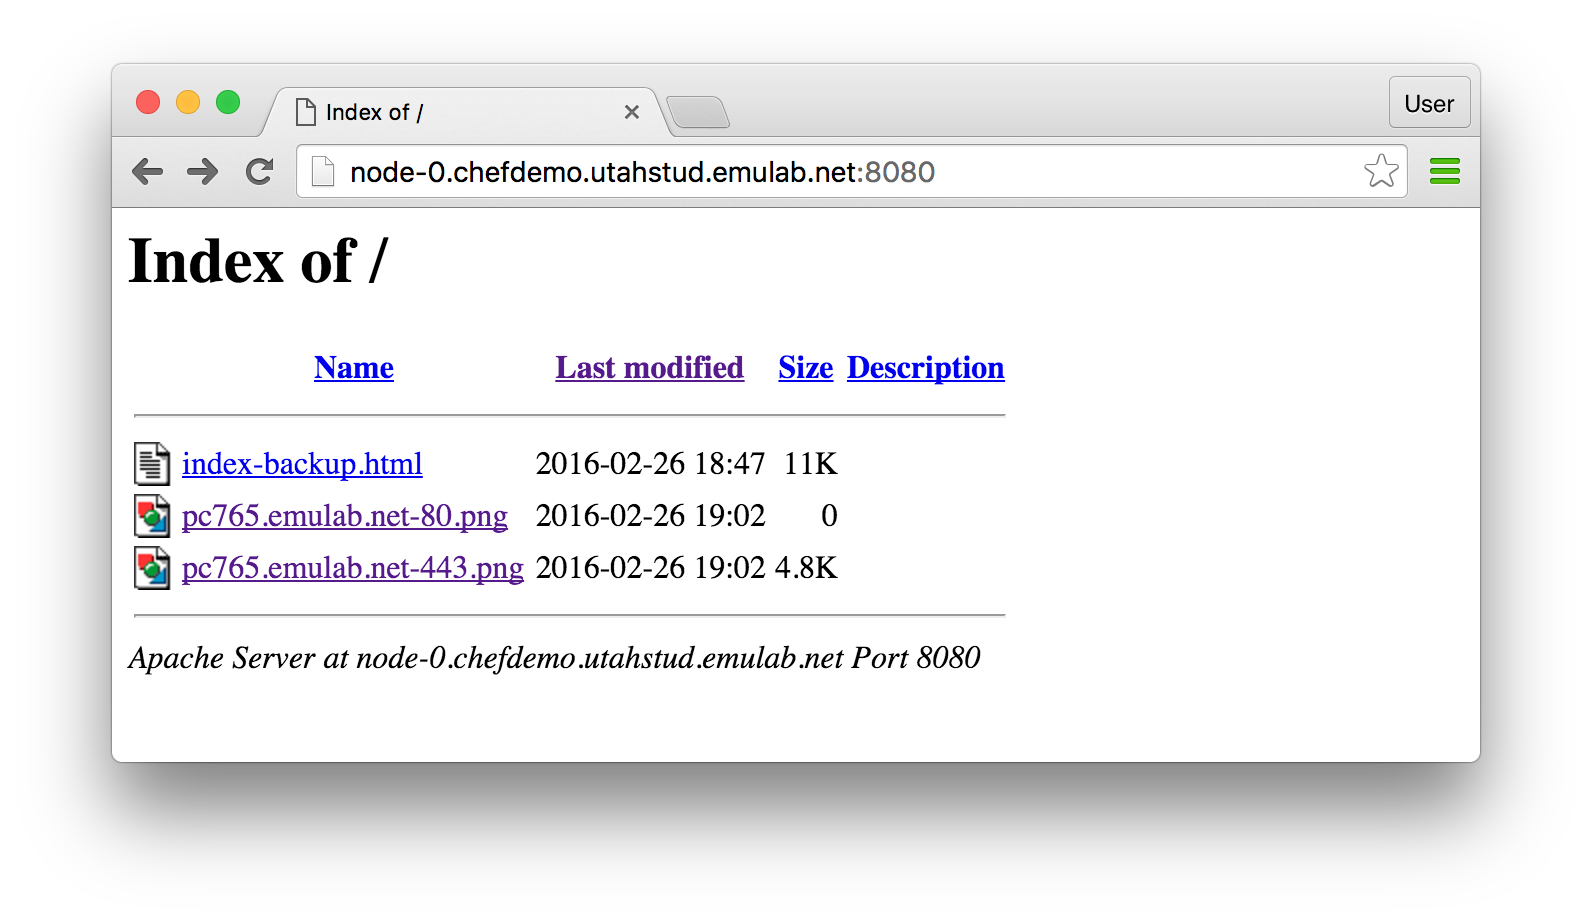 You can explore the benchmarking graphs by clicking at the listed links. So far, ab has run against the local host (i.e. node-0), therefore the results may not be so interesting. Do not close the window with your browser since one of the following steps will ask you to go back to it to see more results.
 - Modify a roleJust like the nfs role described in the previous section, apachebench has a number of attributes that define its behavior. We will use the Chef web console to update the value for one of its attributes.In the console, click on the Policy tab at the top of the page, choose “Roles” in the panel on the left, and select “apachebench” in the displayed list of roles. Select the Attributes tab in the middle of the page. At the bottom of the page, you should now see a panel called “Override Attributes”. Click the “Edit” button inside that panel:
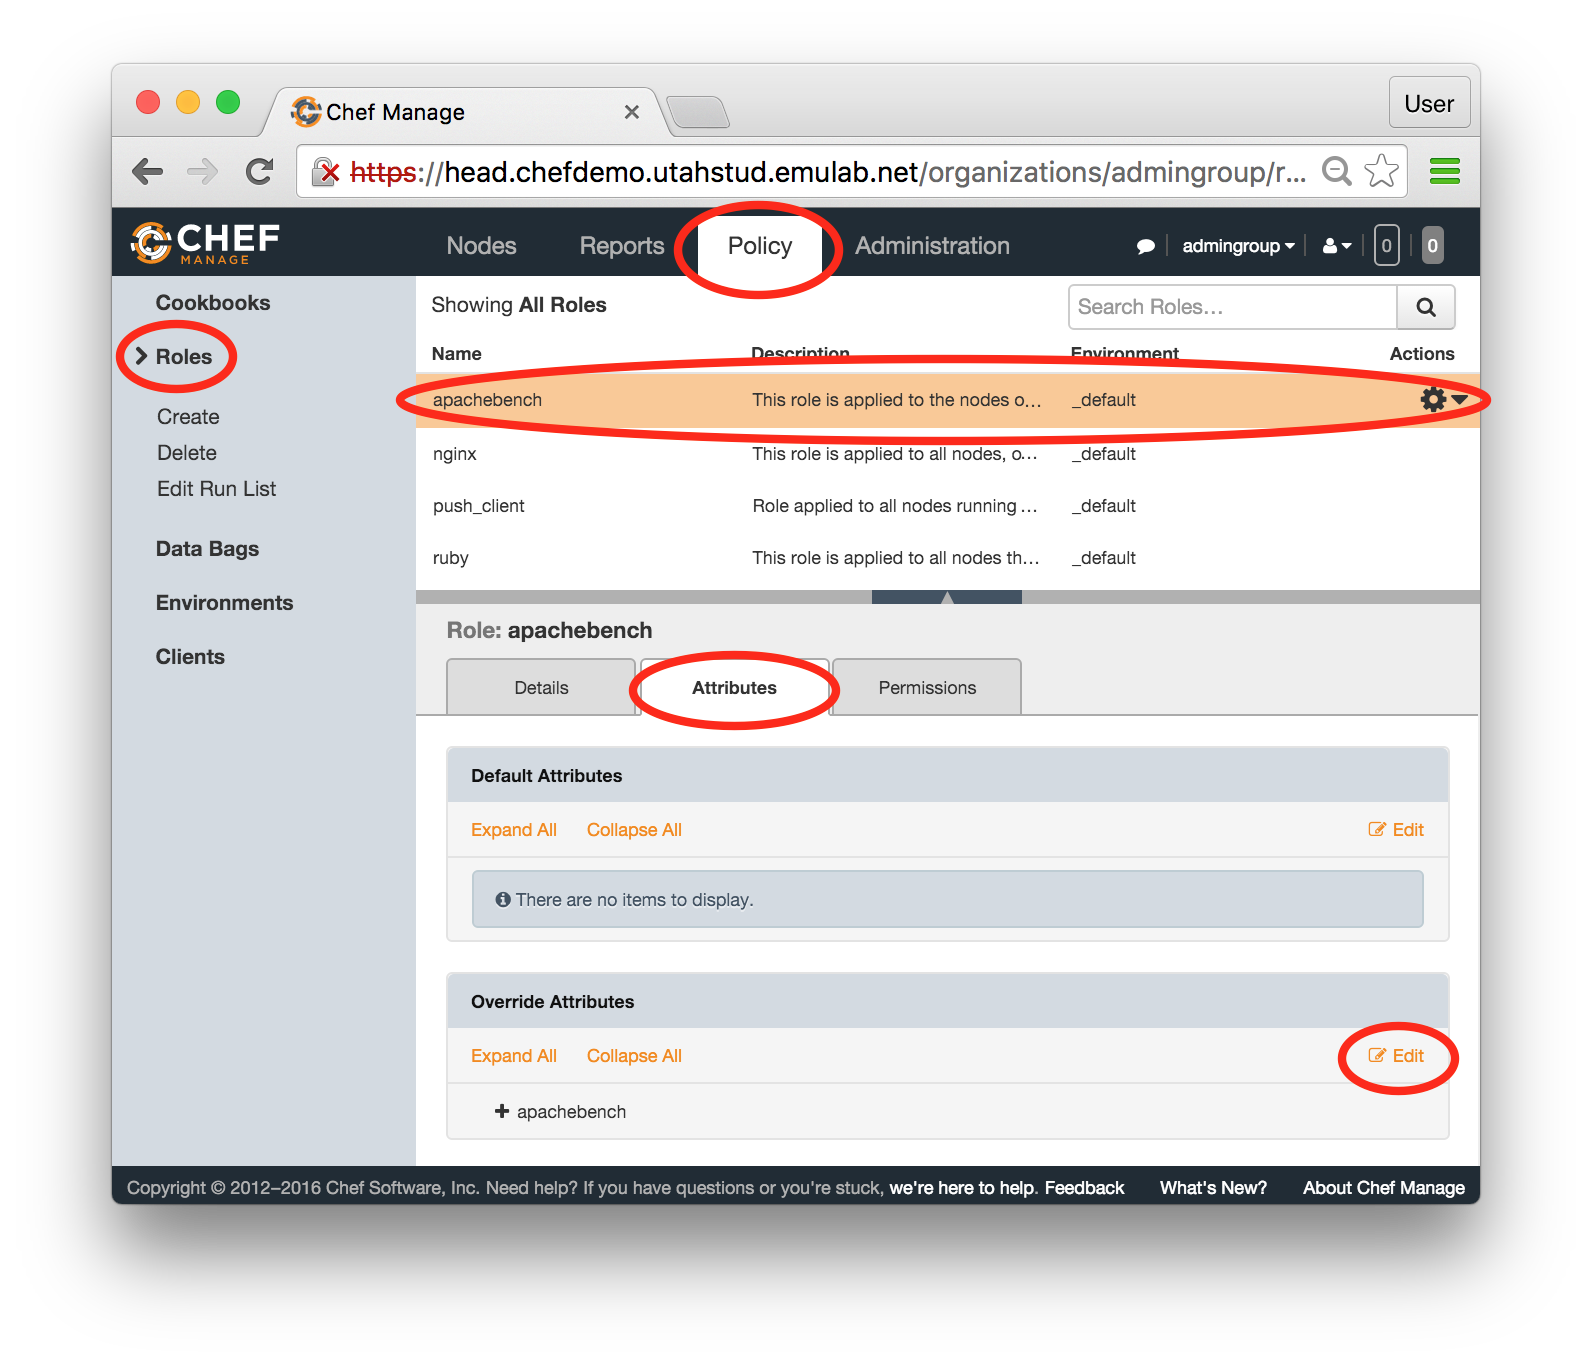 In the popup window, change the target_host attribute from null to the head’s public hostname (refer to the hostnames listed in the profile instructions). Don’t forget to use double quotes around the hostname. Also, let’s modify the list of ports against which we will run the benchmark. Change 80 to 8080 since nothing interesting is running on port 80, while the apache2 server you have just installed is listening on the port 8080. Leave the port 443 in the list —
this is the port on which the Chef web console is running. Here is an example of the recommended changes: 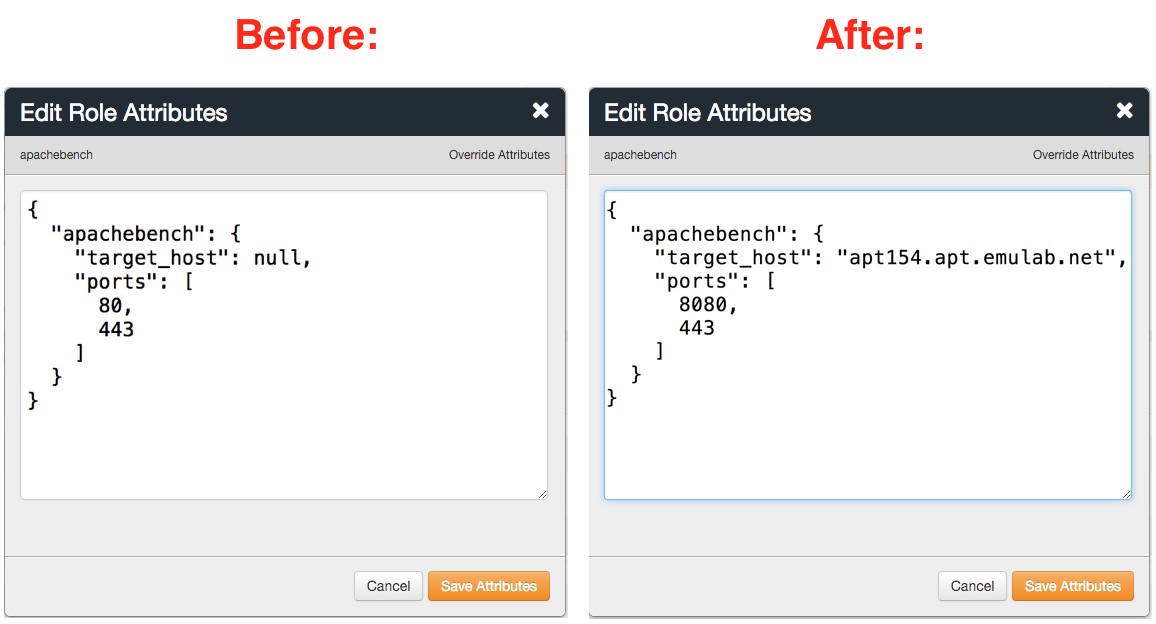 When these changes are complete, click "Save Attributes".Alternative: It turns out that you don’t have to use the Chef web console for modifying this role. Take a look at the two steps described below to see how we can modify this role from the shell or skip to running the benchmark.This is what you need to make the described changes without using the web console:
Edit the file /chef-repo/roles/apachebench.rb on head using a text editor of your choice (e.g., vi)
After making the suggested changes, “push” the updated role to the server by typing: knife role from file /chef-repo/roles/apachebench.rb
- Run the benchmark against headThe updated version of the role is available on the server now. You can run it on node-0 using the following command:
knife ssh "role:apachebench" chef-client
This command, unlike the knife commands you issued in the previous steps, uses a search based on the assigned roles. In other words, it will find the nodes to which the apachebench role has been assigned by now —in our case, only node-0 — and execute “chef-client” on them. - Check benchmarking results againGo back to your browser window and update the page to see the directory listing with new benchmarking results.
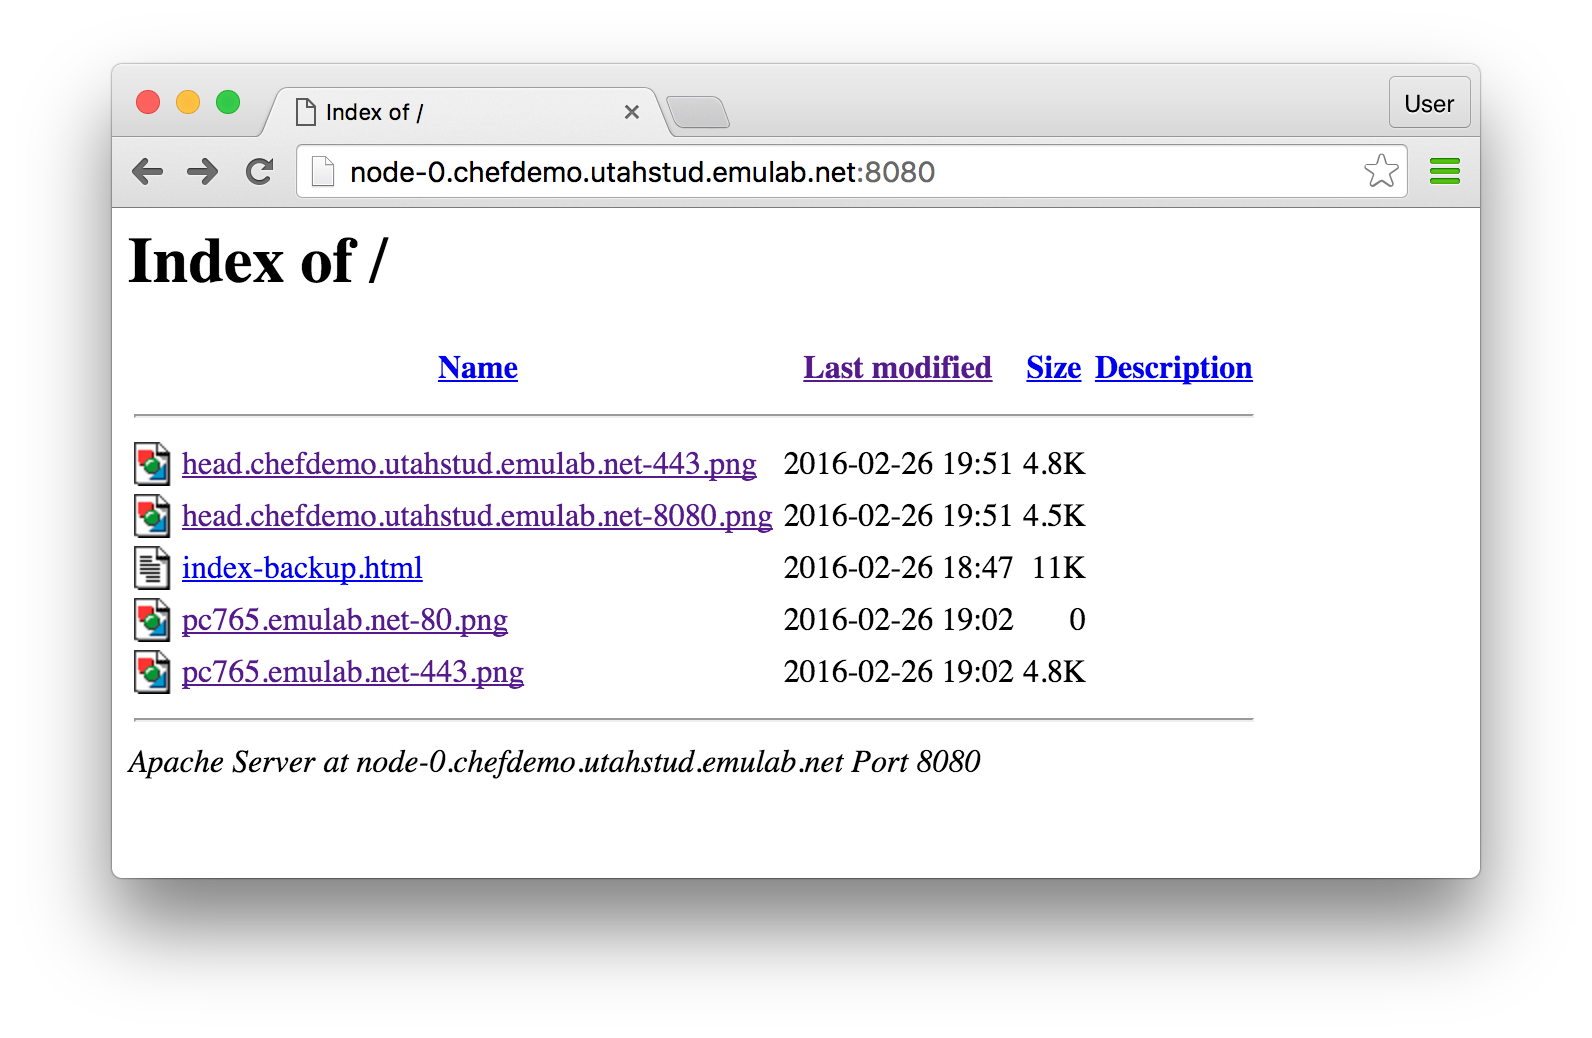 The first two (the most recent) graphs represent the results of benchmarking of the web services running on head performed from node-0. Among many interesting facts that are revealed by these graphs, you will see that the response time is much higher on the port 443 than on the port 8080.
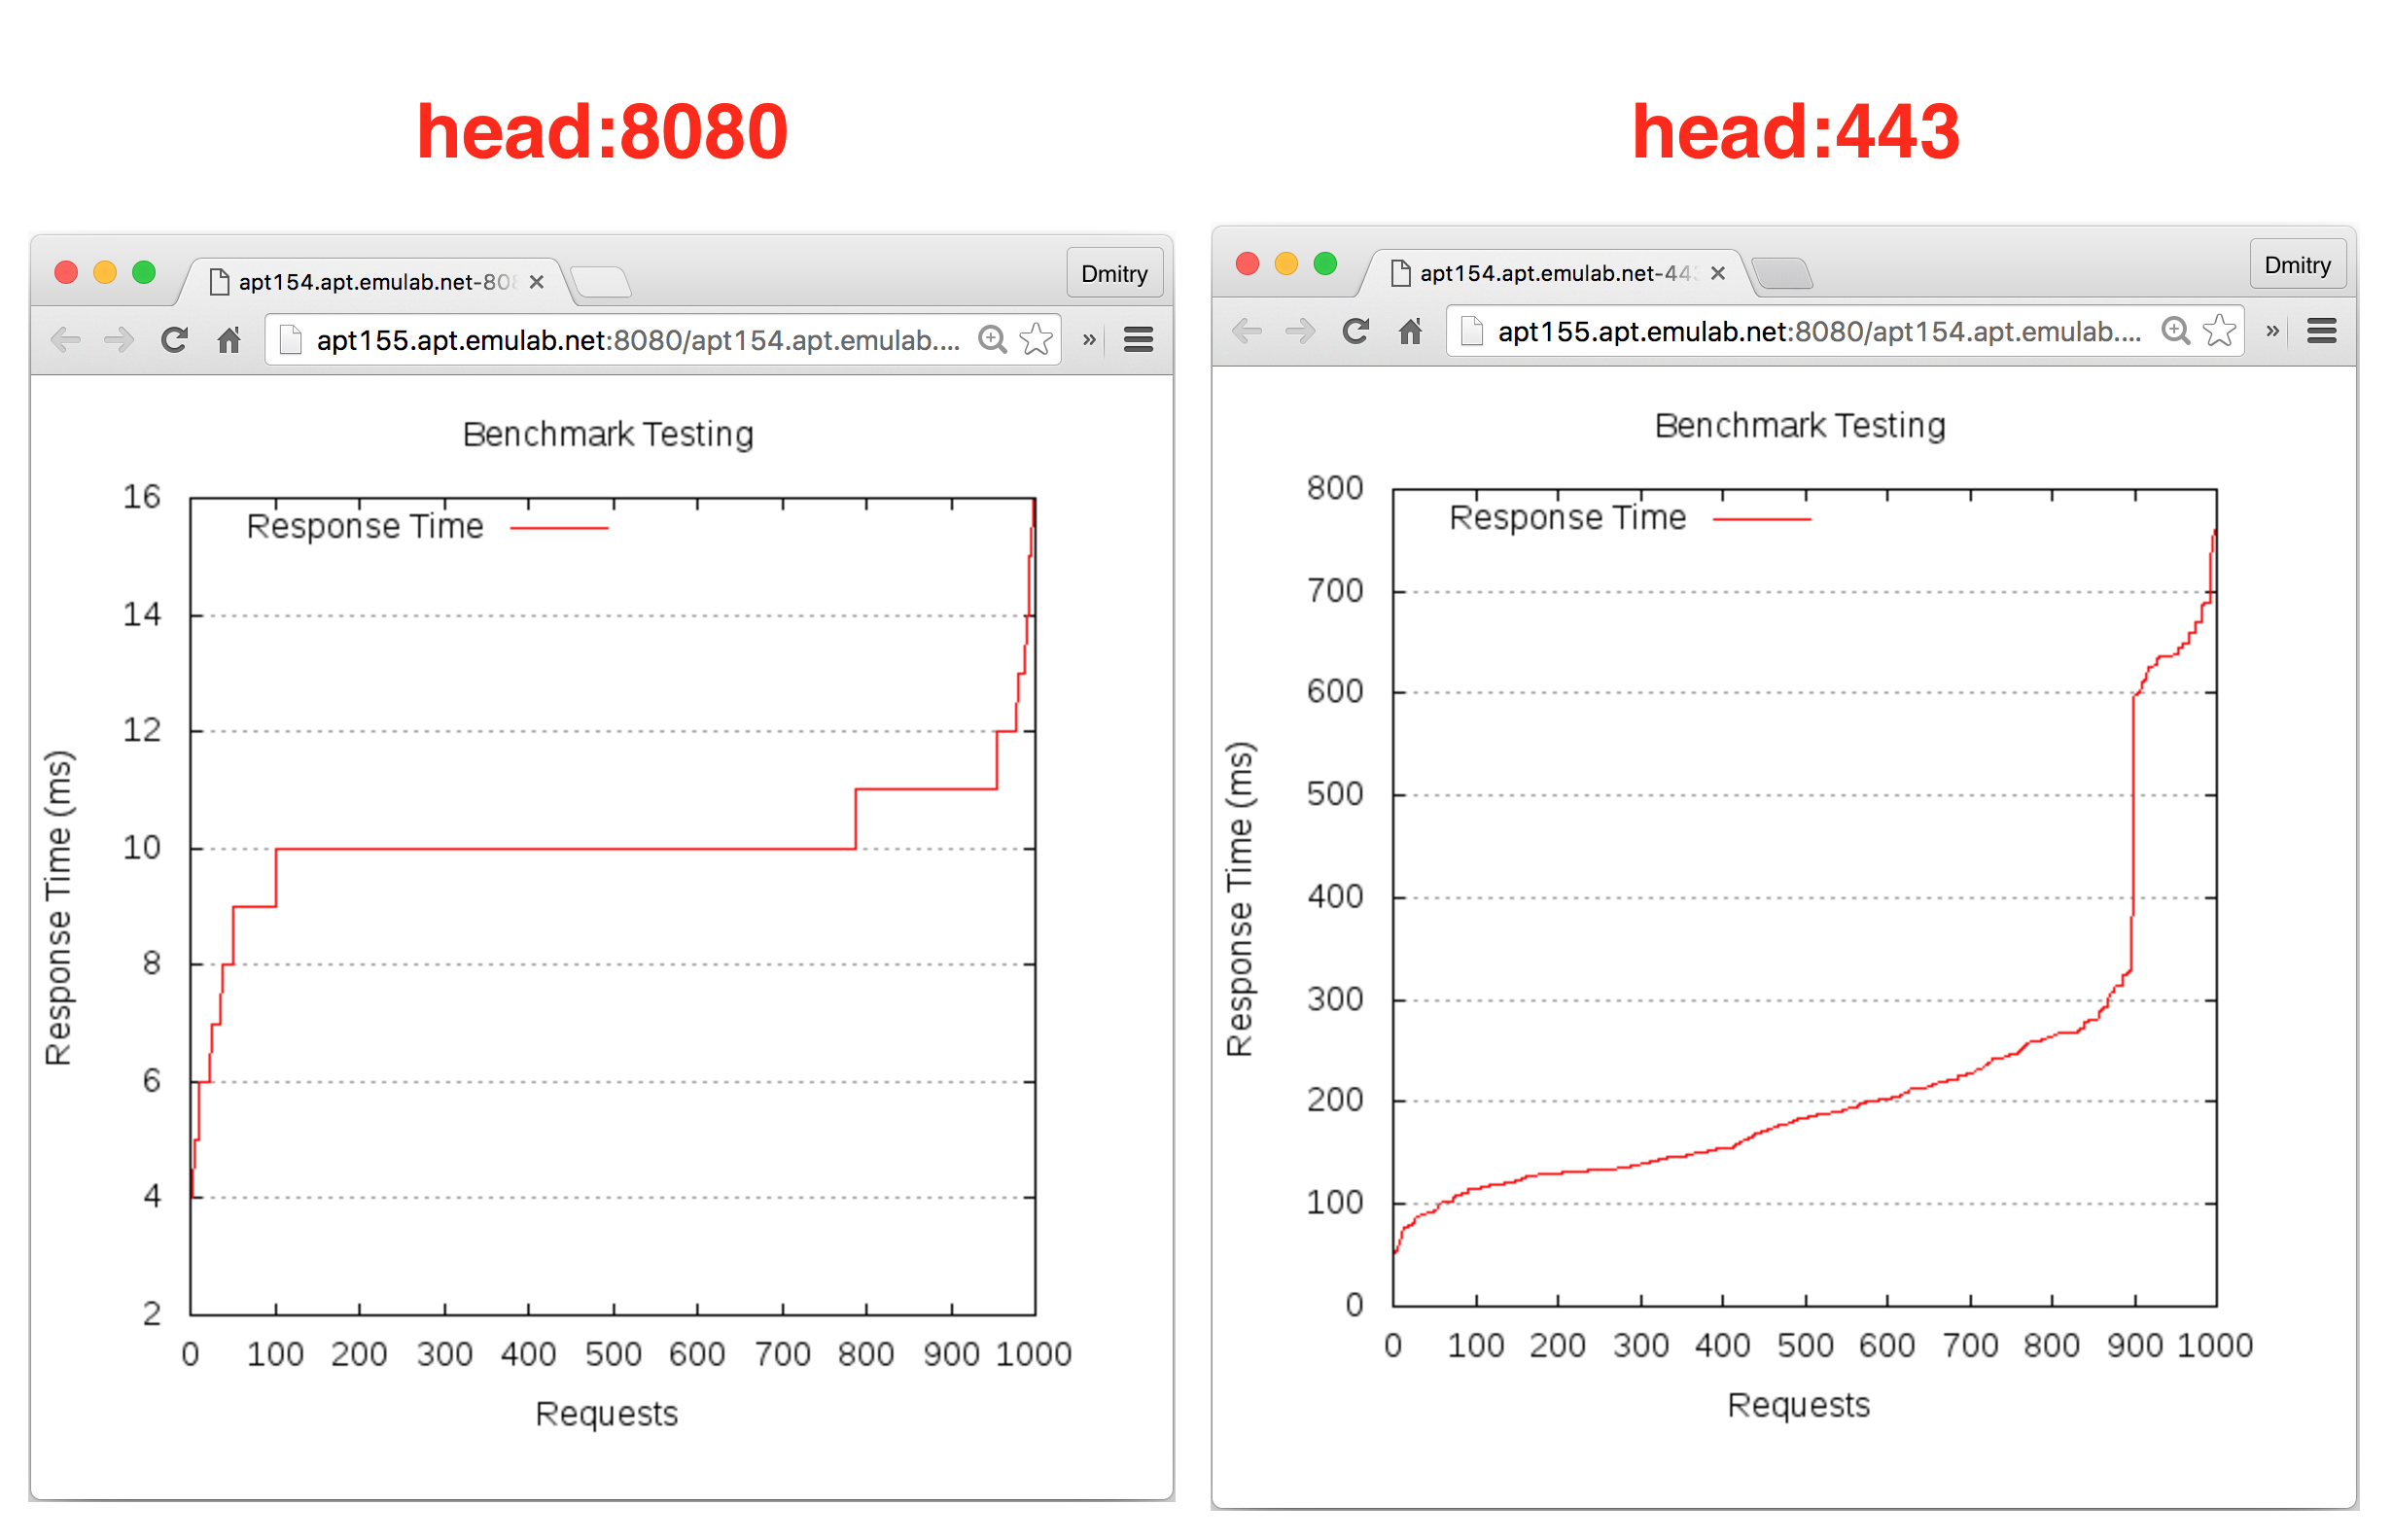
Summary: You have just performed an experiment with apache2 and ab in a very automated manner. The Chef role you have used performed many tasks, including setting up the infrastructure, running a benchmark, saving and processing results, as well as making them easily accessible. The following section will shed some light on how these tasks were accomplished and also how they can be customized.
15.10.1 Understanding the Internals
Below we describe some of the key points about the pieces of infrastructure code you have just used.
The apache2 role is stored at roles/apache2.rb as part of the emulab/chef-repo. Note that the run list specified in this role includes a cookbook apache2 (the recipe called default.rb inside the cookbook is used) and also a recipe mod_autoindex from the same cookbook. This cookbook is one of the cookbooks that have been obtained from Chef Supermarket. All administrative work for installing and configuring the web server is performed by the recipes in this cookbook, while the role demonstrates an example of how that cookbook can be “wrapped” into a specification that satisfy specific application needs.
The apachebench role is stored at roles/apachebench.rb It specifies values for several attributes and adds a custom cookbook emulab-apachebench to the run list. We use the “emulab” prefix in the names of the cookbooks that have been developed by the Emulab staff to emphasize that they are developed for Emulab and derived testbeds such as Emulab. This also allows distinguishing them from the Supermarket cookbooks, which are installed in the same directory on head.
Inside the default.rb recipe in emulab-apachebench you can find many key words, including package, log, file, execute, template, etc. They are called Chef resources. These elements, which allow defining fine-grained configuration tasks and actions, are available for many common administrative needs. You can refer to the list of supported Chef resources and see examples of how they can be used.
Another item that is worth mentioning is the “ignore_failure true” attribute used in some of the resources. It allows the recipe to continue execution even when something does not go as expected (shell command fail, necessary files do not exist, etc.). Also, when relying on specific files in your recipes, you can augment resources with additional checks like “only_if{::File.exists?(<file name>)}” and “not_if{::File.exists?(<file name>)}” to make your infrastructure code more reliable and repeatable (this refers to the notion of idempotent code mentioned earlier).
15.11 Final Remarks about Chef on Emulab
In this tutorial, you had a chance to explore the Chef configuration management system and used some of its powerful features for configuration management in a multi-node experiment on Emulab. Even though the instructions walked you through the process of configurating only two nodes, you can use the demonstrated code artifacts, such as roles, cookbooks, recipes, and resources, and apply them to infrastructure in larger experiments. With the knife commands like the ones shown above, you can “orchestrate” diverse and complex applications and environments.
When establishing such orchestration in your experiments, you can take advantage of the relevant pieces of intrastructure code, e.g., available through Chef Supermarket. In cases when you have to develop your own custom code, you may adopt the structure and the abstractions supported by Chef and aim to develop infrastructure code that is modular, flexible, and easy to use.
The ChefCluster profile is available to all users on Emulab. If you are interested in learning more about Chef and developing custom infrastructure code for your experiments, this profile will spare you from the need to set up necessary components every time and allow you to run a fully functional Chef installation for your specific needs.
15.12 Terminating Your Experiment
Resources that you hold in Emulab are real, physical machines and are therefore limited and in high demand. When you are done, you should release them for use by other experimenters. Do this via the “Terminate” button on the Emulab experiment status page.
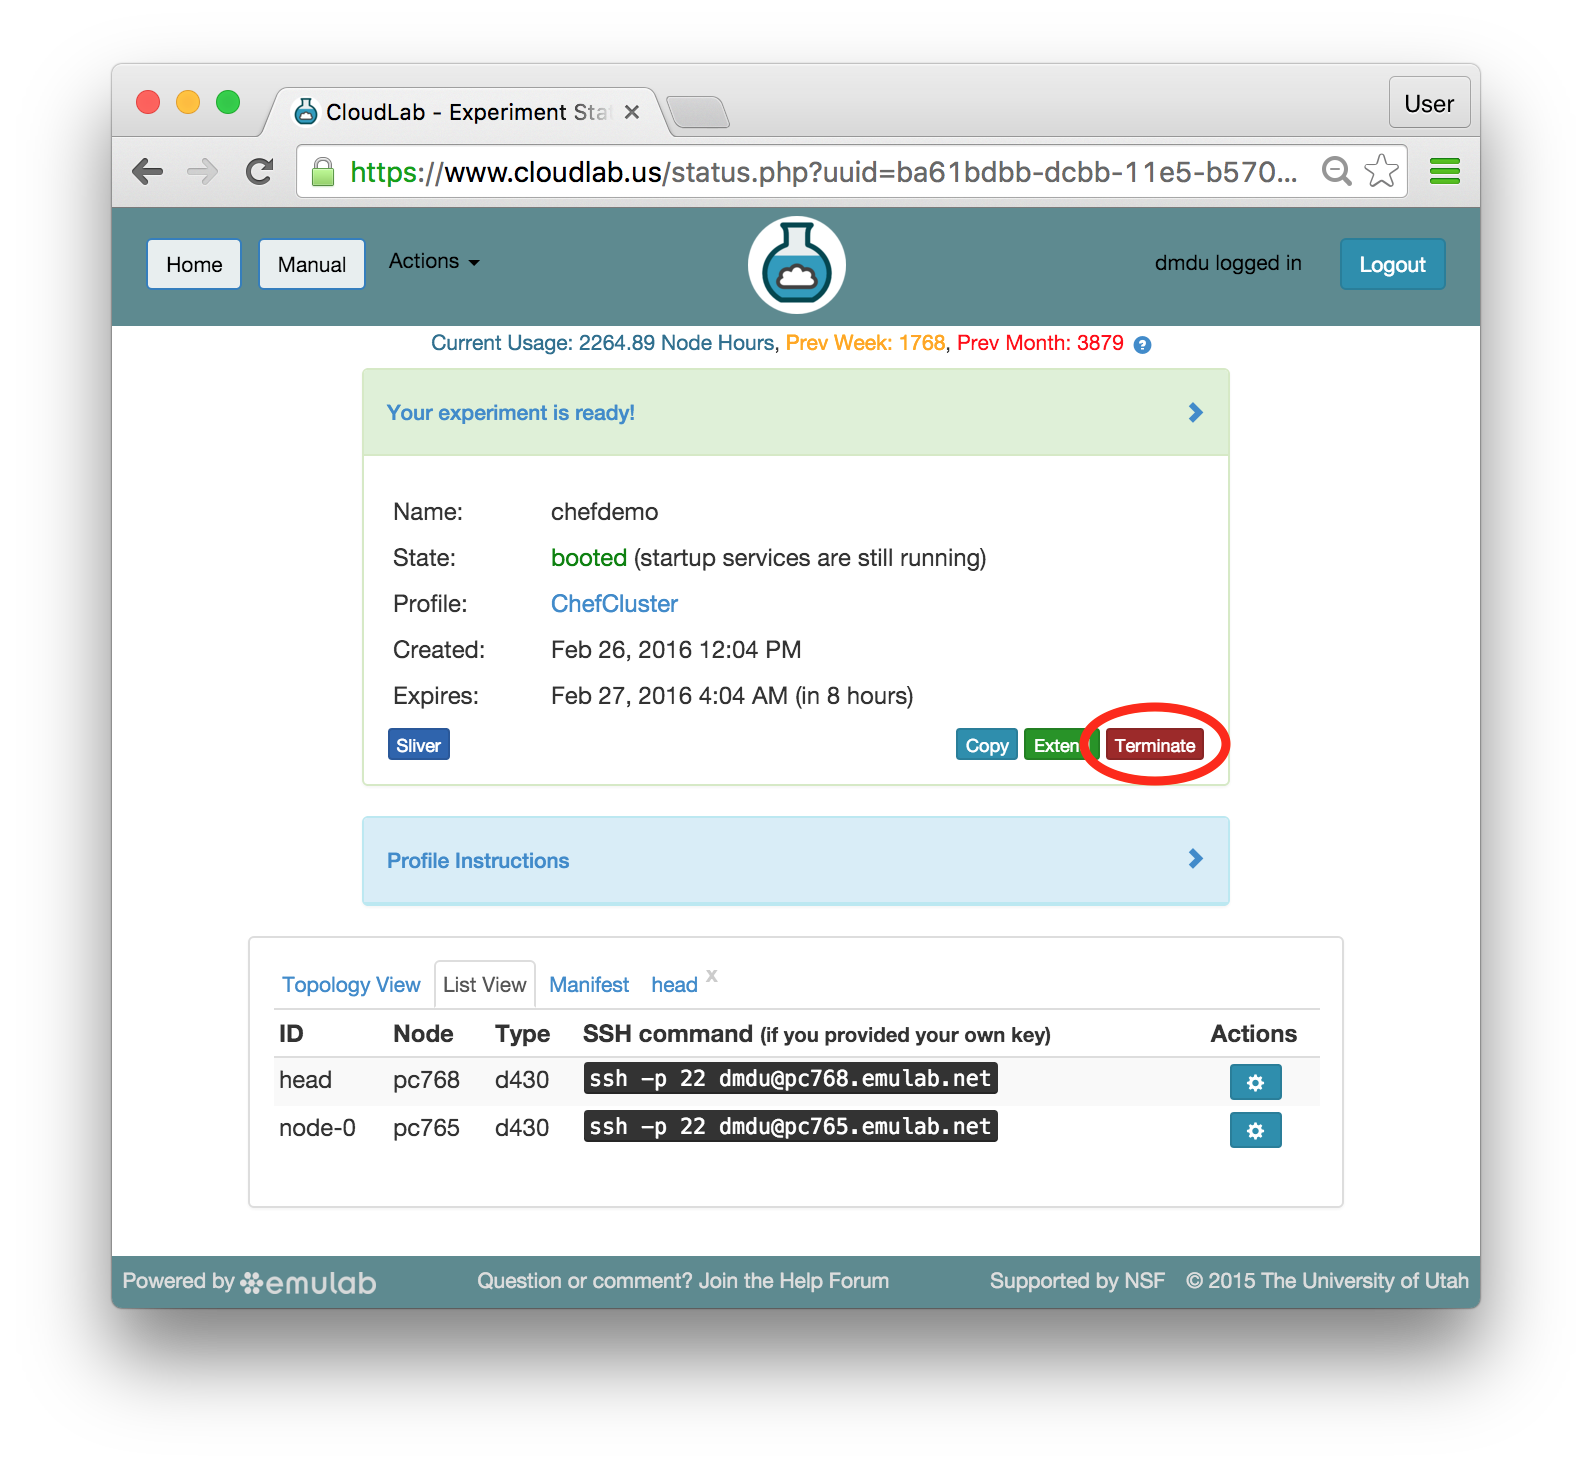
Note: When you terminate an experiment, all data on the nodes is lost, so make sure to copy off any data you may need before terminating.
If you were doing a real experiment, you might need to hold onto the nodes for longer than the default expiration time. You would request more time by using the “Extend” button the on the status page. You would need to provide a written justification for holding onto your resources for a longer period of time.
15.13 Future Steps
Now that you’ve got a feel for how Chef can help manage experiment resources, there are several things you might try next:
Learn more about Chef at the Chef official website
Explore existing cookbooks and roles in the emulab/chef-repo repository
Follow the steps in the Guide to Writing Chef Cookbooks blog post by Joshua Timberman, a Chef developer and one of the active members of the Chef community
Configure a LAMP (Linux, Apache, MySql, and PHP) stack using Chef by following the Creating Your First Chef Cookbook tutorial